
Why is one of my topics getting its breadcrumb formatting from javascript code?
I'm using the latest RH 9.
My output is an html help output (chm).
I use breadcrumbs in all topics. They're generated at compile time from the single source layout. They don't come from a bc placeholder in the .htt nor from the .htm topics.
Let's examine just two topics:
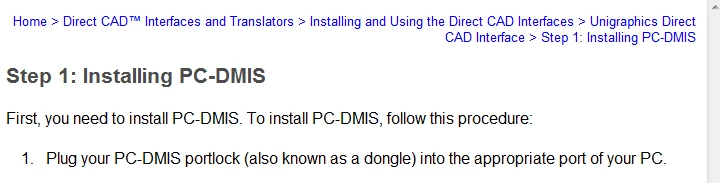
Topic1 here has some not-so-good formatting (ugly standard blue) in the breadcrumbs:
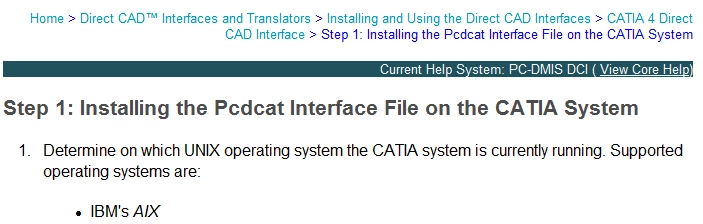
Topic2 here has the desired formatting in the breadcrumbs (aside from the formatting of the final item in the bc trail--but that's a separate issue):
When I look at the compiled topic's html source for Topic1 (from the chm in Notepad++, it has this code. Notice the JavaScript code it's getting (that I marked in red):
Source from Topic1 in CHM
<!doctype HTML public "-//W3C//DTD HTML 4.0 Frameset//EN">
<html>
<head>
<meta http-equiv="Content-Type" content="text/html; charset=windows-1252">
<meta name="generator" content="Adobe RoboHelp 9">
<title>Step 1: Installing PC-DMIS</title>
<link rel="stylesheet" href="Pcdmis40.css" type="text/css">
<script type="text/javascript" language="javascript">var strUrl = document.location.href;
var bc=0;
var n = strUrl.toLowerCase().indexOf("642b3b9347ca42c9b00b820c00c373fa=");
if(n != -1)
{
bc = strUrl.substring(n+33);
document.location.href = strUrl.substring(0, n);
}
if(bc == 3) strUrl = "<p style=\"font-family: ; font-size: 10pt; font-style:normal; color: rgb(0, 0, 255); text-decoration:none; text-align: right\"> <a style=\"font-family: ; font-size: 10pt; font-style:normal; color: rgb(0, 0, 255); text-decoration:none; text-align: right\" href=\"Introducing_Direct_CAD_Interfaces.htm\">Home</a> > <a style=\"font-family: ; font-size: 10pt; font-style:normal; color: rgb(0, 0, 255); text-decoration:none; text-align: right\" href=\"Direct_CAD__Interfaces_and_Translators.htm\">Direct CAD™ Interfaces and Translators</a> > <a style=\"font-family: ; font-size: 10pt; font-style:normal; color: rgb(0, 0, 255); text-decoration:none; text-align: right\" href=\"Installation_Overview.htm\">Installing and Using the Direct CAD Interfaces</a> > <a style=\"font-family: ; font-size: 10pt; font-style:normal; color: rgb(0, 0, 255); text-decoration:none; text-align: right\" href=\"SolidWorks_Direct_CAD_Interface.htm\">SolidWorks Direct CAD Interface</a> > Step 1: Installing PC-DMIS</p>";
if(bc == 2) strUrl = "<p style=\"font-family: ; font-size: 10pt; font-style:normal; color: rgb(0, 0, 255); text-decoration:none; text-align: right\"> <a style=\"font-family: ; font-size: 10pt; font-style:normal; color: rgb(0, 0, 255); text-decoration:none; text-align: right\" href=\"Introducing_Direct_CAD_Interfaces.htm\">Home</a> > <a style=\"font-family: ; font-size: 10pt; font-style:normal; color: rgb(0, 0, 255); text-decoration:none; text-align: right\" href=\"Direct_CAD__Interfaces_and_Translators.htm\">Direct CAD™ Interfaces and Translators</a> > <a style=\"font-family: ; font-size: 10pt; font-style:normal; color: rgb(0, 0, 255); text-decoration:none; text-align: right\" href=\"Installation_Overview.htm\">Installing and Using the Direct CAD Interfaces</a> > <a style=\"font-family: ; font-size: 10pt; font-style:normal; color: rgb(0, 0, 255); text-decoration:none; text-align: right\" href=\"I-DEAS_Direct_CAD_Interface.htm\">I-DEAS Direct CAD Interface</a> > Step 1: Installing PC-DMIS</p>";
if(bc == 1) strUrl = "<p style=\"font-family: ; font-size: 10pt; font-style:normal; color: rgb(0, 0, 255); text-decoration:none; text-align: right\"> <a style=\"font-family: ; font-size: 10pt; font-style:normal; color: rgb(0, 0, 255); text-decoration:none; text-align: right\" href=\"Introducing_Direct_CAD_Interfaces.htm\">Home</a> > <a style=\"font-family: ; font-size: 10pt; font-style:normal; color: rgb(0, 0, 255); text-decoration:none; text-align: right\" href=\"Direct_CAD__Interfaces_and_Translators.htm\">Direct CAD™ Interfaces and Translators</a> > <a style=\"font-family: ; font-size: 10pt; font-style:normal; color: rgb(0, 0, 255); text-decoration:none; text-align: right\" href=\"Installation_Overview.htm\">Installing and Using the Direct CAD Interfaces</a> > <a style=\"font-family: ; font-size: 10pt; font-style:normal; color: rgb(0, 0, 255); text-decoration:none; text-align: right\" href=\"CATIA_5_Direct_CAD_Interface.htm\">CATIA 5 Direct CAD Interface</a> > Step 1: Installing PC-DMIS</p>";
if(bc == 0) strUrl = "<p style=\"font-family: ; font-size: 10pt; font-style:normal; color: rgb(0, 0, 255); text-decoration:none; text-align: right\"> <a style=\"font-family: ; font-size: 10pt; font-style:normal; color: rgb(0, 0, 255); text-decoration:none; text-align: right\" href=\"Introducing_Direct_CAD_Interfaces.htm\">Home</a> > <a style=\"font-family: ; font-size: 10pt; font-style:normal; color: rgb(0, 0, 255); text-decoration:none; text-align: right\" href=\"Direct_CAD__Interfaces_and_Translators.htm\">Direct CAD™ Interfaces and Translators</a> > <a style=\"font-family: ; font-size: 10pt; font-style:normal; color: rgb(0, 0, 255); text-decoration:none; text-align: right\" href=\"Installation_Overview.htm\">Installing and Using the Direct CAD Interfaces</a> > <a style=\"font-family: ; font-size: 10pt; font-style:normal; color: rgb(0, 0, 255); text-decoration:none; text-align: right\" href=\"Unigraphics_Direct_CAD_Interface.htm\">Unigraphics Direct CAD Interface</a> > Step 1: Installing PC-DMIS</p>";
</script>
</head>
<body lang="EN-US" xml:lang="EN-US"><a name="642b3b9347ca42c9b00b820c00c373fa=3"></a><a name="642b3b9347ca42c9b00b820c00c373fa=2"></a><a name="642b3b9347ca42c9b00b820c00c373fa=1"></a><script type="text/javascript" language="javascript">document.write(strUrl)</script>
<h4>Step 1: Installing PC-DMIS</h4>
<p class="BodyText">First, you need to install PC-DMIS. To install PC-DMIS,
follow this procedure:</p>
<ol type="1">
<li class="p-List"><p class="BodyText">Plug your PC-DMIS portlock (also
known as a dongle) into the appropriate port of your PC.</p></li>
<li class="p-List"><p class="BodyText">Insert the PC-DMIS CD-ROM into
your CD-ROM drive.</p></li>
<li class="p-List"><p class="BodyText">Using Windows Explorer, open
the directory containing the CD-ROM and then navigate to the <span
class="bold">setup.exe</span> application for PC-DMIS.</p></li>
<li class="p-List"><p class="BodyText">Double click (execute) the file
<span class="bold">setup.exe</span>.</p></li>
<li class="p-List"><p class="BodyText">This will activate the PC-DMIS
installation sequence.</p></li>
<li class="p-List"><p class="BodyText">Follow the on-screen instructions
until PC-DMIS is installed.</p></li>
</ol>
<p class="BodyText">This completes the PC-DMIS installation.</p>
</body>
</html>
Yet when I examine the essential parts of Topic1 and Topic2 in Notepad++, there's nothing different aside form the expected body text. Can one of you see anything?
Topic1 Source
<?xml version="1.0" encoding="utf-8" ?>
<!DOCTYPE html PUBLIC "-//W3C//DTD XHTML 1.0 Transitional//EN" "http://www.w3.org/TR/xhtml1/DTD/xhtml1-transitional.dtd">
<html xmlns="http://www.w3.org/1999/xhtml">
<head>
<meta http-equiv="Content-Type" content="text/html; charset=utf-8" />
<meta name="Originator" content="ImportDoc" />
<meta name="OriginalFile" content="PreRobohelp - DCI.doc" />
<meta name="topic-status" content="Complete" />
<meta name="topic-check-List" content="Ran Smart Index" />
<meta name="template" content="standard.htt" />
<meta name="generator" content="Adobe RoboHelp 9" />
<title>Step 1: Installing PC-DMIS</title>
<link rel="stylesheet" href="Pcdmis40.css" type="text/css" />
</head>
<body lang="EN-US" xml:lang="EN-US">
<?rh-placeholder type="header" ?>
<h4>Step 1: Installing PC-DMIS</h4>
<p class="BodyText">First, you need to install PC-DMIS. To install PC-DMIS,
follow this procedure:</p>
<ol type="1">
<li class="p-List"><p class="BodyText">Plug your PC-DMIS portlock (also
known as a dongle) into the appropriate port of your PC.</p></li>
<li class="p-List"><p class="BodyText">Insert the PC-DMIS CD-ROM into
your CD-ROM drive.</p></li>
<li class="p-List"><p class="BodyText">Using Windows Explorer, open
the directory containing the CD-ROM and then navigate to the <span
class="bold">setup.exe</span> application for PC-DMIS.</p></li>
<li class="p-List"><p class="BodyText">Double click (execute) the file
<span class="bold">setup.exe</span>.</p></li>
<li class="p-List"><p class="BodyText">This will activate the PC-DMIS
installation sequence.</p></li>
<li class="p-List"><p class="BodyText">Follow the on-screen instructions
until PC-DMIS is installed.</p></li>
</ol>
<p class="BodyText">This completes the PC-DMIS installation.</p>
<?rh-placeholder type="footer" ?>
</body>
</html>
Topic2 Source
<?xml version="1.0" encoding="utf-8" ?>
<!DOCTYPE html PUBLIC "-//W3C//DTD XHTML 1.0 Transitional//EN" "http://www.w3.org/TR/xhtml1/DTD/xhtml1-transitional.dtd">
<html xmlns="http://www.w3.org/1999/xhtml">
<head>
<meta name="template" content="standard.htt" />
<meta http-equiv="Content-Type" content="text/html; charset=utf-8" />
<meta name="Originator" content="ImportDoc" />
<meta name="OriginalFile" content="PreRobohelp - DCI.doc" />
<meta name="topic-status" content="Complete" />
<meta name="topic-check-List" content="Ran Smart Index" />
<meta name="generator" content="Adobe RoboHelp 9" />
<title>Step 1: Installing the Pcdcat Interface File on the CATIA System</title>
<link rel="stylesheet" href="Pcdmis40.css" type="text/css" />
</head>
<body lang="EN-US" xml:lang="EN-US">
<?rh-placeholder type="header" ?>
<h4>Step 1: Installing the Pcdcat Interface File on the CATIA System</h4>
<ol type="1">
<li class="p-List"><p class="BodyText">Determine on which UNIX operating
system the CATIA system is currently running. Supported operating
systems are:</p></li>
</ol>
<ul type="disc">
<li class="p-List"><p class="BodyText" style="margin-left: 48px;">IBM's
<span class="italic">AIX</span></p></li>
<li class="p-List"><p class="BodyText" style="margin-left: 48px;">SGI's
<span class="italic">IRIS</span></p></li>
<li class="p-List"><p class="BodyText" style="margin-left: 48px;">HP's
<span class="italic">HP-UX</span></p></li>
<li class="p-List"><p class="BodyText" style="margin-left: 48px;">SUN's
<span class="italic">SOLARIS</span></p></li>
</ul>
<ol start="2" type="1">
<li class="p-List"><p class="BodyText">Create a directory called "pcdmis"
under a CATIA user directory for installing PC-DMIS files. <span class="bold">Example:</span>
/home/catadm/pcdmis</p></li>
<li class="p-List"><p class="BodyText">Place the appropriate PC-DMIS/CATIA
interface file in the PC-DMIS directory of your UNIX workstation.
This interface file will be one of the following files, depending
on your type of UNIX workstation:</p></li>
</ol>
<ul type="disc">
<li class="p-List"><p class="BodyText" style="margin-left: 48px;">pcdcat.ibm.gz</p></li>
<li class="p-List"><p class="BodyText" style="margin-left: 48px;">pcdcat.sgi.gz</p></li>
<li class="p-List"><p class="BodyText" style="margin-left: 48px;">pcdcat.hp.gz</p></li>
<li class="p-List"><p class="BodyText" style="margin-left: 48px;">pcdcat.sun.gz</p></li>
</ul>
<ol start="4" type="1">
<li class="p-List"><p class="BodyText">You can also download the latest
PC-DMIS/CATIA interface file from ftp://wilcoxassoc.com/dci/catia/.</p></li>
<li class="p-List"><p class="BodyText">On the UNIX station, unzip the
pcdcat file with the gunzip command: <span class="bold">gunzip </span><span
class="italic"><filename></span></p></li>
<li class="p-List"><p class="BodyText">Once the file is in the PC-DMIS
directory on your UNIX workstation and unzipped, rename the file to
simply “pcdcat” (without any file name extension).</p></li>
</ol>
<?rh-placeholder type="footer" ?>
</body>
</html>
Somehow, during compile time, Topic1 (and others) is getting that javascript code and it is conflicting with the formatting I have setup in my stylesheet and in jQuery calls in my .htt.
Where oh where does the rogue javascript code come from? Thanks in advanced for any help you can provide.
Message was edited by: Jared Hess. I pasted the code as straight text since the source code wasn't showing properly in the nifty controls that Adobe offers here that only sometimes work.