

My method for adjusting ink limit (total area coverage)

Copy link to clipboard
Copied
OK, folks. I've decided to post this suggestion as requested. Some may look at this workflow and decide it's way too much work and that there's an easier way. But, I've done this a number of times and have seen excellent results and after a few times running through it I can do it in my sleep. I also feel that this is the least damaging to my image and keeps the file from changing visually too much.
1. First, open the offending image and save as so that you have an original file to go back to if you have to. Here is my example image. I am being informed by the publication I am sending it to that my ink limit should be under 300. But when I check my image with the eyedropper set to "Total Ink" I am seeing 320-350 in many areas.

2. With this new file open, duplicate the file so that you now have two images open. In the "copy" select the black channel and duplicate that channel within the file. In most cases, your high total ink areas will be found in the "darkest" parts of your images. By duplicating the black channel, I will be using this as a selection mask.

3. Now on the "copy" image, you want to choose Edit > Convert to Profile. Here you will choose Custom CMYK and in the next dialog box change the Total Ink Limit to the desired amount, in this case 300.
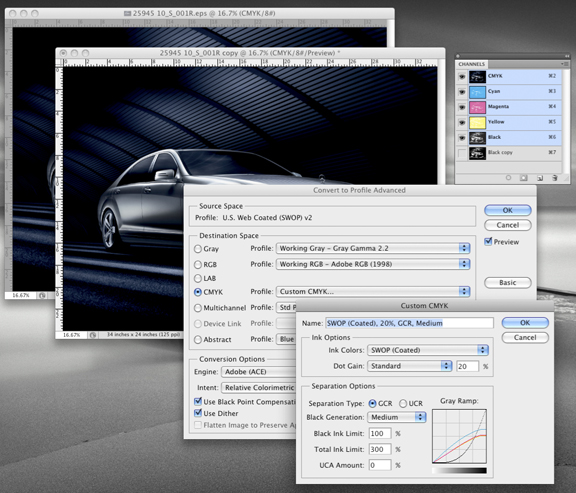
4. After this conversion, use your eyedropper and check the Total Ink in the areas that previously you discovered was too high. You will now see much lower numbers, and actually the numbers may have gone too far and you'll see that your converted image looks very different from your original image. But, not to worry, the following steps will solve that.
5. In the "copy" image, with the CMYK channels active, select all pixels.
6. Go to your other, "original" image you have open and Select > Load Selection. Choose the "black copy" channel from your "copy" image and also choose invert. This will load a selection mask in your image of just the "darkest" parts of your image.

7. Now with this selection active, you want to Edit > Paste Into. You are now pasting into the selection your converted image, but it will be only affecting the darkest parts of your image. The result will also create a new layer and layer mask. If you turn off the view of your bottom layer, you can see what you have actually pasted into your image.

8. Now what I do is use my eyedropper to check the Total Ink with the top layer turned on and then off. I then use the Opacity slider on the top layer to get my image so that the Total Ink meets my desired 300 level. Once it's where I want, I flatten my image and then all is done. Your "copy" image you can just close and no save.


Explore related tutorials & articles
 36
Replies
36
36
Replies
36

Copy link to clipboard
Copied
You might get better performance from a v2 profile with 300 total ink limit (like SWOP), instead of using Custom CMYK. Test it and see.
The real solution, of course, is to use a profile for conversion which more accurately describes press conditions. You might ask the publication for more information (like what profile they use to make separations).
I concur.
And in cases where the same dot gain as incorporated in the available profile can be expected but a slightly reduced Total Area Coverage is requested a simple Selective Color Layer reducing CMY and increasing K for »Blacks« might also suffice.
Copy link to clipboard
Copied
I wouldn't do that. If you look at the CMYK channels, Black is at 90+% in the shadows ( which, to me, is the problem ). I took the image and reduced the Black to around 82% using Curves. The result was very subtle difference in the shadows, but once on press the image should return to 90+%. The CMY's are in the upper mids ( 66-68% ) and do not pose a problem. If it were me and this was my file, I'd just adjust the Black Curve down 15-20% in the Shadows. Very quick and very precise.
Copy link to clipboard
Copied
Black is at 90+% in the shadows ( which, to me, is the problem ).
I don’t follow the reasoning – what’s the problem of black being at 90%?
If the problem is exceeding the TAT then can I not gain more reduction by decreasing CMY in the dark regions (reducing each by 5% would yield 15%) and compensating with K, basically doing a manual GCR?
Copy link to clipboard
Copied
I see what you mean now. You're talking about the mids. I guess what you are suggesting would work for that area. I was talking about the shadows with Black at +90%, which, depending on press and paper, may or may not be a problem. I'd feel better if the shadow Black came down as I suggested. The 60% CMY down to 55 and Black up to 65% in the mids is subjective color removal. I'd leave those areas alone, but that's just me. Even leaving the Black at 90%, I still get a reading of 292 Ti, some would recommend getting that down to 285 ( remember, I'm talking about shadows ).
Copy link to clipboard
Copied
The 60% CMY down to 55 and Black up to 65% in the mids is subjective color removal.
I’m not talking about the middletones but the Blacks.
Copy link to clipboard
Copied
Oops. Step 5 should have said:
5. In the "copy" image, with the CMYK channels active, select all pixels. And then Edit > Copy to the clipboard.
Copy link to clipboard
Copied
Russell, does the Ti ( total ink ) have anything to do with individual's application color settings? I opened your PNG as an adobe RGB 1998 image and converted it to CMYK ( SWOP Coated ) and read 292 max ink. Wouldn't color settings with 20% dot gain control total ink? I'm thinking that once the file is on press and after dot gain you'd get a reasonable result? I'm just curious. If I adjust the image per your suggestion, would it result in a under-saturated print? I like how you are isolating just the heavy areas of the image.
Copy link to clipboard
Copied
Boy, did I open up a can of worms!
John: I would not test my method on the screen shot (PNG) that I show here, because that's all I posted: a screen shot and not the actual image. I've used this technique numerous times over the years with excellent results, so I'm not sure about all the other concerns posted in this thread. To be honest, in all my years of prepress (15 +) color profiles and such still confuse me and give me a major headache.
I've seen other shops correct total ink by converting the image to RGB and then back to CMYK using a profile. Ouch!
I've seen another shop convert the image to Index mode and then back to CMYK. Ouch, again!
I guess it works for them, but I always felt uncomfortable with these somewhat destructive changes to a person's original image. I feel my technique is only changing the parts of the image that need the adjustment.
Of course this method only works for someone that only has a few images to adjust; such as a designer submitting an ad to a magazine or such. The main point of this method is to make designers be aware that there is such a beast as Ink Limit (Total Area Coverage) and that they should be aware of it when designing/creating their artwork.
If someone such as myself does receive a file with multiple images on multiple pages, of course I'm going to use a color profile in my system to globally convert all the ink limits. It would take me forever using this method and opening up each individual image.
I initially posted this to help someone that was preparing one file with only a few images to be printed on the page.
Copy link to clipboard
Copied
I've seen other shops correct total ink by converting the image to RGB and then back to CMYK using a profile. Ouch!
I've seen another shop convert the image to Index mode and then back to CMYK. Ouch, again!

Copy link to clipboard
Copied
I like this thread, it is a subject that most prepress people face all the time, and it should be made clear to others who may read this that this situation is fixable (and also avoidable)!
In a colour managed print shop, you would often be converting to your own profile, which has a built-in TIL/TAC (Maximum Ink) which theoretically means that if you converted from another profile/colour space, no pixel would step over your TIL.
The problem is that when you adjust a pic afterwards using just about any tool, you can cause part of the image to exceed TIL! The limit is soft, ie, can be exceeded because if not, (I presume) we would see a lot of tonal clipping ruining great numbers of images when an adjustment hits the limit.
So, if a prepress op notices that an image already in his 'home' profile exceeds TIL (which is what this thread is about as it is the only situation that needs a visual indication of problem) then converting to rgb or Lab and back to home cmyk is valid as it proportionally fixes the problem. I like to use Lab since there is no chance of damaging the image as alluded to earlier in the thread.
So, if you go cmyk>Lab>cmyk you won't lose any quality but you will be creating a less contrasty image since contrast range is from zero ink to max ink but you won't clip any tones. Obviously, this applies to images without adjustment layers which could still push that limit after conversion.
Copy link to clipboard
Copied
I like to use Lab since there is no chance of damaging the image as alluded to earlier in the thread.
Switching to L*a*b in 8bit it is actually not especially recommendable in my opinion.


Admittedly Dither and Black Point Compensation have some additional influence (both were applied in this example) but I think not a very prominent one in this case.
Copy link to clipboard
Copied
This is a very interesting discussion.
Evil Liar posted: When I have that problem it is usually the CMY that are overdone with not enough black. I just use a selective color adjustment layer and modify only the blacks, where I can bring down the CMY and up the K.
For the image that Russell Goodman posted - this is a much better approach than reducing the K channel in Curves. Because its an undersaturated image, with strong shadow areas, the last thing you would want to do in this case is to reduce the percentage of black ink. You want a strong, powerful K channel, controlling the total ink density with some kind of CMY reduction.
Russell Goodman, your complex workaround is far too involved.
The best of all solutions is to have a proper CMYK profile given to you. Remember that the CMYK file that you provide will have its Profile attached to it. If you then reduce the total ink, the profile tag effectively becomes meaningless. If its an external printer that you are dealing with, in this case they should be asking you for an RGB anyway. Requesting 300% is usually done for this reason IMHO - when it prints crap, they can contrive some excuse. The last thing you want to do is send out a PROFILED cmyk file, with a different maximum ink than is specified in the profile tag. Thats a route to disaster, because if your printer then re-converts the image to their own profile using dumb methods - it will be washed out.
Copy link to clipboard
Copied
Reynolds (Mark) wrote:
Russell Goodman, your complex workaround is far too involved.
The best of all solutions is to have a proper CMYK profile given to you. Remember that the CMYK file that you provide will have its Profile attached to it. If you then reduce the total ink, the profile tag effectively becomes meaningless. If its an external printer that you are dealing with, in this case they should be asking you for an RGB anyway. Requesting 300% is usually done for this reason IMHO - when it prints crap, they can contrive some excuse. The last thing you want to do is send out a PROFILED cmyk file, with a different maximum ink than is specified in the profile tag. Thats a route to disaster, because if your printer then re-converts the image to their own profile using dumb methods - it will be washed out.
I emphatically disagree that my method is COMPLEX or far to involved.
In my situation, I am the last person in line receiving the files and when the job is due on press, we don't have the time or luxury to go ten levels back to instruct a designer that's half a world away and sometimes doesn't speak the same language.
You must understand that "in the printing" biz, many times people in prepress like myself are receiving files many steps from the person that initially designed and created the files. In other words, sometimes the designer sends the files to a advertising agency or graphic design house, who sends the files to a broker, who farms it to someone else and then eventually it gets to the print house. It is damn near impossible to contact the designer to instruct them on profiles and such. Most times these designers have no clue how many hands their files are going through and many times the broker will not even let you talk to the designer. So, how can we give them a profile to use?
And I only use this method when needed and in isolated cases.
Oops, gotta run. A job needs to be worked on and output.
See ya 'round the edges!
Copy link to clipboard
Copied
This is a method for evaluating total ink that may work for some:
1. Load CMYK channel as selection
2. Invert selection
3. Layer: New Fill Layer: Solid Color, make it white
4. Select mask. Image: Adjustments: Threshold. Slider all the way to the left (1). If you see some image, go to next step. If you don't see image, slide to the right until you do.
6. Deselect the mask and read the total ink info.
Also note: repeatedly hiding and showing the black channel can be helpful in quickly identifying problem areas. When you do this, areas with excessive ink coverage stand out.
Russell this is a variation of your method for TIL reduction:
1. Image: Duplicate
2. Convert to Profile, with flatten, select CMYK profile with appropriate TIL.
3. Layer: Duplicate to original document. Close dupe file, no need to save
4. Move new layer to top and hide
5. Load K channel as selection, invert selection
6. Show top most layer. Layer: Layer mask: reveal selection.
7. Set blend mode of layer to Luminosity.
Results vary depending on the image. Color areas can be affected. If so the mask can be subdued with a curve. Another option: you could try loading CMYK channel as the selection in step 5, instead of the K channel. This will affect much more of the image, but you also have more mask area to work with if you need to adjust the mask with a curve.
Mark's concern about the profile losing meaning is warranted. So keep the adjustment non-destructive (a top most layer). And make sure the image is an end file. You've altered the black point and a conversion wouldn't be ideal.
And Ptaz makes a good point in post 9 about overlap. If the image is overly critical an ink cutback layer might not be the best route.
As you know the best thing is for images to remain source color and be converted to CMYK at output, which is most always past the Photoshop stage (InDesign).
I get files with too much ink coverage too. Many times Photoshop isn't even to blame. It is easy for someone to Multiply on top of images in InDesign and create 400% ink coverage.
Copy link to clipboard
Copied
The trouble with threshold is it takes into account ink densities, so for a dark blue, the dividing line will be at the 270 mark, while for dark oranges it will be around 300. I'm sure for most images this is not a problem.
Put another way: create a doc with two blocks, 30,100,100,80 and 100,100,0,80. See which one threshold thinks is darker? They're 30% different in TIL but rated 10% apart (wrong way around) by threshold. I mean, it's not like the threshold trick isn't a kludge too. Is there something I'm not understanding about total ink (like the colors with more pigment drying slower weight the TIL priority in parallel with the threshold layer)?
Copy link to clipboard
Copied
You are right, there is a flaw in the method I posted for seeing the total ink.
First off, step 2 (select inverse) needs to be thrown out, not sure what I was thinking.
In step 1, loading CMYK channel as a selection, is based on luminosity. The problem is you could potentially have an area, 100K only, and another area 100C 75M 100Y 0K. So it's 100% ink versus 275% ink.
But from a luminance standpoint the 100K is darker, so prepress would not be aware of the dark hunter green. They would think 100% ink was the maximum coverage.
I made an action that remedies the problem. Before the CMYK channel selection, add a Channel Mixer layer. 25% across the board, all 4 colors. This puts all the inks on an equal playing field. After that, make the CMYK channel selection, then hide the channel mixer layer and proceed with the white fill layer. Remember, the threshold is applied to the white fill mask.
Deselect the mask at the end. Everything is white except the areas with the most ink.
To summarize:
1. Channel Mixer adjustment layer, 25% all colors for all channels.
2. Load CMYK channel as selection.
3. Hide channel mixer layer.
4. White fill layer.
5. Select mask, Adjustment: Threshold. Slide to 1. then go to the right until you see image.
6. Deselect mask and read the info of the non white areas.
Copy link to clipboard
Copied
So in the end (long way round) it works just like a threshold layer... Someone said that threshold is an interpreted value but I don't think that is right, threshold reads exactly the TIL of what is beneath it in my experience.
Copy link to clipboard
Copied
With neutral / similarly-colored objects / shadows, yes. But if you have a dark purple object and a dark orange one, threshold will activate on very different TIL. I'm definitely looking at an image now where threshold splits at 327/328 for purple and 331/332 for red. In the same image a green with 325 is ignored, while a blue with 308 is flagged.
Copy link to clipboard
Copied
Thanks, J Maloney, you are correct of course and I was wrong... I guess I had just been making assumptions all these years! I only use it as a rough tool for finding the darkest point of a pic which it does perfectly, and the TIL there was measured AFTER that, so I know how I came to my assumption.
Ok, everyone back to what you were doing.... ignore me![]()
![]()
Copy link to clipboard
Copied
Reading back, I see where the methods posted earlier create a warning layer (starting with post 19). So if you wanted to flag 260 TIL, 260 / 400 = .65. Set the curve points at 64 and 66, problem areas are indicated.
My method was simply hiding all but the heaviest coverage areas, then read the info of what you see.
Both methods work well. The warning method is more like what is available in InDesign and Acrobat.

Copy link to clipboard
Copied
Moved to main forum to allow more current methods.
Copy link to clipboard
Copied
That method you describe is only really suitable for spot adjustment of a 'broken' image, normal correction of TIL is carried out by using levels or curves etc and not masked.
By masking you are introducing an 'overlap' of tones where 2 adjacent tones are reversed where the reduction in the TIL in the selected area reduces a density of part of that selection to less than an area which was originally less than the adjustment. eg: 89, 90 becomes 89, 87 (a very crude example for clarity).
Most times you can get away with that but sometimes it will be fatal and since the whole thing is really unnecessary, I can't see where you would use it except on a broken image.
If you have ink levels outside your desired TIL then you are working with an incorrect profile for the task at hand since when you are working in the correct profile you won't have areas outside TIL.

Copy link to clipboard
Copied
When I have that problem it is usually the CMY that are overdone with not enough black. I just use a selective color adjustment layer and modify only the blacks, where I can bring down the CMY and up the K.
It would be really nice to have some kind of ink limit viewer widget in Photoshop, instead of having to flip back and forth to Indesign to see where it is going over.
-
- 1
- 2

 AdChoices