August 26, 2010
Question

My method for adjusting ink limit (total area coverage)

  • August 26, 2010
  • 5 replies
  • 67629 views

OK, folks. I've decided to post this suggestion as requested. Some may look at this workflow and decide it's way too much work and that there's an easier way. But, I've done this a number of times and have seen excellent results and after a few times running through it I can do it in my sleep. I also feel that this is the least damaging to my image and keeps the file from changing visually too much.

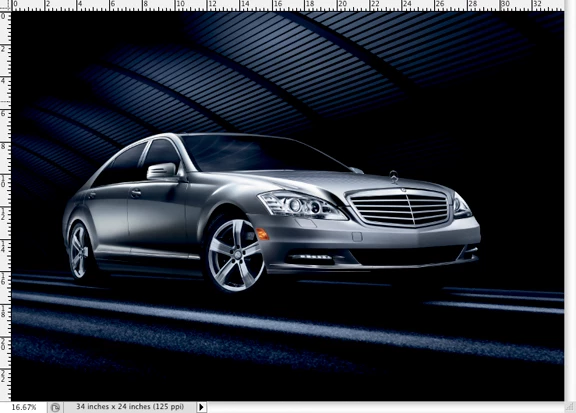
1. First, open the offending image and save as so that you have an original file to go back to if you have to. Here is my example image. I am being informed by the publication I am sending it to that my ink limit should be under 300. But when I check my image with the eyedropper set to "Total Ink" I am seeing 320-350 in many areas.

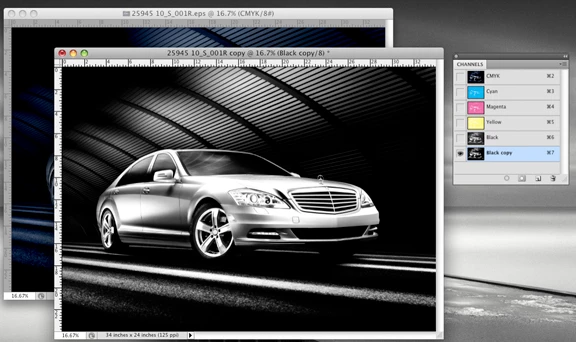
2. With this new file open, duplicate the file so that you now have two images open. In the "copy" select the black channel and duplicate that channel within the file. In most cases, your high total ink areas will be found in the "darkest" parts of your images. By duplicating the black channel, I will be using this as a selection mask.

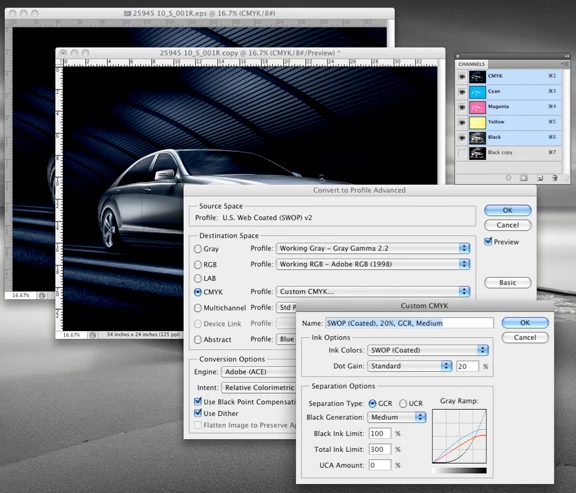
3. Now on the "copy" image, you want to choose Edit > Convert to Profile. Here you will choose Custom CMYK and in the next dialog box change the Total Ink Limit to the desired amount, in this case 300.

4. After this conversion, use your eyedropper and check the Total Ink in the areas that previously you discovered was too high. You will now see much lower numbers, and actually the numbers may have gone too far and you'll see that your converted image looks very different from your original image. But, not to worry, the following steps will solve that.

5. In the "copy" image, with the CMYK channels active, select all pixels.

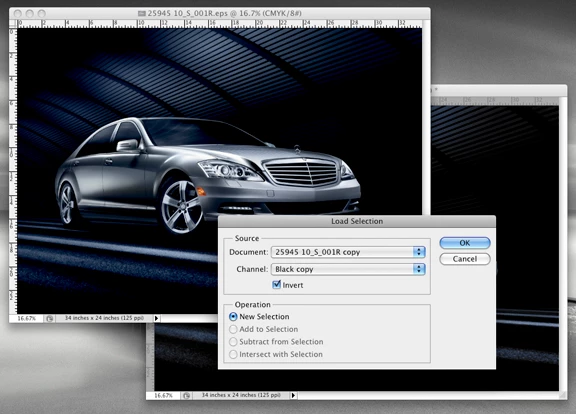
6. Go to your other, "original" image you have open and Select > Load Selection. Choose the "black copy" channel from your "copy" image and also choose invert. This will load a selection mask in your image of just the "darkest" parts of your image.

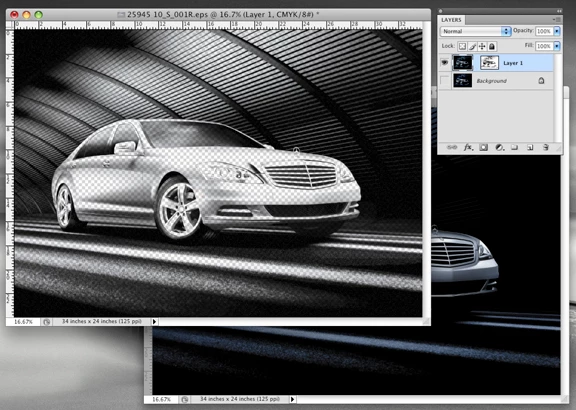
7. Now with this selection active, you want to Edit > Paste Into. You are now pasting into the selection your converted image, but it will be only affecting the darkest parts of your image. The result will also create a new layer and layer mask. If you turn off the view of your bottom layer, you can see what you have actually pasted into your image.

8. Now what I do is use my eyedropper to check the Total Ink with the top layer turned on and then off. I then use the Opacity slider on the top layer to get my image so that the Total Ink meets my desired 300 level. Once it's where I want, I flatten my image and then all is done. Your "copy" image you can just close and no save.

    This topic has been closed for replies.

    5 replies

    Participating Frequently
    August 30, 2010

    When I have that problem it is usually the CMY that are overdone with not enough black. I just use a selective color adjustment layer and modify only the blacks, where I can bring down the CMY and up the K.

    It would be really nice to have some kind of ink limit viewer widget in Photoshop, instead of having to flip back and forth to Indesign to see where it is going over.

    c.pfaffenbichler
    Community Expert
    August 30, 2010
    It would be really nice to have some kind of ink limit viewer widget in Photoshop, instead of having to flip back and forth to Indesign to see where it is going over.

    Definitely.

    I thought that had come up in the Feature Request-section more often, but I can find only one thread at the moment:

    http://forums.adobe.com/message/2829509#2829509

    You might want to add your support there.

    Inspiring
    August 30, 2010

    I came up with an action that gives a color warning in PS for TIL limits. Basically, it applied each channel (@ 25% opacity) in linear burn mode to a blank layer and then uses blend if to mask a color overlay. It needs to be run to be updated, but that seems quicker than jumping back and forth between Photoshop and InDesign. Of course it's limited to multiples of four for warning limits.

    p_taz
    Inspiring
    August 29, 2010

    That method you describe is only really suitable for spot adjustment of a 'broken' image, normal correction of TIL is carried out by using levels or curves etc and not masked.

    By masking you are introducing an 'overlap' of tones where 2 adjacent tones are reversed where the reduction in the TIL in the selected area reduces a density of part of that selection to less than an area which was originally less than the adjustment.  eg:  89, 90 becomes 89, 87 (a very crude example for clarity).

    Most times you can get away with that but sometimes it will be fatal and since the whole thing is really unnecessary, I can't see where you would use it except on a broken image.

    If you have ink levels outside your desired TIL then you are working with an incorrect profile for the task at hand since when you are working in the correct profile you won't have areas outside TIL.

    August 26, 2010

    Russell, does the Ti ( total ink ) have anything to do with individual's application color settings?  I opened your PNG as an adobe RGB 1998 image and converted it to CMYK ( SWOP Coated ) and read 292 max ink.  Wouldn't color settings with 20% dot gain control total ink?  I'm thinking that once the file is on press and after dot gain you'd get a reasonable result?  I'm just curious.  If I adjust the image per your suggestion, would it result in a under-saturated print?  I like how you are isolating just the heavy areas of the image.

    September 1, 2010

    Boy, did I open up a can of worms!

    John: I would not test my method on the screen shot (PNG) that I show here, because that's all I posted: a screen shot and not the actual image. I've used this technique numerous times over the years with excellent results, so I'm not sure about all the other concerns posted in this thread. To be honest, in all my years of prepress (15 +) color profiles and such still confuse me and give me a major headache.

    I've seen other shops correct total ink by converting the image to RGB and then back to CMYK using a profile. Ouch!

    I've seen another shop convert the image to Index mode and then back to CMYK. Ouch, again!

    I guess it works for them, but I always felt uncomfortable with these somewhat destructive changes to a person's original image. I feel my technique is only changing the parts of the image that need the adjustment.

    Of course this method only works for someone that only has a few images to adjust; such as a designer submitting an ad to a magazine or such. The main point of this method is to make designers be aware that there is such a beast as Ink Limit (Total Area Coverage) and that they should be aware of it when designing/creating their artwork.

    If someone such as myself does receive a file with multiple images on multiple pages, of course I'm going to use a color profile in my system to globally convert all the ink limits. It would take me forever using this method and opening up each individual image.

    I initially posted this to help someone that was preparing one file with only a few images to be printed on the page.

    c.pfaffenbichler
    Community Expert
    September 1, 2010
    I've seen other shops correct total ink by converting the image to RGB and then back to CMYK using a profile. Ouch!
    CMYK-to-CMYK-separation should yield at least as good a result (if it’s only about technical aspects like TAC and not more far-reaching changes) because one additional conversion through the Profile Connection Space is avoided.
    I've seen another shop convert the image to Index mode and then back to CMYK. Ouch, again!
    Ouch indeed – that method seems more than a little peculiar.
    Anyway, if the problematic files are profiled according to one of the more popular standards the best method would probably have to be a device link-profile.
    But I myself have admittedly still not gotten around to looking into those sufficiently to actually use them …
    And hopefully you don’t mind that we’ve gone off-topic a bit.
    August 26, 2010

    Oops. Step 5 should have said:

    5. In the "copy" image, with the CMYK channels active, select all pixels. And then Edit > Copy to the clipboard.

    Inspiring
    August 26, 2010

    You might get better performance from a v2 profile with 300 total ink limit (like SWOP), instead of using Custom CMYK. Test it and see.

    The real solution, of course, is to use a profile for conversion which more accurately describes press conditions. You might ask the publication for more information (like what profile they use to make separations).

    c.pfaffenbichler
    Community Expert
    August 27, 2010

    You might get better performance from a v2 profile with 300 total ink limit (like SWOP), instead of using Custom CMYK. Test it and see.

    The real solution, of course, is to use a profile for conversion which more accurately describes press conditions. You might ask the publication for more information (like what profile they use to make separations).

    I concur.

    And in cases where the same dot gain as incorporated in the available profile can be expected but a slightly reduced Total Area Coverage is requested a simple Selective Color Layer reducing CMY and increasing K for »Blacks« might also suffice.

    August 27, 2010

    I wouldn't do that.  If you look at the CMYK channels, Black is at 90+% in the shadows ( which, to me, is the problem ).  I took the image and reduced the Black to around 82% using Curves.  The result was very subtle difference in the shadows, but once on press the image should return to 90+%.  The CMY's are in the upper mids ( 66-68% ) and do not pose a problem.  If it were me and this was my file, I'd just adjust the Black Curve down 15-20% in the Shadows.  Very quick and very precise.