

New in Beta: Meshes and 3D Materials, Oh My!
The Shapes of Things to Come
After Effects beta users, time to start building!
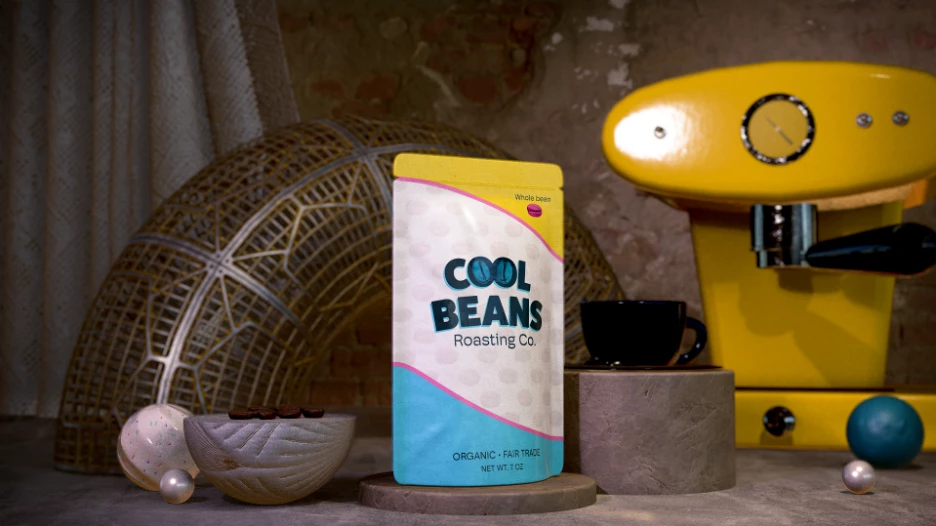
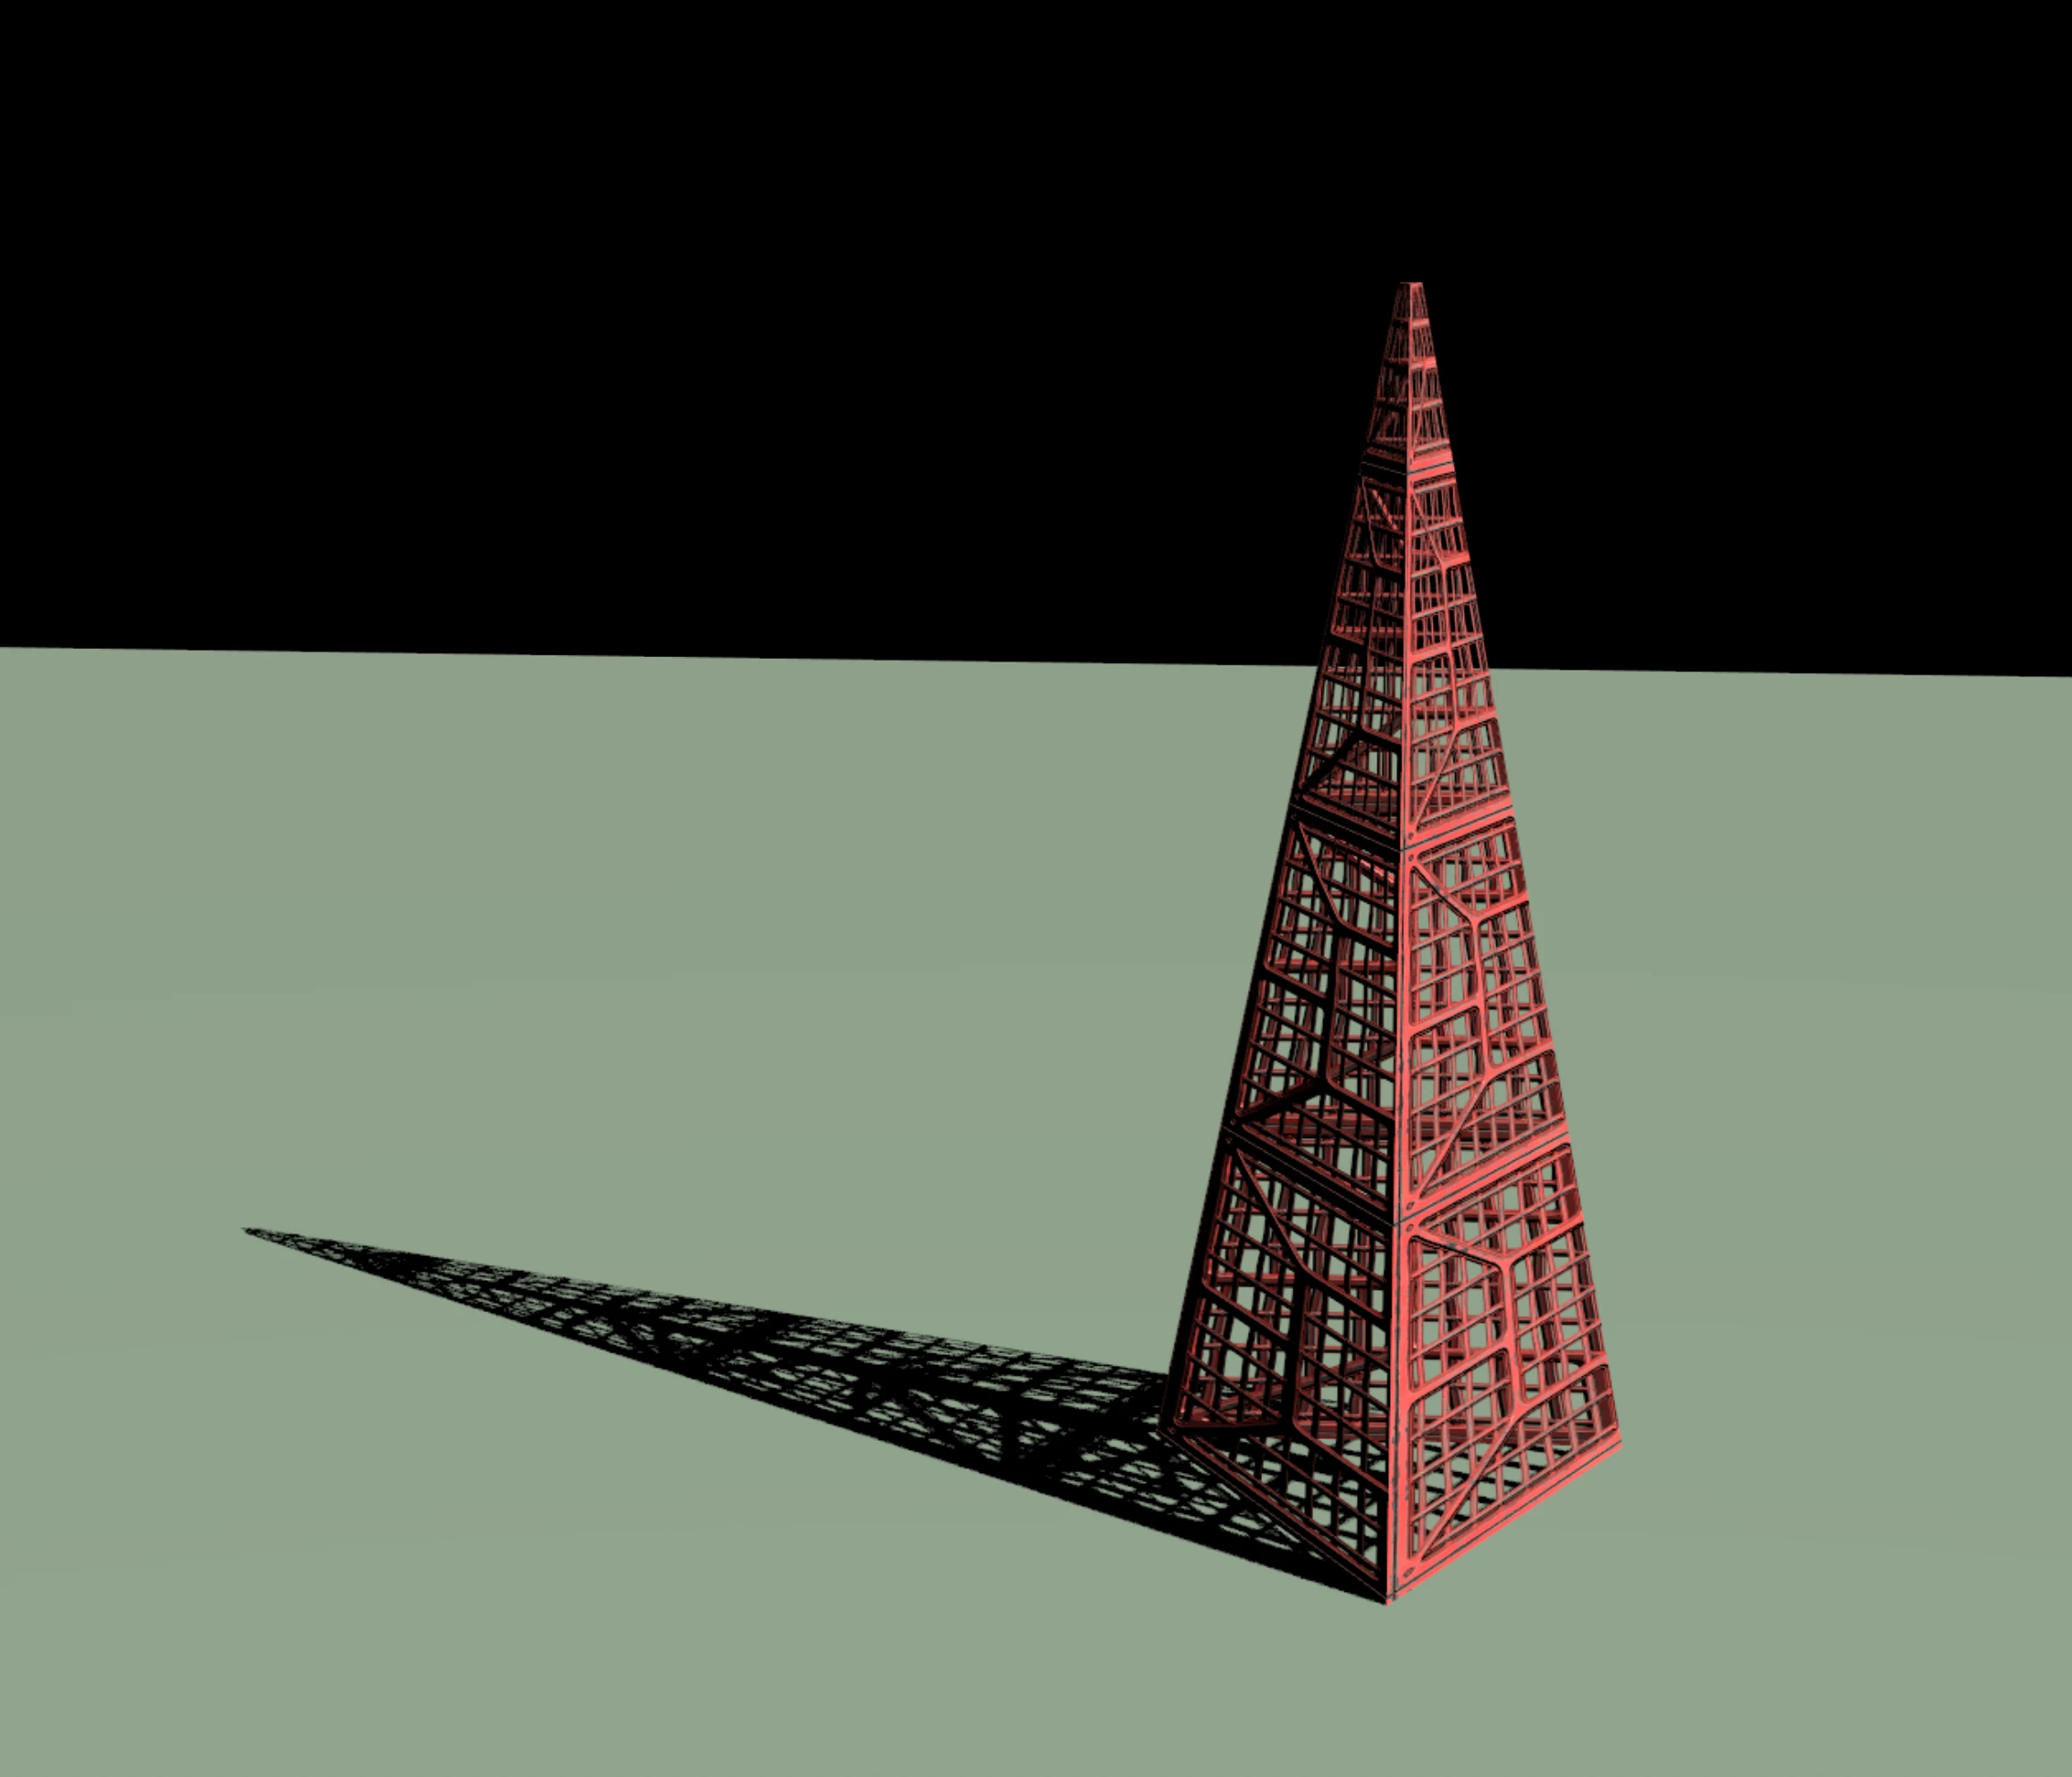
We are excited to introduce two new 3D features that work well individually but even better together: Parametric Meshes and Substance 3D Materials. With their powers combined, you can now design beautiful 3D scenes rich in shape and texture natively within After Effects.
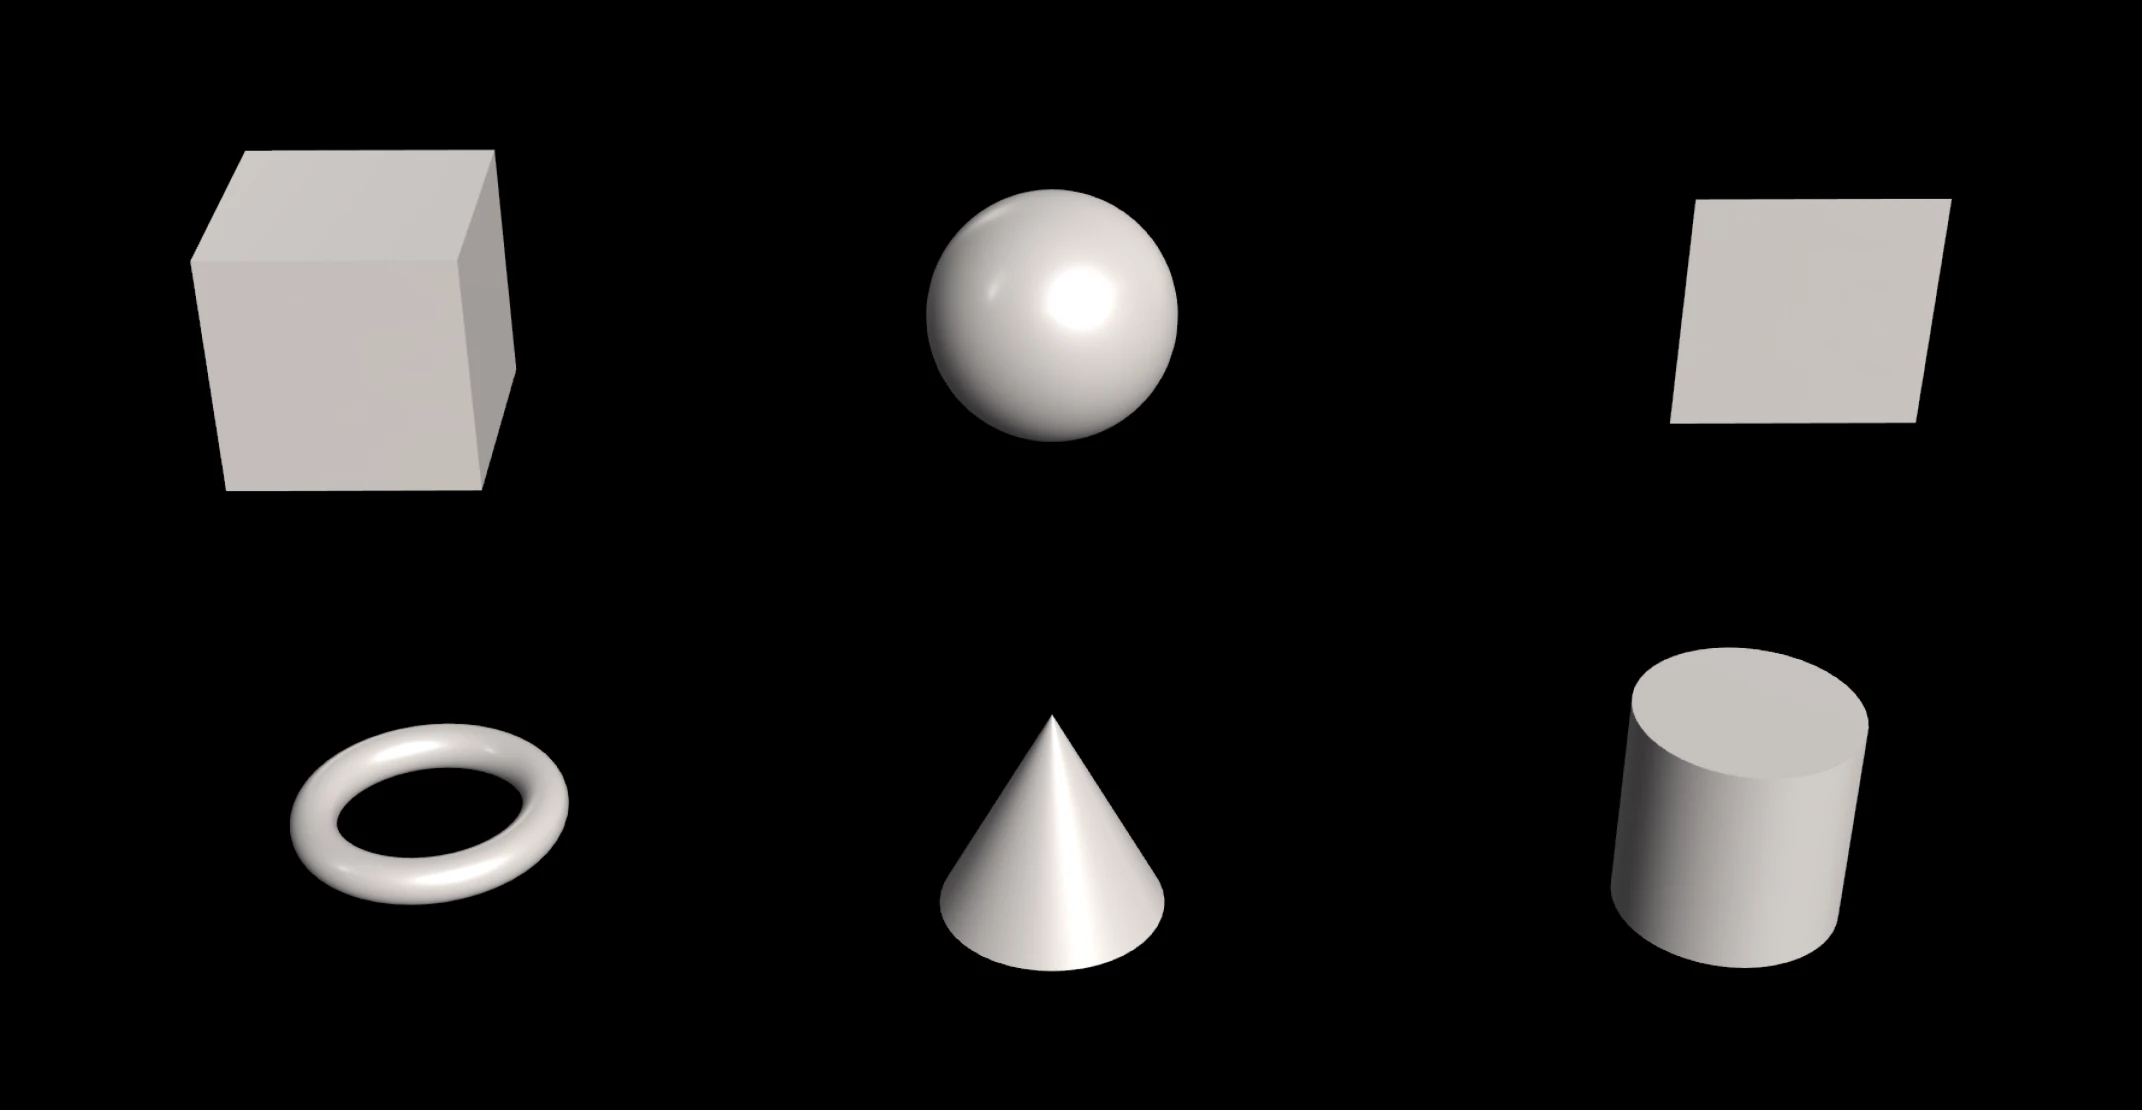
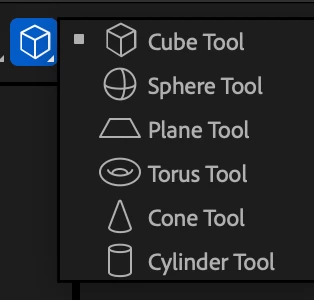
AE’s growing toolbox of useful 3D features now includes an assortment of Parametric 3D Meshes, which is a fancy technical description for 3D shapes that you can use as building blocks for your compositions. These meshes include a Cube, a Sphere, a Plane, a Torus (mmm, donut), a Cone and a Cylinder, all of which can be customized to create a wide variety of looks.
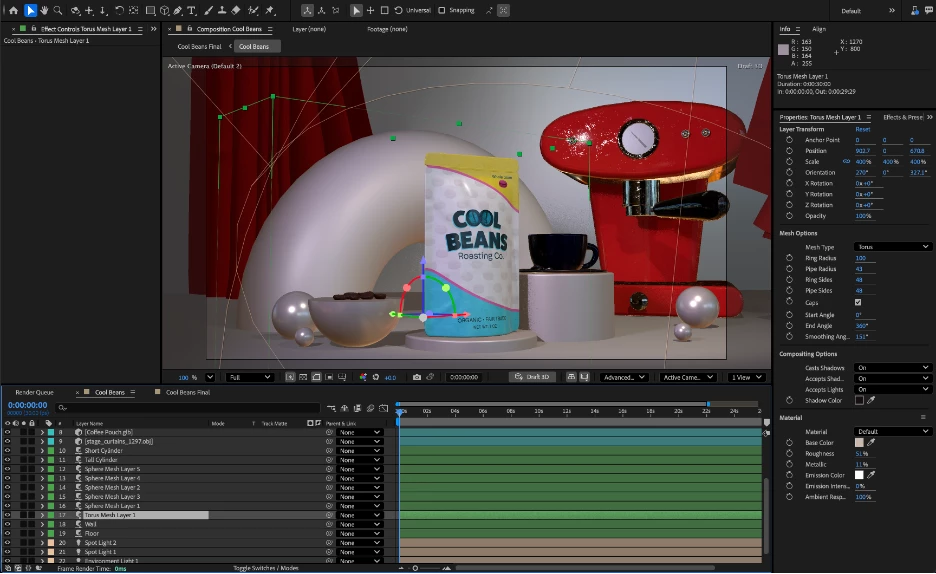
Combining Parametric Meshes with Substance 3D Materials (aka SBSARs) can give your 3D meshes and models an exciting new look. SBSARs are dynamic, adjustable materials that can look like almost anything, natural or man-made—construction materials, a forest floor, sci-fi components, you name it. If you’re new to the world of Substance, they’re a lot like MOGRTs but for 3D materials... for example, SBSAR authors can add as many controls as they like, creating endless opportunities for customization!
Both Substance 3D Materials and Parametric Meshes are available in After Effects beta Version 26.0.08 and later.
Making a Mesh of Things
Parametric 3D Meshes include a Cube, a Sphere, a Plane, a Torus (mmm, donut), a Cone and a Cylinder, all of which can be customized to create a wide variety of looks.
Getting Started
You can add a Parametric Mesh to a composition in multiple ways:
- Start by locating the new Parametric Mesh tool in the tool bar.

- With your desired shape selected, you can draw directly in the comp window, to place shapes where you want them, at whatever size you wish.
- Alternatively, choose the shape that you want to add from the Toolbar, then double-click on the shape icon to add the shape to the active composition with default settings.
- Or, in the Layer menu, you can choose a shape option from the new section at the bottom of the list. This will add the shape into the center of your active composition with default settings.
Note: Parametric Meshes require the Advanced 3D Render Engine. If you attempt to access the Parametric Mesh menu using the Classic engine, you will see an alert with a prompt to change to the Advanced 3D engine.
Shape Drawing Tips
- Drag anywhere in the comp window with your chosen shape tool to draw a parametric mesh. This should feel very similar to creating a shape layer.
- Constrain the X, Y and Z dimensions by adding the shift key as you drag.
- Adding the Command (Mac) or Control (Win) key will scale the new shape from the center instead of from the corner.
- Adding the Space Bar while dragging will temporarily interrupt the drawing of the 3D Shape and instead allow you to move the shape… releasing the Space Bar then goes back to the drawing behavior. This is a quick way to more precisely align elements while drawing.
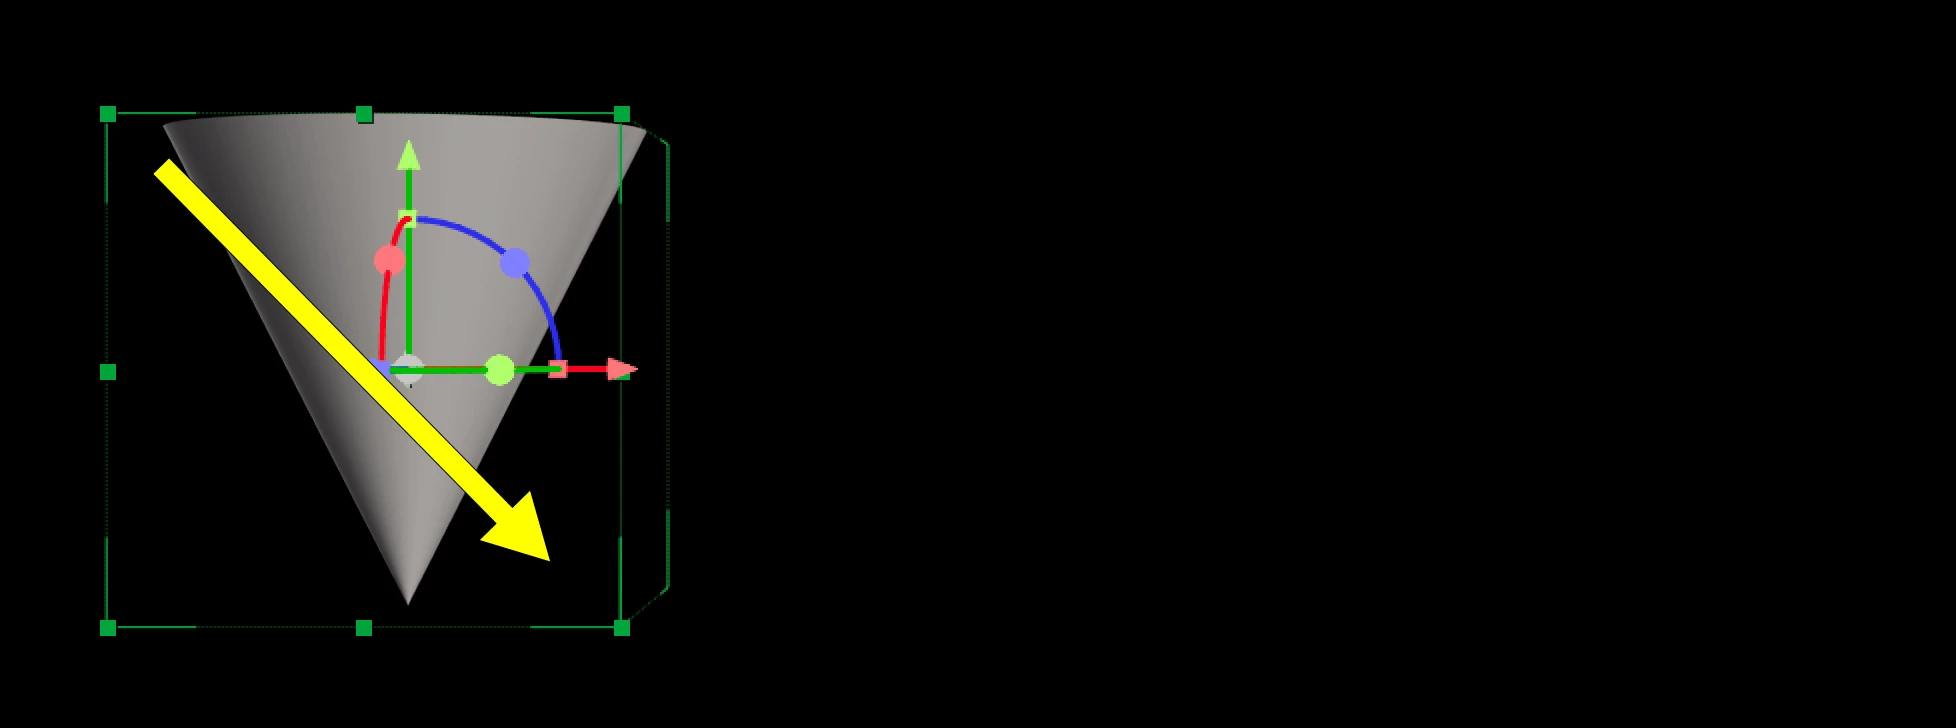
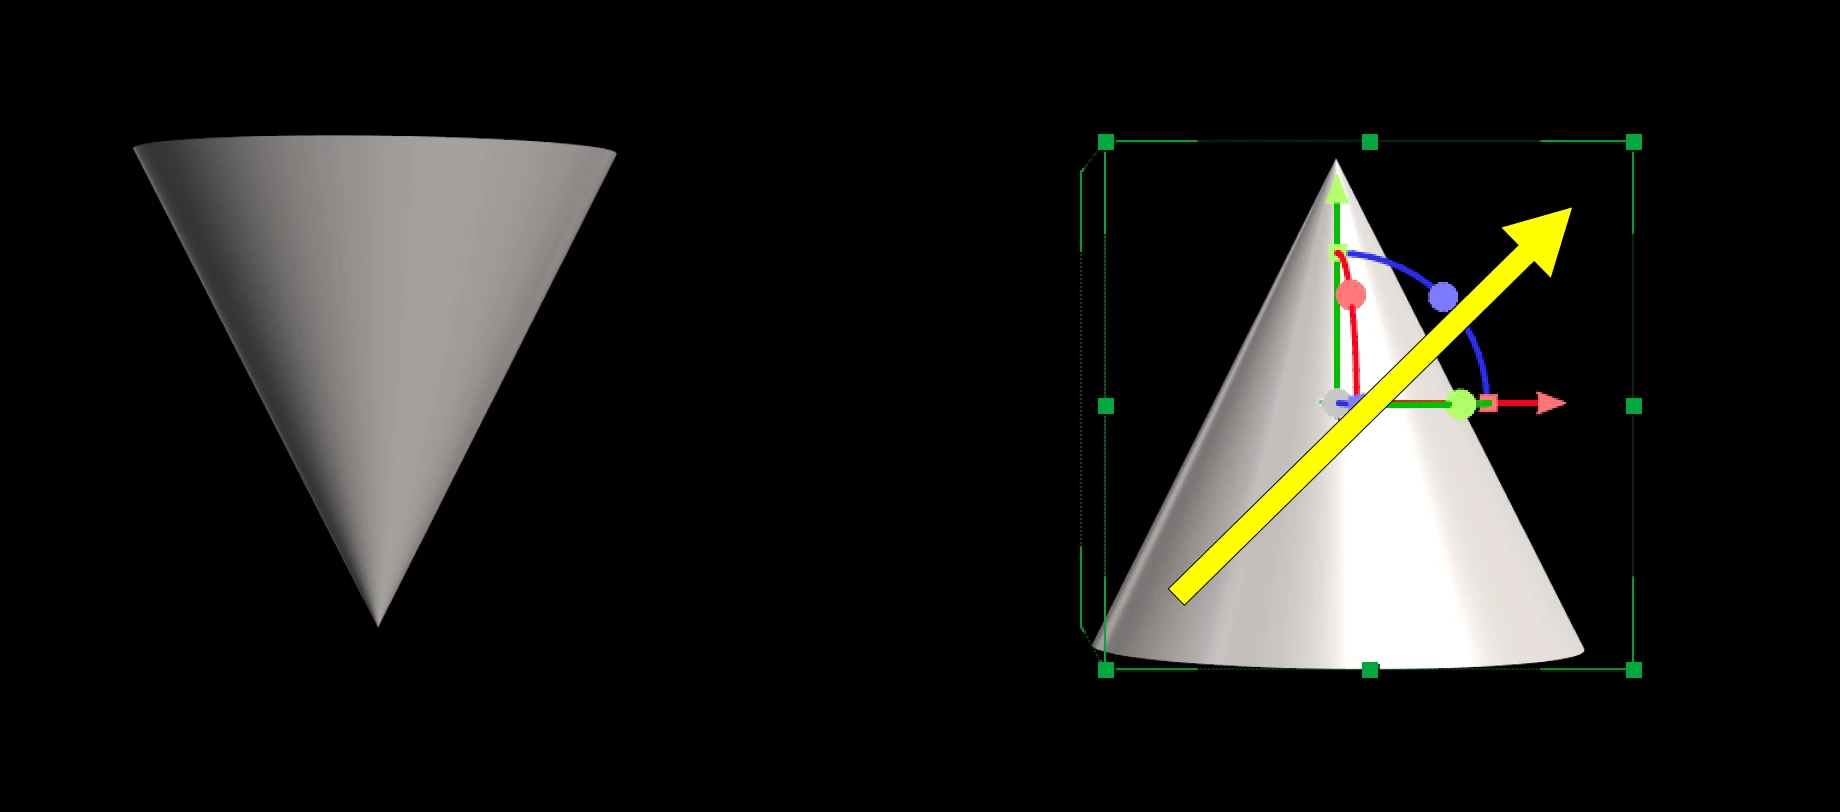
- One mesh type, the Cone, behaves subtly differently from the other shapes, in that: if you draw a box by dragging down, the cone will point down, and if you draw a box from the bottom up, then the cone will point up.
- When drawing meshes, elements will be center-aligned to one of the three cardinal planes: XY, XZ, or YZ. Which plane is selected is determined by the orientation of the camera, so by default you draw on the XY plane (the “back wall”) but if you tilt the camera down past 45 degrees, then you will draw on the XZ plane (the “floor”), similarly if you pan the camera to the right or left past 45 degrees, you will draw on the YZ plane (the “side wall”).
Modifying Meshes
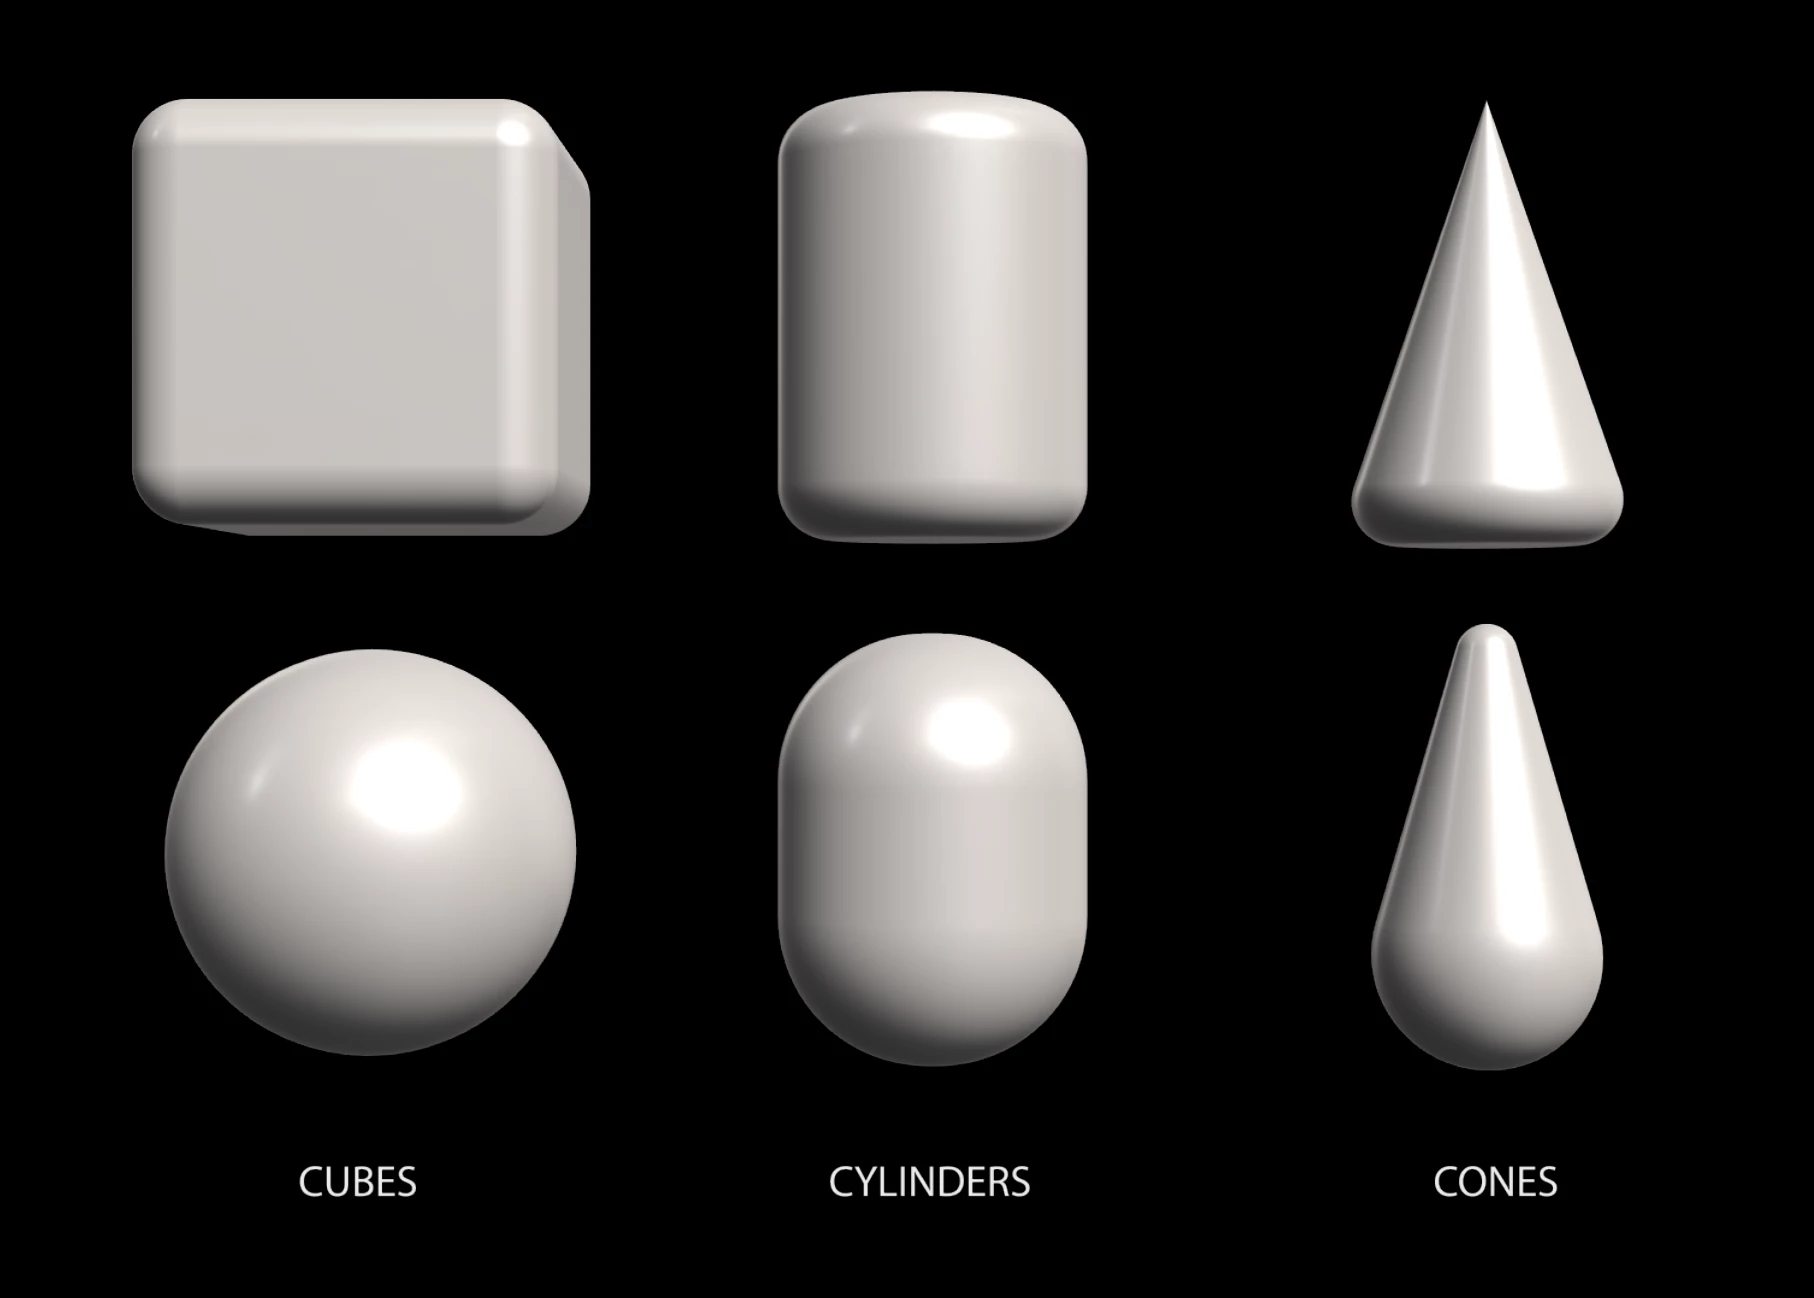
In addition to the basic dimension of each shape, most 3D meshes also have bevel controls that allow you to round off the corners of an object to soften sharp edges. Most also have the ability to control the number of sides, so in addition to a default smooth-sided cone for example, you could reduce the number of sizes to 4 and create a square pyramid shape.
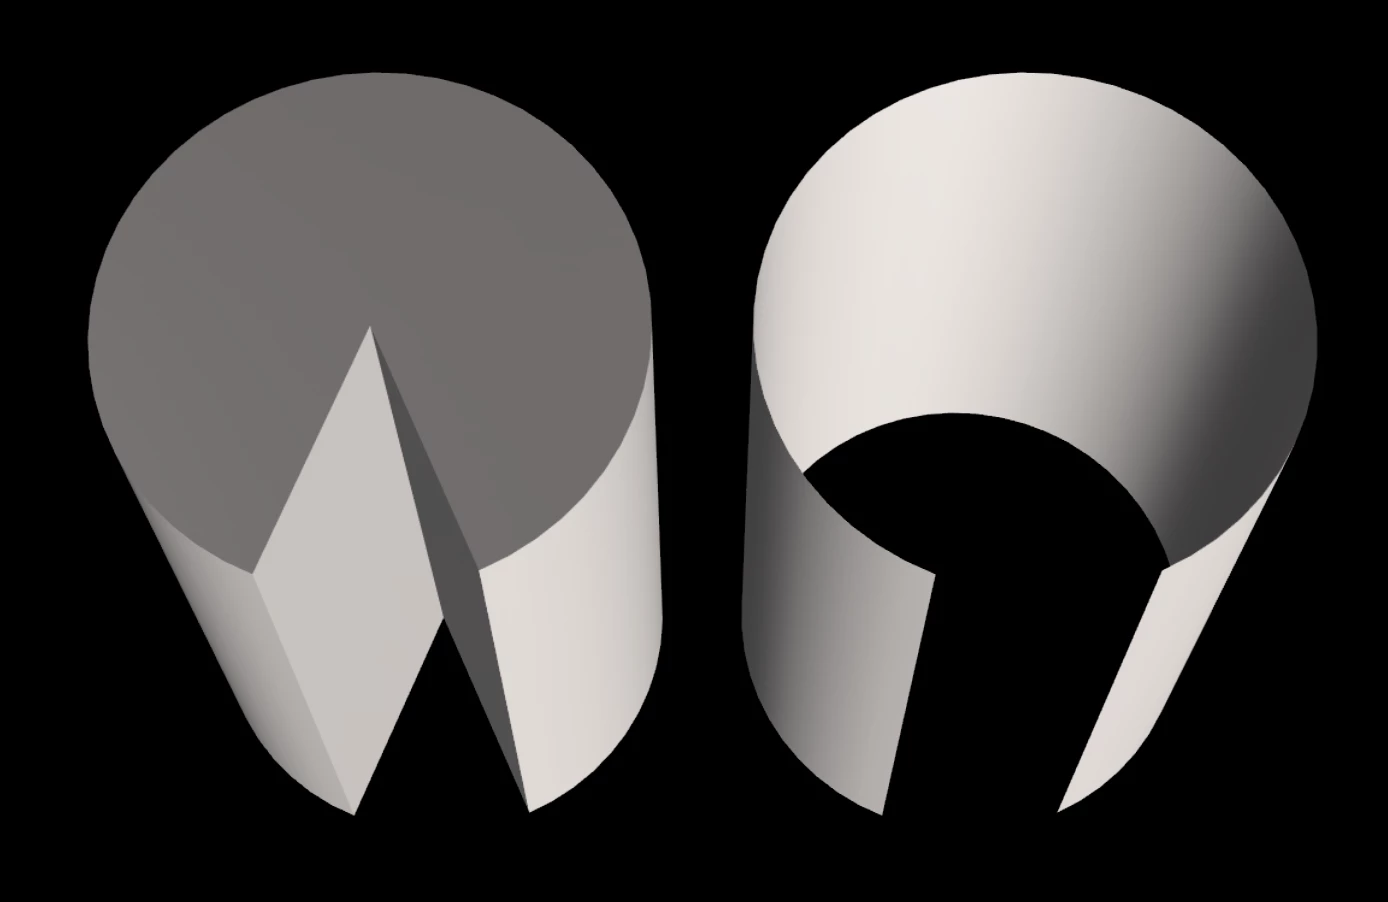
The Sphere, Cone, Torus and Cylinder shapes also allow you to carve out a slice from the object. If you want to build a pie chart, or animate a PAC-MAN, these are the controls for you.
The Cylinder and the Cone have end caps that can be turned off if you want to see inside the object. Similarly, if you create a slice in an object, the slice caps can be turned off if you want to create a hollow-object effect.
Modification Tips
The Cone shape is basically a cylinder with discrete radius controls at each end… you can independently set, bevel and animate the top and bottom of the cone for some creative results. Other shapes have global bevel controls that affect the whole object.
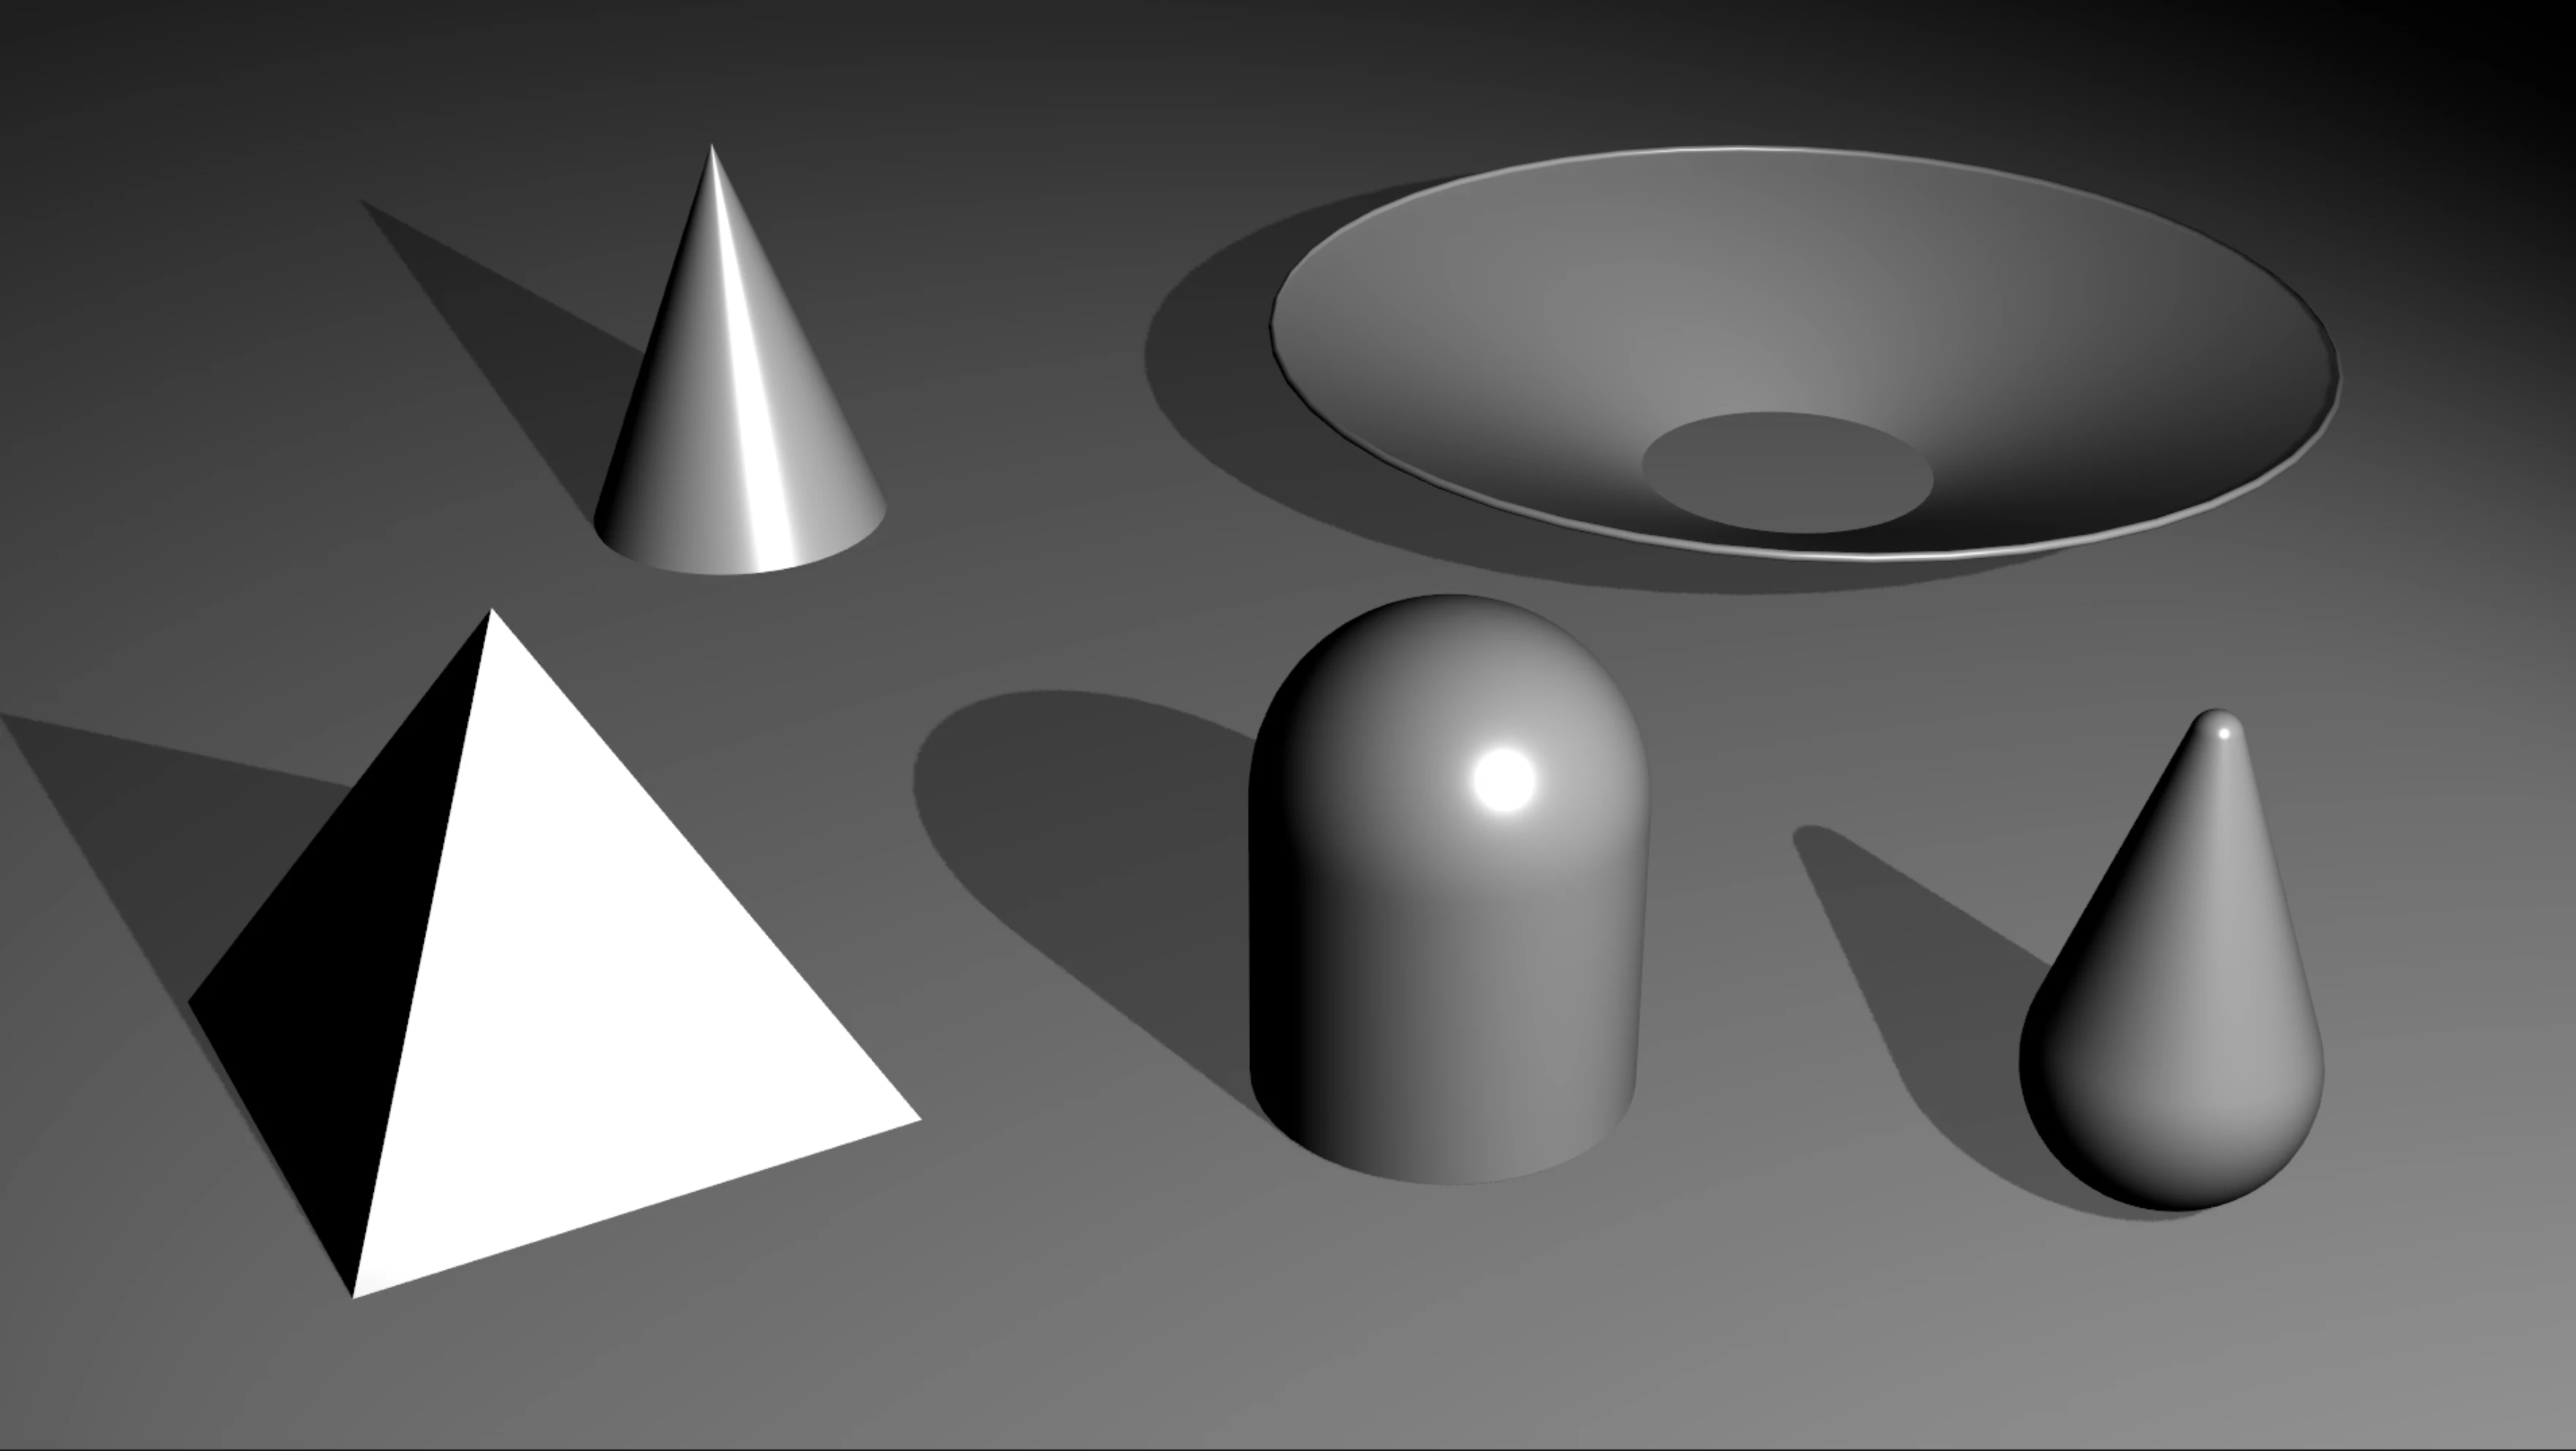
Pro Tip: If you want a circular Plane instead of the default square Plane, don’t overlook the Plane's Corner Radius controls! Increase this value for rounded corners, crank it all the way up for a circular Plane, or set the Corner Sides to 1 if you want to create an octagon.
Intrinsic (Default) Materials
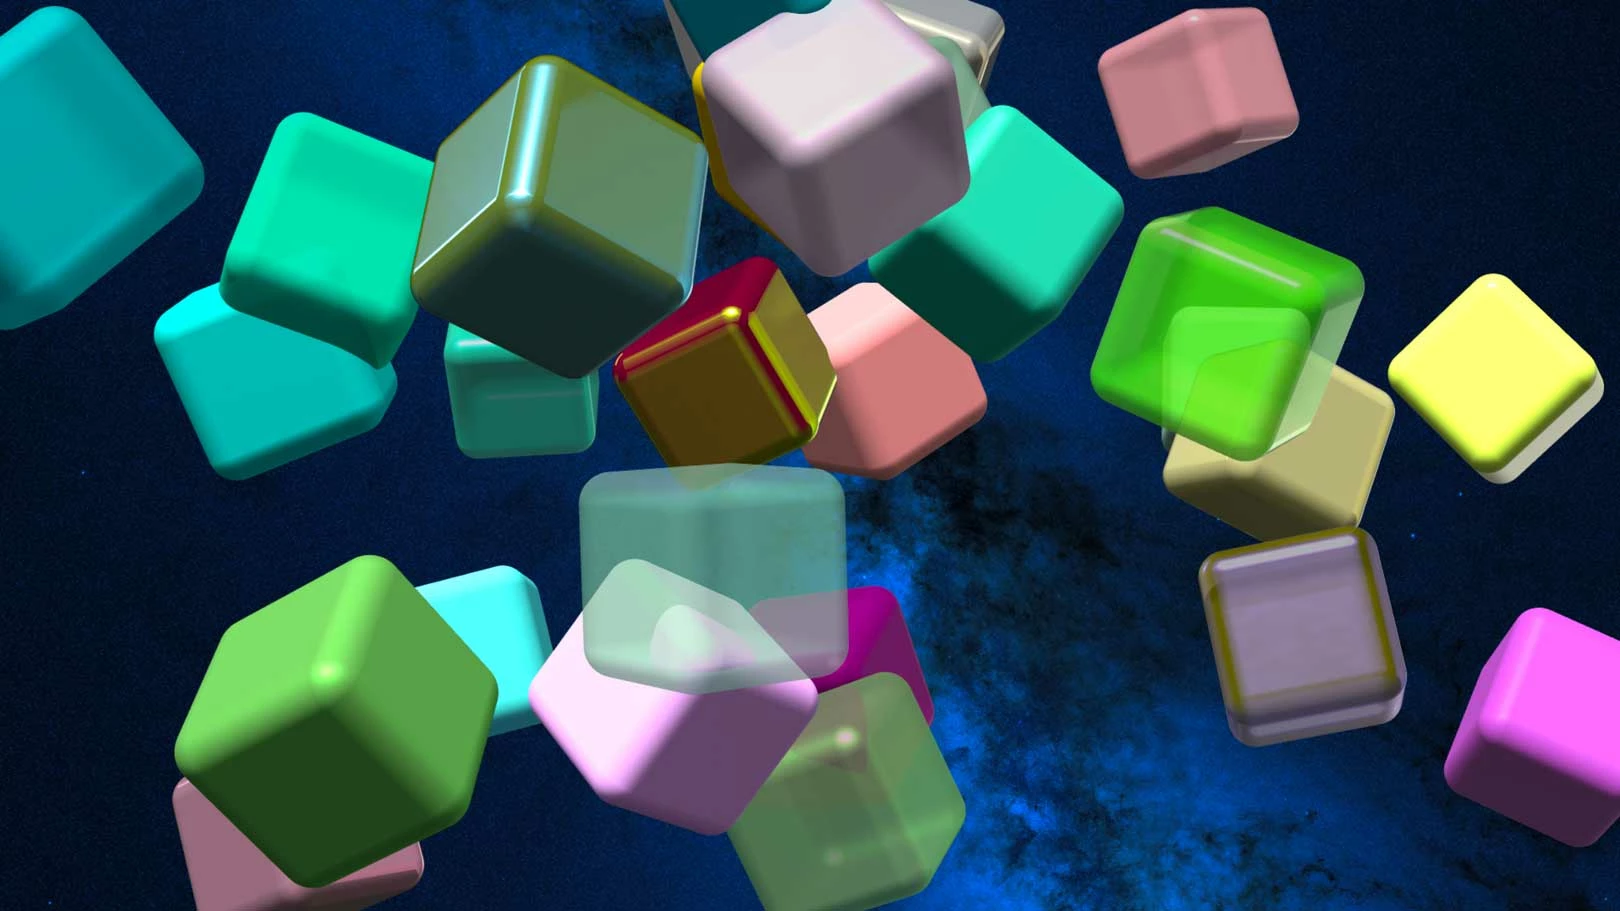
Each 3D Object has an Intrinsic, or Default Material applied to it, so you can easily adjust properties like Color, Roughness, Metal… options that are similar to the material controls in legacy 3D elements like extruded text and shape layers. There are some new ones in here however, such as Emission Color and Emission Intensity, which allow you to mix colors on the objects in creative and interesting ways.
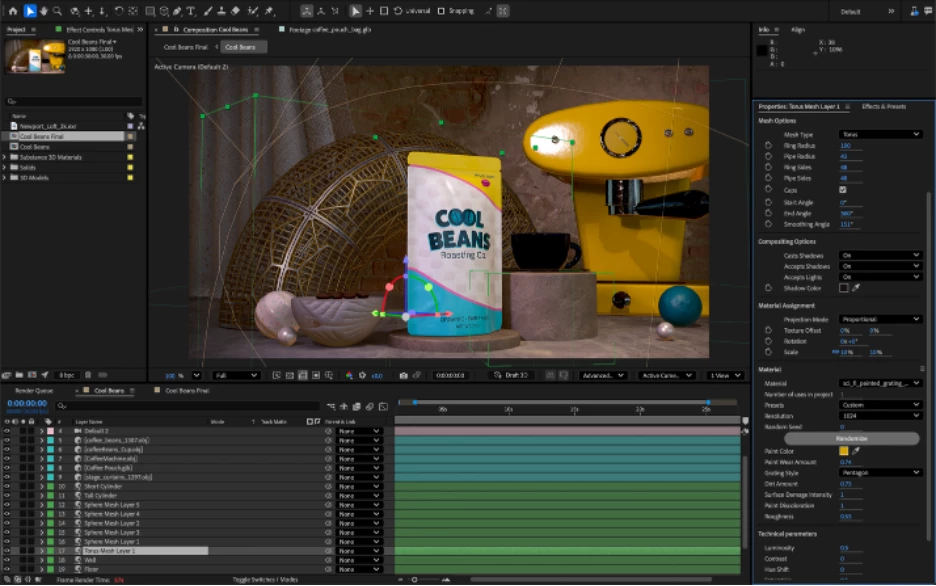
Substance 3D Materials
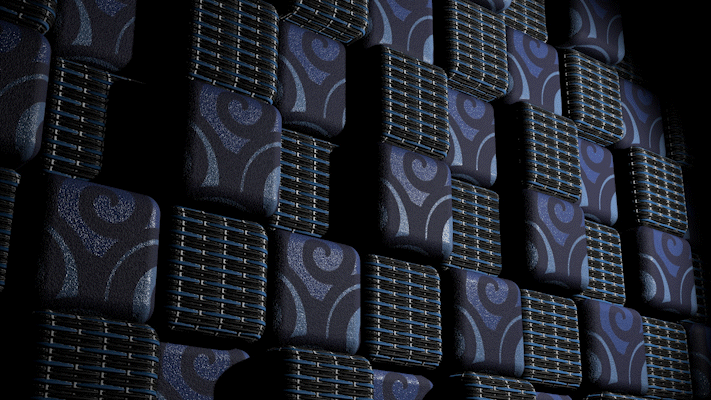
In addition to the Default Materials, you can import and apply Substance Materials (SBSARs) to 3D shapes. This opens up a staggering variety of creative options.
As a starting point you can find a large library of free SBSARs to explore through Substance Community Assets, and thousands more professionally-created materials are available with a Substance 3D subscription. Download, mix & match, and explore! You can of course also create your own materials using the Substance suite of tools.
Working with Substance 3D Materials in After Effects is a slightly different workflow than you are probably accustomed to.
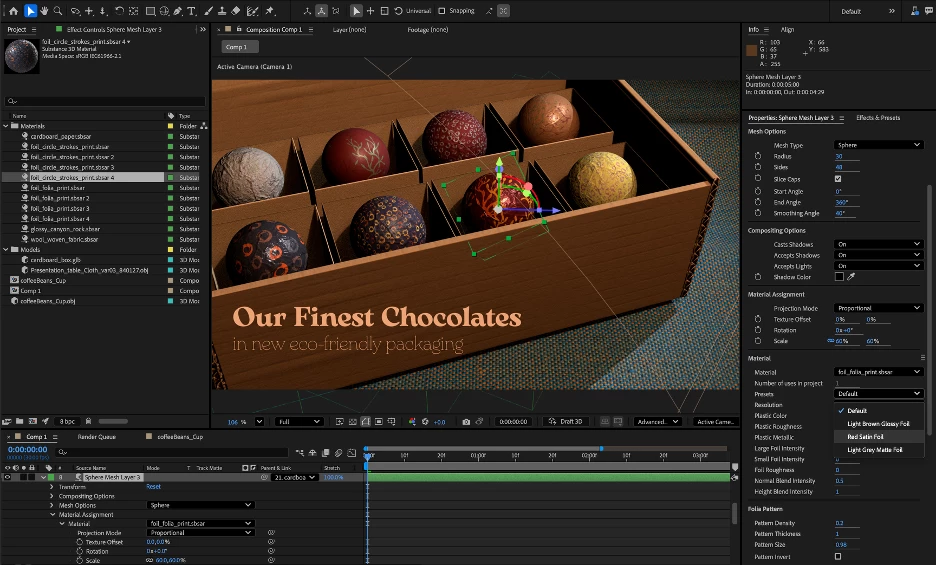
To apply Substance 3D Materials to Parametric Meshes, follow these simple steps:
- Select a Parametric Mesh layer.
- Choose your imported SBSAR in the Material Assignment section of the Timeline or Properties panel.
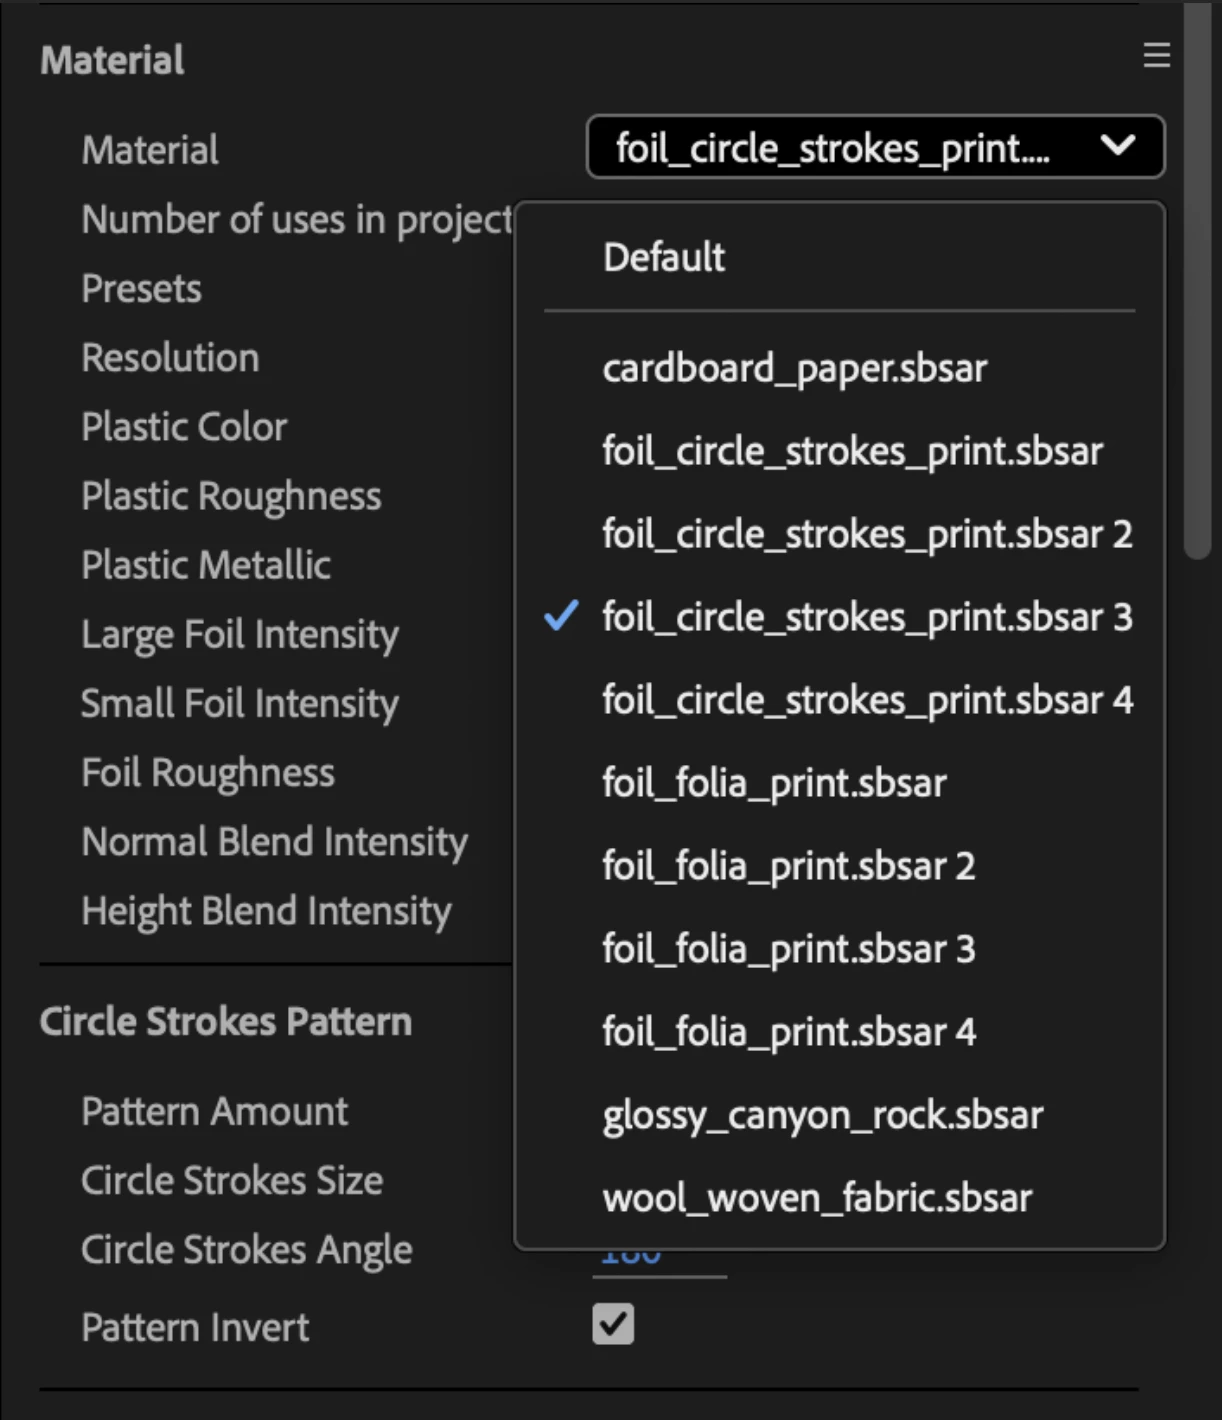
Note: THIS IS THE UNUSUAL PART. You do not need to add the SBSAR to the timeline... as long as the sbsar file is in the project panel, you can choose it as a Material assignment. - Refine how the material is applied by adjusting its Texture Offset (this shifts its position across the model or mesh’s surface, and the texture seamlessy wraps around to contiuously cover the shape), Rotation (around the native center of the texture) or Scale (around the native center of the texture).
- Customize the material properties in the Properties panel. The myriad controls you may find here are unique to each SBSAR, and can produce a wide variety of looks.
Very Important Note: While Material Assignment options like Scale are specific to the layer or Mesh Selection, any changes you make to the SBSAR material itself are global changes and will affect every instance of that material in your project. If you’d like to customize just one instance, choose Duplicate and Assign Material in the flyout menu of the Material section of the Properties panel. This will create another instance of the material in your project and automatically assign it to the selected layer in place of the original.
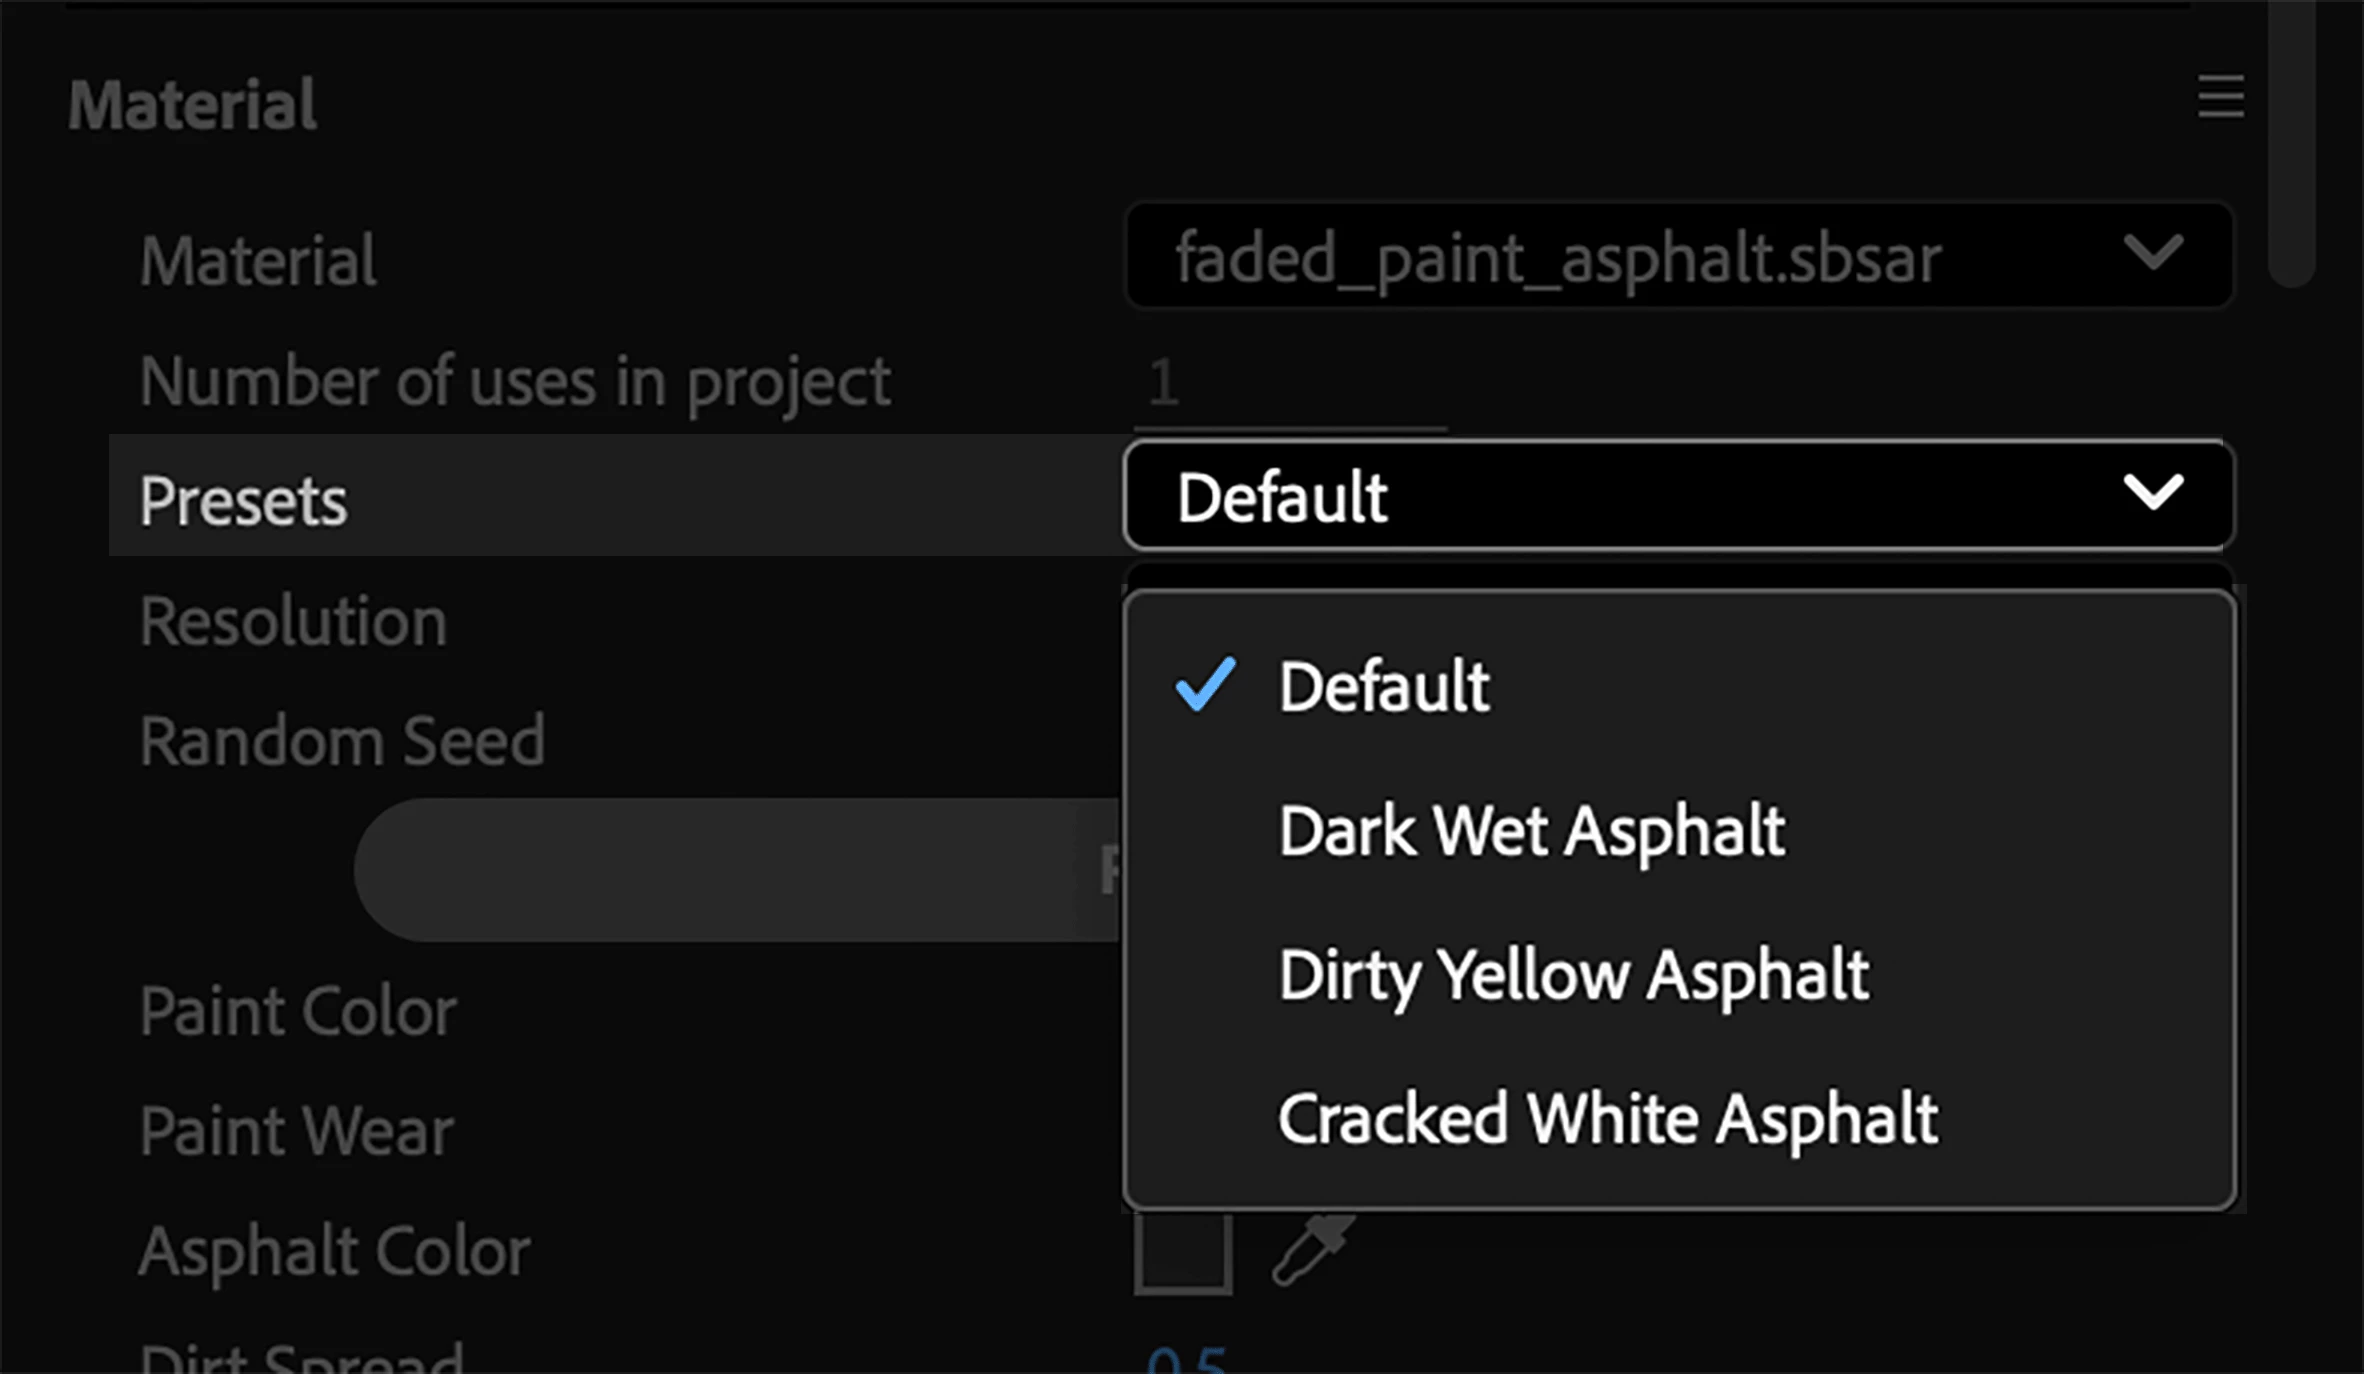
5. Many materials also include helpful presets that give you quick access to different looks.
Note: Selecting a preset is local to the model, not a global change.
You can also apply Substance 3D Materials to imported 3D models with pre-assigned materials. How well this works will depend on the quality of the UV Maps in the model, but in most cases you will have complete freedom to customize the look of your models.
For models with multiple assignable materials, choose which part of the model you want to apply the material to via the Mesh Selection menu in the Properties panel. You can also navigate to it by twirling open the layer in the Timeline.
Tip: Need to find some more materials? The same menu also includes a shortcut to browse free Substance Community Assets.
SBSARs can currently be mapped to Parametric Meshes using two different methods, “Proportional” and “Stretch”. When you assign Substance materials with patterns to animated 3D shapes, by default the textures will maintain the material’s original proportions. However, if you animate the mesh properties, that may cause the texture to slide around the shape, or it might create seams that are unsightly. Switch the Projection Mode from Proportional to Stretch to make it “stick” to a mesh, even as it changes size.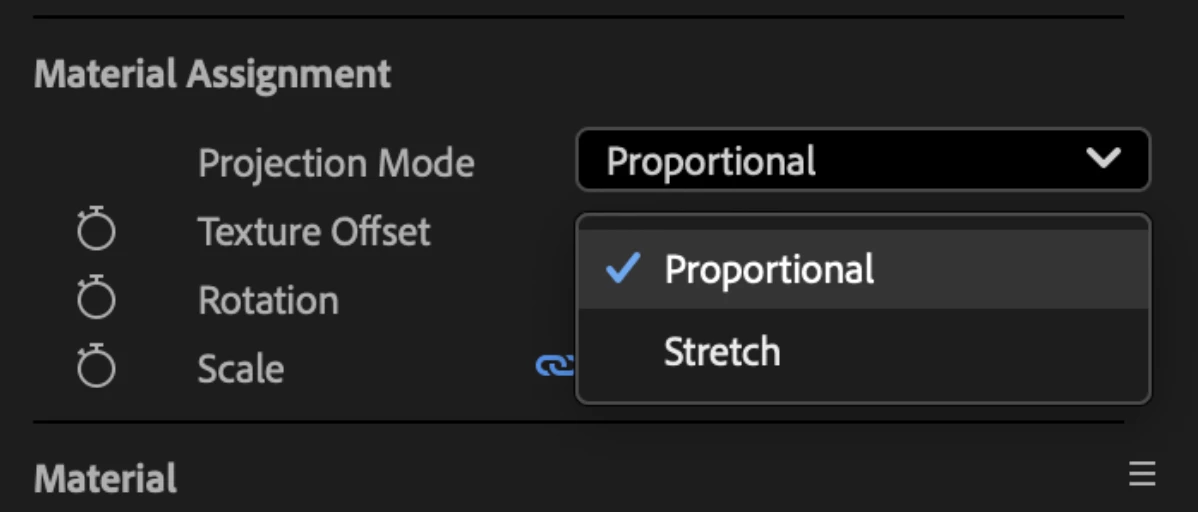
Proportional: The default setting attempts to preserve the underlying scale, aspect ratio and general integrity of the material texture. This looks great in many circumstances and should animate well if you are modifying the surface position of the material, for example if you want to create a conveyor-belt texture that moves smoothly along a beveled cube.. However, if you animate the underlying geometry of the shapes, Proportional can appear to “slide around” or produce seams in the textures that many be undesirable.
Stretch: For shapes with animated or exaggerated properties (e.g. animated bevels) stretched can produce clean results with minimal visible seams. However, if your shape has an exaggerated dimension—a cube with a very long Y axis for example—the stretched texture may be noticeable. You can compensate for this with the Material Assignment > Scale property.
Note: If a SBSAR has an Alpha Channel, the 3D Shape will render with appropriate transparency, which can produce some truly beautiful results. As a bonus, if you use a Spot light or Parallel light to cast a shadow on a 3D Object with an appropriate SBSAR, the alpha channel will be correctly rendered in the shadow.
While this article is lengthy, it is far from exhaustive. I hope it has inspired you to dive in and explore these deep new creative features in After Effects Beta, and let us know what you think!
Notes for Testing
- Please try using Parametric Shapes in your scenes.
- Animate the different geometry and material settings and see how they feel.
- Download and apply a variety of SBSARs and try customizing their various settings.
- Please provide feedback on any misusing features that you feel are important. This is an evolving feature set and your feedback will help us determine which features to prioritize.
Images and videos by Brian Maffitt unless otherwise noted.
