• Global community
    • Language:
      • Deutsch
      • English
      • Español
      • Français
      • Português
  • 日本語コミュニティ
    Dedicated community for Japanese speakers
  • 한국 커뮤니티
    Dedicated community for Korean speakers
Exit
0

After Effects: Why this shape layer becomes transparent only on main output?

Community Beginner ,
Oct 17, 2018 Oct 17, 2018

Copy link to clipboard

Copied

Hi. In After Effects I imported a PhotoShop Shape (Script Logo), then I made a bunch of controllers, extrusion, etc. After I render all, everything was fine. A reflective 3d script letters with a slogan.
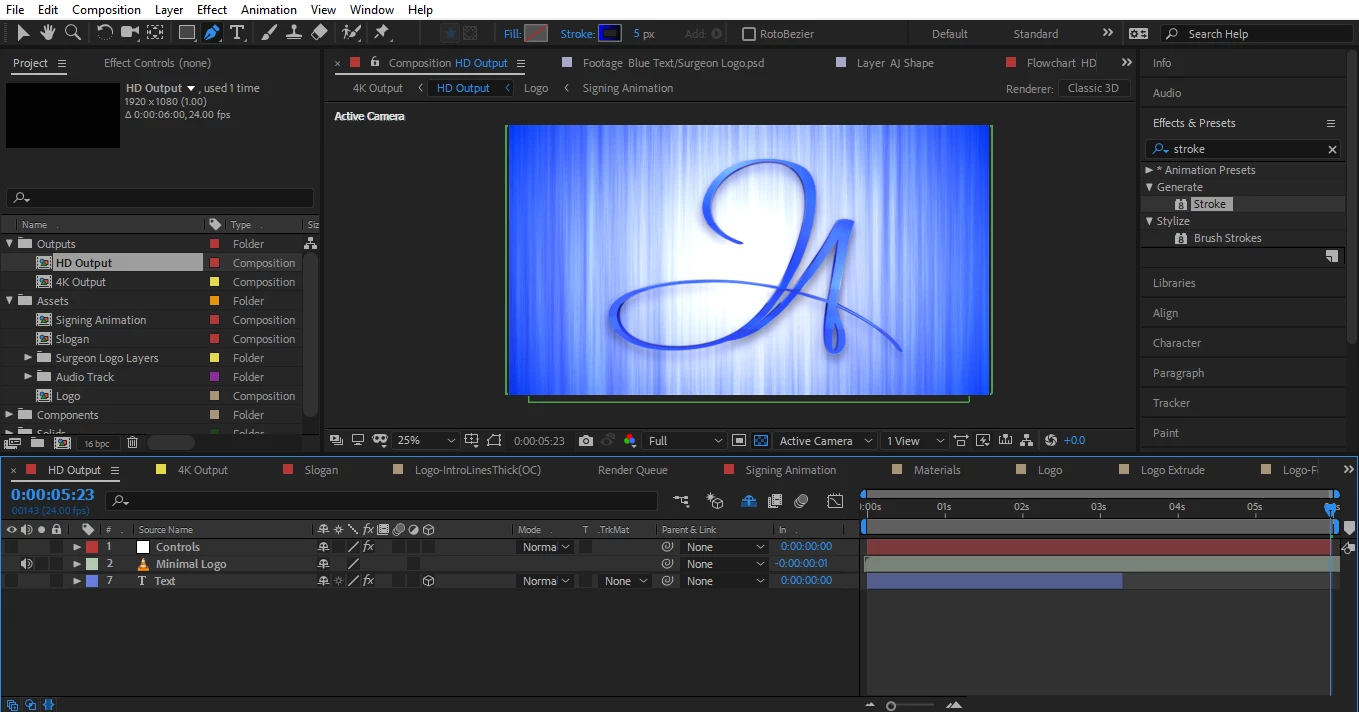
But then the customer changed his mind and told me he wants a version of the logo without slogan/name (only Logo's Icon) and the logo to appear like someone is signing. The comp that is connected directly to Main Output for rendering is called "Logo" (the one with all the controllers and effects). "Logo" have inside a comp called "Signing Animation". Inside of "Signing Animation" is where the PhotoShop shape (with 5 maks) is now. So I made a Shape Layer below that PS Shape and ended up with 5 shapes and a Trim Path inside that new Shape Layer's content.
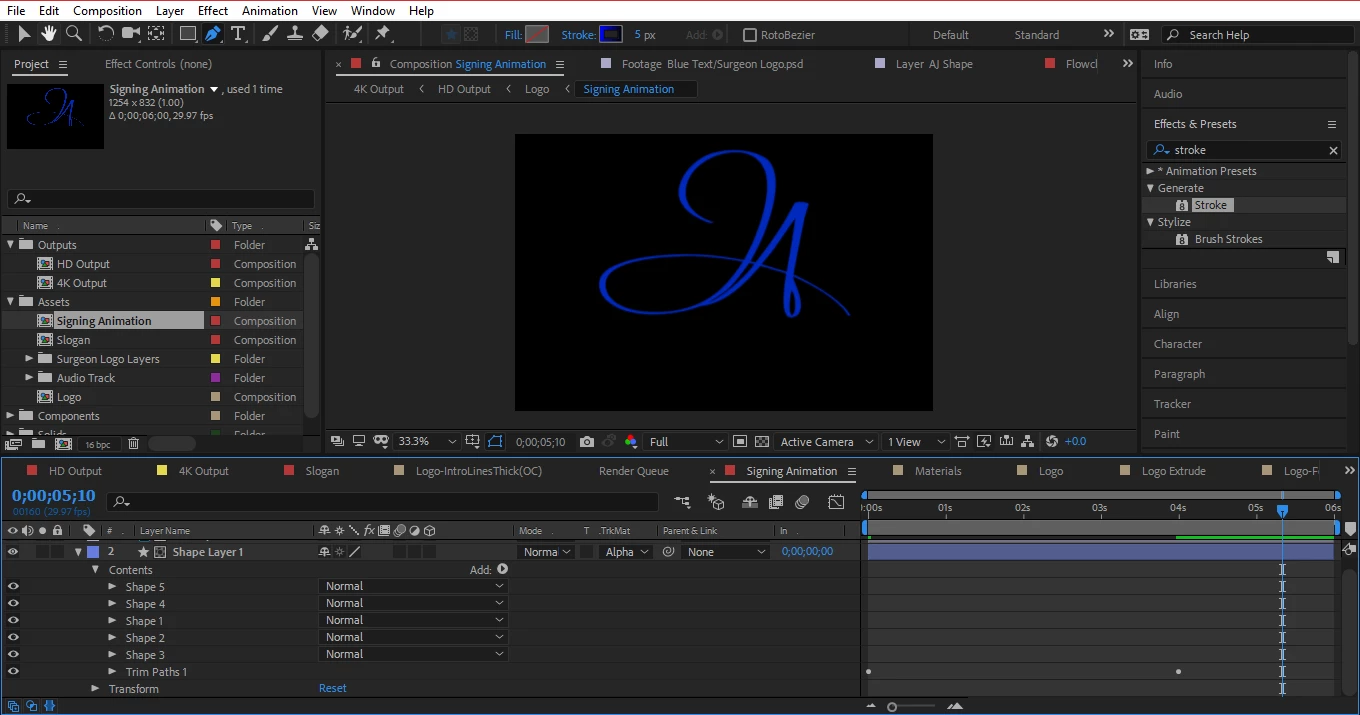
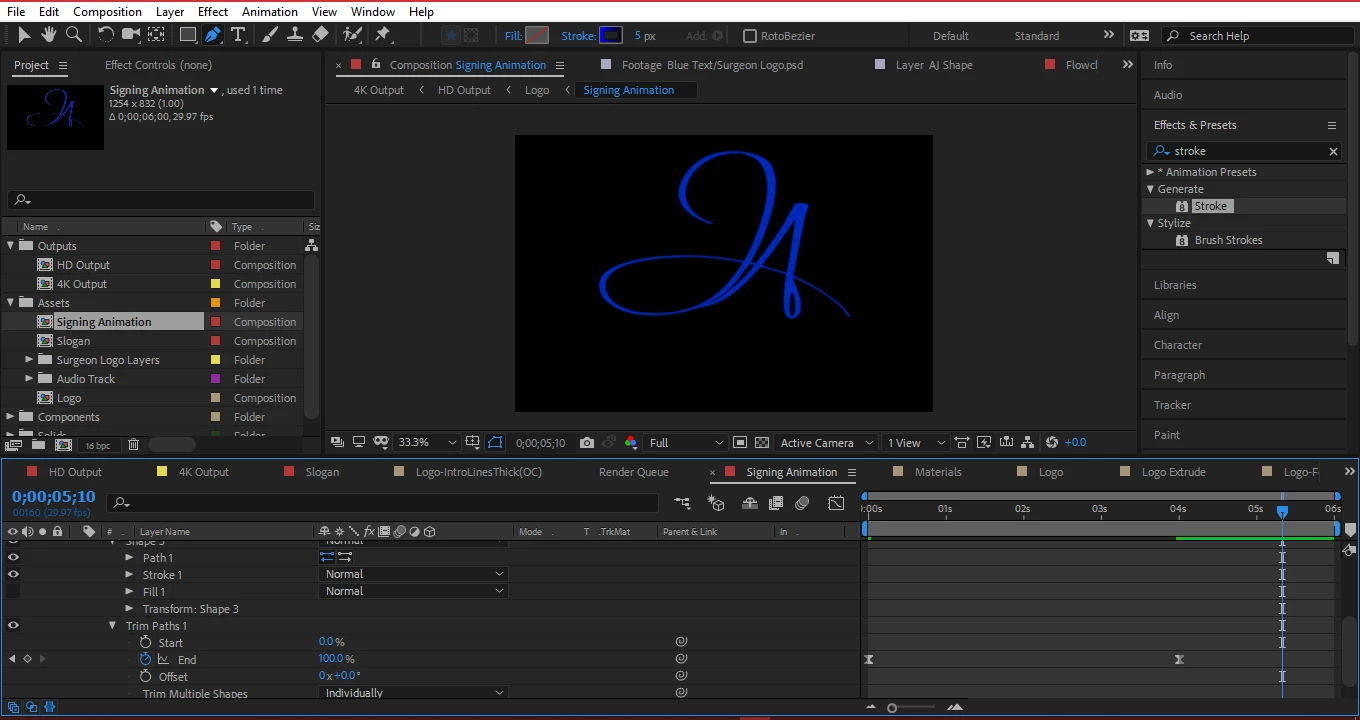
The trim path is animated with end 0% at 0 seconds and 100% at 6 seconds. The "Trim Multiple Shapes" is set as "Individually". This 5 shapes have stroke and fill effects inside each of them. The 2d shape now makes a signing animation similar to when you animate a stroke and choose to reveal original image. Note that the Shape Layer have a Track Matte to Alpha AJ Shape (the PS Shape) that is now disabled so that only the Shape layer 1 is shown. And I used that Track Matte so that the stroke has the same smooth shape the original PS shape has. The animation seems to work for now when previewed inside this comp called "Signing Animation" that you can see in the following image.
Now when going to Main HD Output, I expect to find something like the first image I attached in this post. But instead, I get the following result:

Only the reflections, shadows, controllers effects, etc are shown and a bit of blue in the first part of the animation (upper left side of the script letter J). The Shape layer's blue color and extrusions etc. are not there, just a clear/transparent mess. I'm used to work with PS and Premiere mostly, so I'm AE newbie, Plus I installed a new version of AE and now I'm lost in this part. Did I mess up somewhere inside "Signing Animation" comp or in another place (controllers, effects)? Can it be something related to "Collapse Transformation/Sun Icon" which is grayed out for my Shape Layer 1? My customer is waiting for this logo intro and I'm stuck now that the whole work is finished. English is my second language, so... sorry for any grammar problem.

Views

6.2K

Translate

Translate

Report

Report
Community guidelines
Be kind and respectful, give credit to the original source of content, and search for duplicates before posting. Learn more
community guidelines
Community Expert ,
Oct 17, 2018 Oct 17, 2018

Copy link to clipboard

Copied

Look like you have apply some blending mode to your shapes layer or so, and it's not clear in your screenshoot and you clcik the collapse transformation for you Signing Animation comp, please check if you have blending mode and try to post better screenshoot show us all the layer specially on the HD-Output try to remove the shy button to we can see your layers structure

Votes

Translate

Translate

Report

Report
Community guidelines
Be kind and respectful, give credit to the original source of content, and search for duplicates before posting. Learn more
community guidelines
Community Beginner ,
Oct 18, 2018 Oct 18, 2018

Copy link to clipboard

Copied

Thanks, Ok...

1. On the 2nd screenshot that I provided is shown that "Shape Layer 1" blending mode is Normal, as well as all 5 shapes inside (normal).

2. Now, because I paused that work for a significant time waiting for the customer, I forgot that I had enabled the general shy button (Hide all shy layers). Now reading your answer made me remember about that button so that I can provide a better screenshot.

3. For "shape layer 1" the "collapse transformations" is enabled and greyed out. I can't click on it. Note that the PS Shape is hidden to only show the Shape Layer being animated. The PS shape looks complete and fine in output (like the first screenshot I send earlier) when not hidden, but the "shape layer 1" don't get the same result in output.

Now back to the HD Output Comp, I took 2 screenshots from Logo to below (the whole thing don't fit on 1 screenshot), because that's where the problem starts at 2 seconds and ahead.

Reflections have blending mode of overlay and light overlay have blending mode of add. Note that the light overlay and reflection have track matte to "Logo" composition so that only that shape have reflection and light. Note that at the preview window, the shape no longer shows the extrude and front of shape neither. It just shows the reflection and light overlay. Also, see that on that screenshot, "Logo" appears 4 times but hidden because if enabled they would look plain 2d like in original "Signing Animation". They're there just for 2 Materials, Light Overlay and Reflection's Track Matte. I want Logo-Front(OC), Logo Extrude(OC) and Logo Extrude Reflection, to affect the JA Shape coming from "Logo". I tried putting more "Logo" copies above each of those 3 effect compositions that are not showing for the JA shape animation, but they still don't show. After those compositions shown on the screenshot, the following are the compositions that remain:

This happens when you finish a project in a new software you'll learning, and then you leave it for some weeks, then you don't remember what you did.

I'll leave it there, if the problem can not be solved with that info, then I send a new comment with screenshots where the compositions that are not shown are opened to show effects details, Although it would be weird if the problem resides in the effects taking in mind that it works fine for the PS Shape, but not for the Shape Layer 1.

Votes

Translate

Translate

Report

Report
Community guidelines
Be kind and respectful, give credit to the original source of content, and search for duplicates before posting. Learn more
community guidelines
Community Expert ,
Oct 18, 2018 Oct 18, 2018

Copy link to clipboard

Copied

Are there any other modified properties in the layers you are having problems with? Without a screenshot that reveals all modified properties of the problem layers (UU + Print Screen + Paste is the easiest way) and a screenshot of the expanded flowchart for the project, it's pretty hard to figure out exactly what is going on. 

Does the original comp still work? If it does I'd just open it and turn off all layers that you want to remove and see what happens.

Votes

Translate

Translate

Report

Report
Community guidelines
Be kind and respectful, give credit to the original source of content, and search for duplicates before posting. Learn more
community guidelines
Community Beginner ,
Oct 18, 2018 Oct 18, 2018

Copy link to clipboard

Copied

Thanks a lot, Y'all. Here is the image after clicking UU. Has to look for a new program to scroll screenshot the whole long window. You can maybe skip to layer 9 "Logo" (Color Green) that starts at 2 seconds where the problem starts. The flowchart screenshot is also attached after the 1st one.

All Layers Screenshot.png

Flowchart

Flowchart.png

Votes

Translate

Translate

Report

Report
Community guidelines
Be kind and respectful, give credit to the original source of content, and search for duplicates before posting. Learn more
community guidelines
Community Beginner ,
Oct 18, 2018 Oct 18, 2018

Copy link to clipboard

Copied

I would try to get your ‘logo Front comp‘ back to the top....not sure what’s inside. But seems like the only comp without matting stuff. But for sure it’s hard to figure out with your screenshots only. Maybe it’s a thing with the 3D Comps. Try a bug with setting an adjustment layer above your 3D Layer which has to be on top, but needs to be lower...

Votes

Translate

Translate

Report

Report
Community guidelines
Be kind and respectful, give credit to the original source of content, and search for duplicates before posting. Learn more
community guidelines
Community Beginner ,
Oct 18, 2018 Oct 18, 2018

Copy link to clipboard

Copied

But when I enable the PhotoShop Shape (AJ Shape/Surgeon Logo) inside "Signing Animation" comp (Which is in "Logo" comp), then it would look fine and I can render good, but then it wont be animated, because the PS shape is in front of the animated "Shape Layer 1". If I hide the PS shape, then is animated again, because Shape Layer 1 is the only one shown, but then that same shape layer, which is in "Signing Animation" which is also in "Logo", won't show all the effects like the PS shape used to. They're both inside the same composition "Logo" (The only one linked to the effects, not its children.), which confuse me about why they behave differently being inside the same stuff.

Here I enabled AJ Shape(Original PS Shape)

Now when I go to output, everything looks fine, but not animated anymore (maybe shape layer 1 is being animated behind the PS shape).

Votes

Translate

Translate

Report

Report
Community guidelines
Be kind and respectful, give credit to the original source of content, and search for duplicates before posting. Learn more
community guidelines
Community Beginner ,
Oct 20, 2018 Oct 20, 2018

Copy link to clipboard

Copied

Nothing?

Votes

Translate

Translate

Report

Report
Community guidelines
Be kind and respectful, give credit to the original source of content, and search for duplicates before posting. Learn more
community guidelines
Community Expert ,
Oct 20, 2018 Oct 20, 2018

Copy link to clipboard

Copied

Did you try and solo the problem layer? If the problem goes away start turning on layers until it returns then explore the modified properties of the layers that seem to be causing the problem.

Votes

Translate

Translate

Report

Report
Community guidelines
Be kind and respectful, give credit to the original source of content, and search for duplicates before posting. Learn more
community guidelines
Community Beginner ,
Oct 21, 2018 Oct 21, 2018

Copy link to clipboard

Copied

Ok, when I solo the problem layers, nothing is shown. All the extrude and front layers are the ones giving me problems. This ones...

When I disable the Animated Trim Path, the shape layer looks fine at the Output but then is not animated.

I should write the question now "Why does an animated Trimpath render my Shape's 3d extrusion invisible at Output?" This is how my Trim Path is set inside of "signing animation"...

You think that maybe it has to do with something about my 3D Renderer? The key is to find how a Trim Path can affect 3D shapes. Also when I use the controllers to increase extrusion thickness, part of the logo's Extrusion and Front start to show up. But that's not a solution because my costumer don't want this logo really thick. In here I increased thickness from 7 to 41 and this happened. Part of the logo is shown in output. Only part of it, even if the signing animation is almost over...

Votes

Translate

Translate

Report

Report
Community guidelines
Be kind and respectful, give credit to the original source of content, and search for duplicates before posting. Learn more
community guidelines
Community Expert ,
Oct 21, 2018 Oct 21, 2018

Copy link to clipboard

Copied

I see a bunch of Classic 3D comps but I don't see any C4D or Ray-traced comps. You won't get an extruded shape layer unless you have one of those somewhere in the pipeline. If you do have a comp set up so you can extrude you can't add effects to the 3D layers. There are also a bunch of other things you can't do.

You can apply effects to a nested comp but if you turn on collapse transformations then the effects will go away.

I still don't know what you are doing wrong. I have not seen a flow chart either. If this were my project I would do the extrusion and add textures to the extruded shape using C4D lite. It's pretty simple. Create a comp with a shape layer, Add trim paths, animate trim paths so that at least a sliver of the path is still visible, Make the Shape Layer 3D, add a Comp camera. Save the project file, export using the C4D exporter, start a new main comp, import the C4D file you just rendered and then add it to the main comp timeline. Ther you go. Inside C4D lite you can add effects, change colors, and do about a million things you can do with the extrusion, then import the C4D file into a new comp and complete the project.

Votes

Translate

Translate

Report

Report
Community guidelines
Be kind and respectful, give credit to the original source of content, and search for duplicates before posting. Learn more
community guidelines
Community Beginner ,
Oct 21, 2018 Oct 21, 2018

Copy link to clipboard

Copied

Ok thanks, is 2am here. Let me just try that in the morning and come back here mid-day to update. Btw, the flowchart is in a screenshot I pasted on my 3rd reply.   

Votes

Translate

Translate

Report

Report
Community guidelines
Be kind and respectful, give credit to the original source of content, and search for duplicates before posting. Learn more
community guidelines
Community Beginner ,
Oct 25, 2018 Oct 25, 2018

Copy link to clipboard

Copied

Ok. As a conclusion let's forget all the details and focus on the following questions to summarize all of this if you want to help me out:

1. Is it possible to animate using trim paths with extruded/3d shapes using only AE without an extra software or C4D lite?

2. If is possible... Which AE 3d renderer should I use having in mind the things that get disabled with each renderer?

3. If is not possible... What alternate option do I have to make a signing effect 3D? (Even if I have to delete most things and start again)

I see a template on videohive doing this effect without any problem. 3D text being reveal in a writing way. https://videohive.net/item/wood-3d-logo-titles-reveal/19650970 I tried with write-on effect and the same problem happens. Extruding sides and front disappear.

Votes

Translate

Translate

Report

Report
Community guidelines
Be kind and respectful, give credit to the original source of content, and search for duplicates before posting. Learn more
community guidelines
Community Expert ,
Oct 25, 2018 Oct 25, 2018

Copy link to clipboard

Copied

LATEST

really there are a lot of way to create a 3D text on AE the example you send it on videohive, i think they not use any kind of 3D extrude it's just duplicate the text or shape layer linked together than change the z position, really it's a old school technic.

anyway try this link https://greyscalegorilla.com/tutorials/after-effects-create-3d-text/

also do a small search on google about how to create 3d text on AE and you will find a tone of result.

Votes

Translate

Translate

Report

Report
Community guidelines
Be kind and respectful, give credit to the original source of content, and search for duplicates before posting. Learn more
community guidelines