Participant
April 30, 2021
Answered

Animate letters from light to bold

  • April 30, 2021
  • 2 replies
  • 3289 views

Good day everyone, this is my very first entry.


I have, in the past animated a font I'm drawing on GlyphsApp, from light to regular. I took the shapes back into illustrator, saved them, placed in in after effects, and carefully moved each point of the light version to match the regular version. 


Here is a link towards what I mean : 

https://www.instagram.com/p/CKliaZSCAr6/


I know have all the letters and can use the fonts as normal type in after effects. 

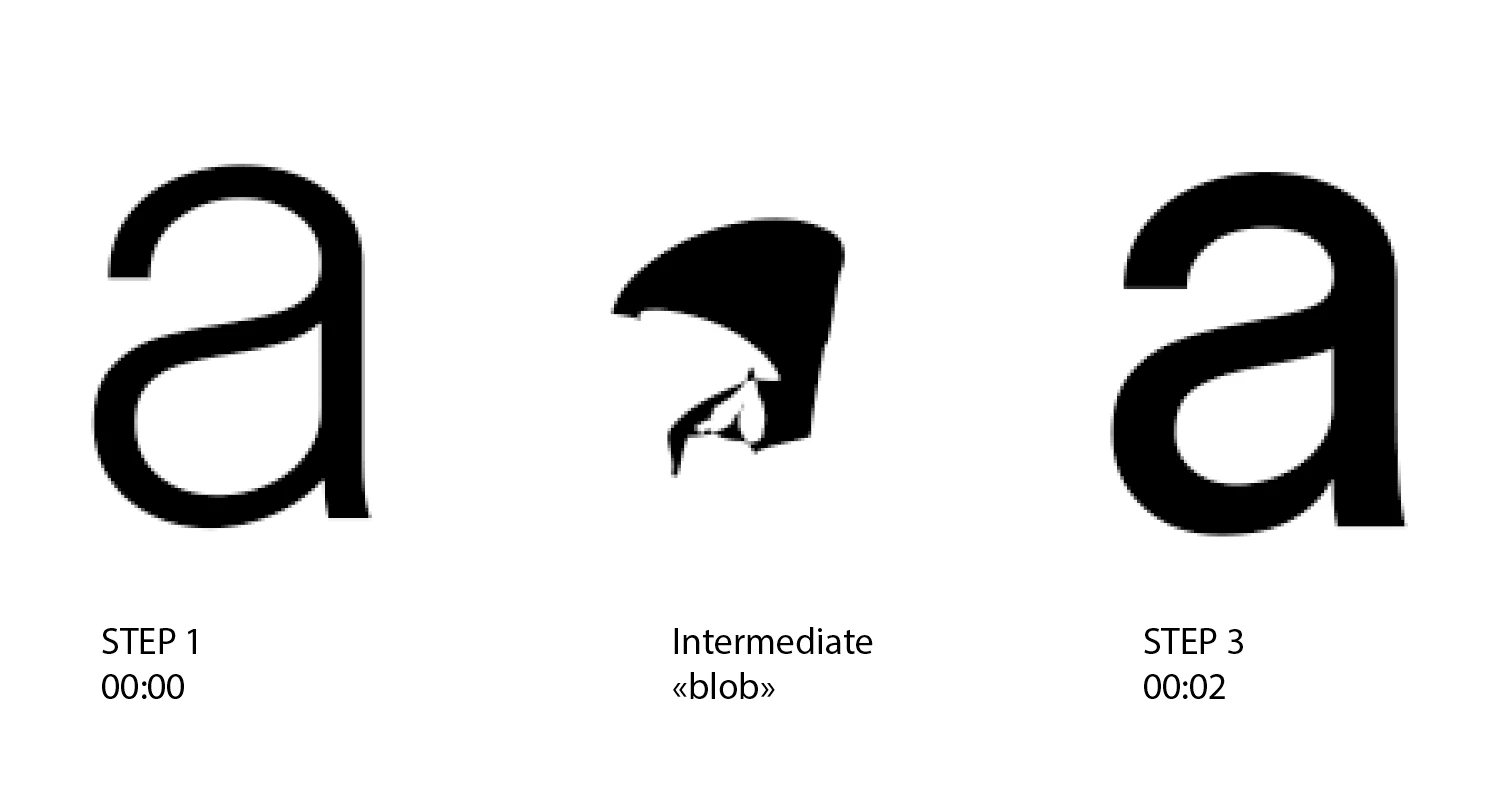
I created a new shape layer from both light and regular font in AE, how ever, everytime I try to "morph" the paths from ligh to regular, I get a weird twist of points as you can see here :


Here is my question : 


Does anyone know a much better, less time consuming way of doing this ? I'd like to avoid the intermediate blob by making sure every point connect to the other, without having to move them individually so I can use this animation on longer words.


I only have a "light" and a "regular" weight. 


Please help,


thank you !

Correct answer Kieran Burr

Ok so it seems that defining a vertex for both shapes is the real key for this.


The two shapes do not have the same number of points, but I chose the same first vertex for both.


Thanks again, it really helped,


Kieran

2 replies

Jose Panadero
Community Expert
Community Expert
April 30, 2021

Try the solution from @nishu_kush 


Anyway, the problem you show us is related to the first vertex on every path. When you select a path, you will see one of the points that is bigger than the others. This is the first vertex. If you want to morph path, the first vertex for the origin path and the target path must be around the same position in both paths to avoid those weird transformations. To convert any point to a first vertex point select the point and go to Layer > Mask and Shape Path > Set first vertex. Also it is a good idea to add points if needed to get a more organic transformation.

Participant
May 2, 2021

Hi Jose,


Thank you for your time and your answer, 


I feel your approach could be working, if I manage to have as many points from light to regular, it could work smoothly ! 


I'll let you know if it works, 


Thanks again,


Kieran

Kieran BurrAuthorCorrect answer
Participant
May 3, 2021

Ok so it seems that defining a vertex for both shapes is the real key for this.


The two shapes do not have the same number of points, but I chose the same first vertex for both.


Thanks again, it really helped,


Kieran

nishu_kush
Legend
April 30, 2021

Hi Kieran Burr,


Welcome to the Community.

Here's another way to do it.

  1. Create a text layer.
  2. Reveal its properties and select "Stroke Width" and "Stroke Color". Check out the screenshot.

You'll have the option to choose the stroke color (which could be the same as your text fill color) and you can animate the stroke width to make it look like it's changing from "light" to "regular".

Hope it helps.


Thanks.

Nishu

Participant
May 2, 2021

Thank you for your time and your anwser. 


I did this method a while ago, however it seems more of a cheat move than a real way of turning a weight into another. The stroke won't perfectly fit the width of the regular 😕😕


But thanks you again for your time,


Kieran