• Global community
    • Language:
      • Deutsch
      • English
      • Español
      • Français
      • Português
  • 日本語コミュニティ
    Dedicated community for Japanese speakers
  • 한국 커뮤니티
    Dedicated community for Korean speakers
Exit
0

How to batch process a Composition to make separate animations of all the flags in the world?

New Here ,
Sep 10, 2022 Sep 10, 2022

Copy link to clipboard

Copied

Hello all,

Im trying to make an animated GIF of all the countries' flags in the world in the below animated "coin" format.
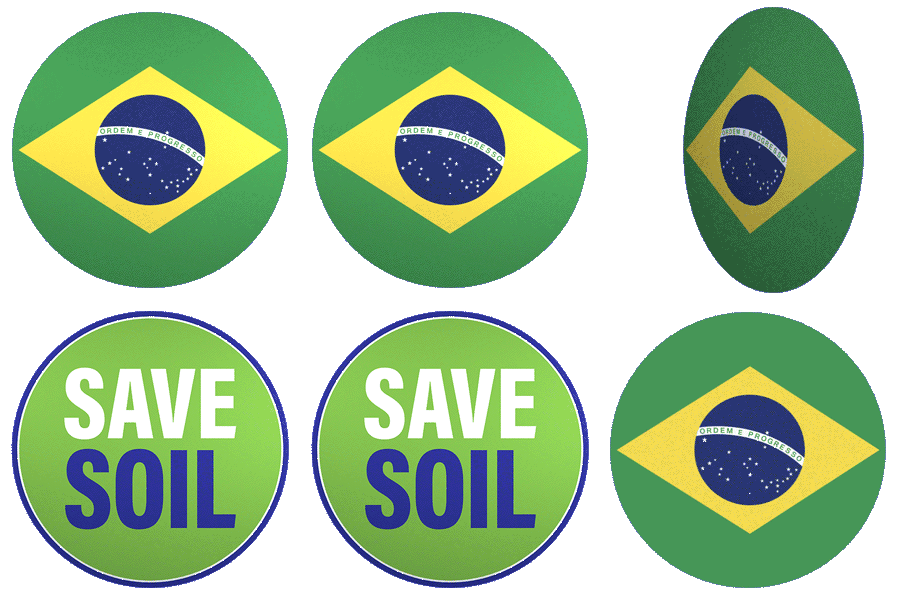
SaveSoil-Flags-Animation-Brazil.gif

On one side is the flag, on another is a "Save Soil" logo.

The two variables are: The Flag, obviously is one variable. The other is the logo, as some countries will have a logo in that language, while others will just/also be in English.


My first workflow was importing a PSD with the two layers in to AE. Then I exported the output as a PNG/Alpha sequence, then brought them into Photoshop and exported as the final GIF with transparency, to get little better control over the size/# of colors.


Doing a few is easy. Just replacing the flags/logo from smart objects in PSD . The re-opening the linked file in AE file and re-rendering. Back in PSD, I just replaced the footage of the sequence. Then Re-exporting the new GIF.


But.... doing over 100 will be too tedious... Does anyone have suggestion on how to batch automate this workflow?


The Flags and Logo are/can be EPS/PNG files, which I guess can be directly imported in AE (we can remove the first PSD step)... but how to get the rest done, I have no idea 🙂


Any help would be greatly appreciated.


Regards

Swami Trika

TOPICS
How to

Views

280

Translate

Translate

Report

Report
Community guidelines
Be kind and respectful, give credit to the original source of content, and search for duplicates before posting. Learn more
community guidelines
LEGEND ,
Sep 10, 2022 Sep 10, 2022

Copy link to clipboard

Copied

There's no need to jump through any hoops here. You just use multiple compositions. Why would you even replace your imported artwork all the time. All that's required is a single pre-composition for the backside with the slogan and then another 100 with the flags, which then can easily be combined in a 3D comp where the animation is applied via a script, animation preset or the simplest case some copy & paste of keyframes. On a good day this takes half an hour to set up. Then you simply let the image sequences render out in a single swoop and create GIFs for them in whatever tool you fancy, be that an online service or some image viewer tool with batch processing capabilities. PS is of course an option as well, though likely the worst one. Admittedly controlling the colors to avoid sxcessive dithering will be tricky, but even that could be controlled to some extent by setting up adjustment layers in AE that quantize colors like a Levels effect or even a Colorama with a custom spectrum that eliminates any inbetween colors.


Mylenium

Votes

Translate

Translate

Report

Report
Community guidelines
Be kind and respectful, give credit to the original source of content, and search for duplicates before posting. Learn more
community guidelines
Community Expert ,
Sep 10, 2022 Sep 10, 2022

Copy link to clipboard

Copied

I would number your flag images like this: Flag 001.png, Flat 002.png, Flag 001.png, and so on until you get to Flag.100.png. If you are on a Mac, Automator will do that in a couple of seconds. I'm sure there is a Windows equivalent. You can also do it in Bridge.


Then I would import the flags as a sequence, open the File/Interpret footage panel and set the frame rate to 1 fps, and then create a comp from the sequence. You end up with a composition that is 100 frames long and the same size as your flags. 


The next option is to create a master composition for the flag side of the image. Make that composition the same frame size as the comp created from the Flag Images (they should all be the same size) and long enough to create the rotation. The maximum frame rate for an animated Gif should be 15 fps, so set the comp to that frame rate. Name the composition "0" and open it.


The next step would be to import the flag image sequence and then go to Layer/Time/Freeze frame. If your CTI is at the start of the composition, then Time remapping should display 0:00:00:00 in the properties. Now add this expression to Time Remapping:


thisComp.name


The composition will now show the first flag. Add the other layer, make both 3D, and complete your animation, so the virtual coin flips over. It is a good idea to offset the front and back side of the coin by 1 pixel in Z and to scale the back aide layer to -100, 100 so that it flips around and then parent the back side image to the front side. That way, you only have to animate rotation on one layer. 


When the animation works and the first comp is perfect, duplicate the composition in the project panel. Every time you duplicate the composition, time remapping will move forward 1 second (which is one frame if the time remapped comp was set to 1fps), and each duplicate comp will have a different flag.


If you have 100 flags, make 100 duplicates. You can then select them all in the Project Panel and add them all to the Render Queue.


That's how I would do it. 


Votes

Translate

Translate

Report

Report
Community guidelines
Be kind and respectful, give credit to the original source of content, and search for duplicates before posting. Learn more
community guidelines
New Here ,
Sep 12, 2022 Sep 12, 2022

Copy link to clipboard

Copied

Hello Rick,

Thanks for yout suggestion. As a basic user of AE, I might be able to go through this process, but before I do, can you explain one more scenario? Mostly we will make 2 sets one with an English version of the Save Soil side and another one with a version in that countries language. Can you explain how we would do that also?

Votes

Translate

Translate

Report

Report
Community guidelines
Be kind and respectful, give credit to the original source of content, and search for duplicates before posting. Learn more
community guidelines
Community Expert ,
Sep 13, 2022 Sep 13, 2022

Copy link to clipboard

Copied

Just repeat the process with another image. 


If you really want to optimize the animated gif and must use After Effects, you only want to use one frame for the at rest part of the animation. 1 frame for the coin front, 10 frames for the rotation, 1 frame for the coin back, then 10 frames for the rotation. 


You would then open the rendered files in Photoshop and set the duration of the first frame and the 11th frame to 2-seconds. You end up with a 22-frame animated gif. You can create an action in Photoshop that would automate the process. 


There are much more efficient ways to create animated gifs than After Effects. If you are going for web-only content, Adobe Animate would be the tool to use to develop code-based animations. The file size would be a lot smaller.

Votes

Translate

Translate

Report

Report
Community guidelines
Be kind and respectful, give credit to the original source of content, and search for duplicates before posting. Learn more
community guidelines
New Here ,
Sep 13, 2022 Sep 13, 2022

Copy link to clipboard

Copied

LATEST

Rick, Thanks. We're actually going to be putting these in Giffy. So we'll just need proper GIF files. 

Ill try out your suggestion and see how it cuts down on the size.

Votes

Translate

Translate

Report

Report
Community guidelines
Be kind and respectful, give credit to the original source of content, and search for duplicates before posting. Learn more
community guidelines