If the interpreted frame rate of a clip is the same as the frame rate originally used to shoot the video playback will be realtime. 10 seconds of realtime will equal 10 seconds of video. Change interpretation, which comes from the metadata, and you change the speed of the playback.
The frame rate of a composition has absolutely nothing to do with the speed of the playback. Drop a clip in a comp that has a different frame rate than the clip and you will get frames that are blended. There is nothing in frame blending that makes the clips jittery. If you render the original clip that is 30 fps using any software out there from Freebies like Handbrake to $$$ plugins (apps) like Twixtor Pro (probably one of the very best), you are going to get blended frames, and there is nothing wrong with blended frames. Every feature film you watch on broadcast TV has blended frames because they were shot at 24 and are broadcast at 29.97 (assuming 60Hz power in your country).
If you want to preserve the original frames in After Effects, you'll have to open up file interpretation and change the frame rate to 23.976. That's all there is to it. The only problem with that is that 10 seconds of realtime will now take 12.5 seconds to playback. If you are OK with the speed change, that is the way to preserve the original frames.
If you want to maintain the original playback speed you are going to have to live with blended frames. AE has 3 different frame blending modes. The switch is in the Switches column
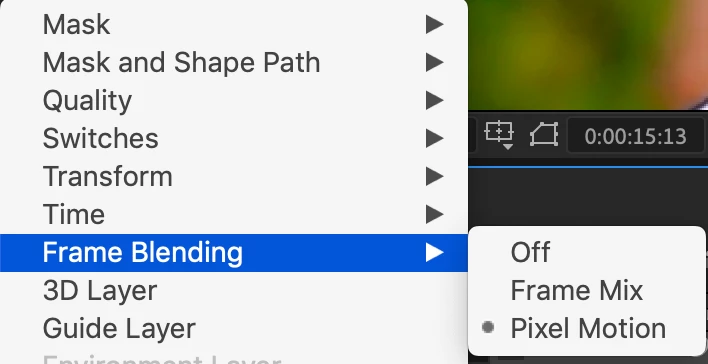
Just pick the one that makes the blended frames look the best. The only way to figure out which is best is to step through the timeline one frame at a time and look for frames that have the highest amount of motion. Frame Mix is usually the worst option, but it works very well with some kinds of motion. I usually use Pixel Motion unless I get some really bad frame blending on a couple of frames. About the only way to improve the look of blended frames is to use something like Twixtor (link above) but that usually only helps if you are trying to do some extreme speed changes. You won't see any difference between expensive solutions and AE's frame blending options if you have a 30fps clip in a 23.976 comp.
Not one of the techniques you were considering or that have been suggested will do anything to smooth out the blended frames. With these kinds of small frame rate differences, AE probably outperforms the Media Encoder, Hand Brake, or any other rendering option, especially because you can instantly preview the results in AE. Here's a test with some Sock footage Interpreted at 30 fps in a 32.976 fps comp. The third option looks like it produces the best results with this footage. The frame I am testing has the fastest motion and the worst blending problem. If I move forward 2 frames everything lines up and all frames are identical.

As far as making footage less jittery, that is usually caused by what is called critical panning speed problems. It has nothing do do with frame rates. It is caused by the stroboscopic effect of motion vs frame rates. Wheels, especially Stagecoach wheels in westerns, appearing to turn backward, or propellers looking weird is a perfect example. Lower frame rates have more problems with jittery or juddering footage than higher frame rates, but if you want the wheels to look like they are turning in the right direction you have to pick a shutter speed/frame rate/vehicle speed combination that will make that happen. If your film judders or is jittery, then you have to change the speed of the movement or the frame rate of the comp.
You mentioned that Handbrake turned the 29.97 fps footage into nice smooth footage with no repeated frames, but it was not necessary and you wasted the render time. Pixel motion is virtually indistinguishable to the calculations that video compression software makes when it changes the frame rate on a render. There was no real gain. The only way to get a better frame blending interpretation is to use something like Twixtor.
Almost everybody that did not start in the production business shooting motion picture film and transferring that film to videotape does not completely understand how frame rates and frame blending works. Let me go over the basics one more time.
If you want to see every original frame and you don't care about real-time playback, change the frame rate interpretation of the source file. If you want to maintain real-time playback and the frame rate of the comp is different than the frame rate of the footage, try one of the 3 frame blending modes. This also works, and can be very effective, for some effects when nesting a comp with a different frame rate. An example of this is creating a cell animation at 12 fps, then dropping that in the Main comp that is 24 fps, collapsing transformations, and setting the frame blending mode to Pixel Motion.
I hope this clears things up.
