louc81972341
Participating Frequently
November 26, 2016
Answered

Rotobrush Shortcuts?

  • November 26, 2016
  • 4 replies
  • 11902 views

Hello,

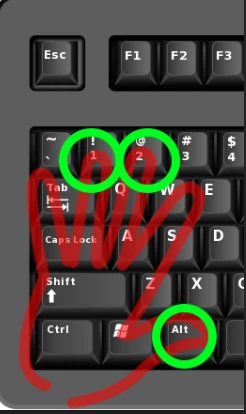
Just wondering if anyone knows a way to change the  default keyboard shortcut for removing unwanted areas. (red- circle ) Holding ALT when using the rotobrush?

It becomes very annoying when you have to advance frames using the PAGE UP and then having to go all the way over to the ALT to subtract an area.

Try doing that that for every other frame and you'll feel my pain.

The only shortcut I found to edit was just to open the rotobrush but not to change any brush controls.

Thanks in advance,

Lou

    This topic has been closed for replies.
    Correct answer Roei Tzoref

    WAIT! HOLD THE PRESS! I mean... I think I got it! .

    when you are on any of the paint tools, when you press 1 and 2 on the normal keyboard you can advance respectively backwards or forward one frame. this way you can very easily have access also to the Alt key. no need for page dn or up.

    What say you?

    **Credit for pointing out goes to the Meyers. I had to recall a few things about paint so was looking at their apprentice tutorials for it. After Effects Apprentice 13: Paint, Roto, and Puppet. BTW I do recommend anything from Chris and Trish Meyer and this course has also very useful information about Roto Brush workflow. guess I have missed the shortcut because I skipped the most of the paint chapter and they probably only gave this shortcut advice once in the paint section .

    this will speed up my workflow too so thanks for advocating for doing all with one hand. this doesn't mean you shouldn't work as efficient as possible and make as much strokes as you need to and nothing more.

    4 replies

    Participant
    August 28, 2024

    Hey

    Do you have any idea how can I access the delete section brush without alt key because my alt key stopped working

    I did change the shortcut of roto brush from alt +w to shift + w

    But I still can't figure out how to access the delete section brush 

    Roei Tzoref
    Roei TzorefCorrect answer
    Legend
    November 29, 2016

    WAIT! HOLD THE PRESS! I mean... I think I got it! .

    when you are on any of the paint tools, when you press 1 and 2 on the normal keyboard you can advance respectively backwards or forward one frame. this way you can very easily have access also to the Alt key. no need for page dn or up.

    What say you?

    **Credit for pointing out goes to the Meyers. I had to recall a few things about paint so was looking at their apprentice tutorials for it. After Effects Apprentice 13: Paint, Roto, and Puppet. BTW I do recommend anything from Chris and Trish Meyer and this course has also very useful information about Roto Brush workflow. guess I have missed the shortcut because I skipped the most of the paint chapter and they probably only gave this shortcut advice once in the paint section .

    this will speed up my workflow too so thanks for advocating for doing all with one hand. this doesn't mean you shouldn't work as efficient as possible and make as much strokes as you need to and nothing more.

    Roei Tzoref
    Legend
    November 26, 2016
    It becomes very annoying when you have to advance frames using the PAGE UP and then having to go all the way over to the ALT to subtract an area.

    how about going forward and backwards with the Ctrl/Cmd + right/left Arrows? I added you a key but you can do this in one hand (if they are big enough.. it is still a stretch) and M suggestion is a good one - you usually don't change every frame so make sure you read this through carefully and know how to save yourself time, effort and productivity with proper propagation before you correct your strokes: Roto Brush and Refine Matte in After Effects , After Effects Roto Brush, Refine Edge, and Refine Matte

    louc81972341
    Participating Frequently
    November 26, 2016

    Oh well, too bad.

    I will have to rethink my workflow if I choose the rotobrush for some mattes.

    Thanks guys,

    Community Expert
    November 26, 2016

    There are a bunch of different techniques for pulling a matte from footage. In my compositing work I find that Rotobrush is only the right tool about 10% of the time. I use everything from hand drawn roto to procedural mattes pulled using everything from Colorama to Keylight. The fastest path to a successful matte is to always ask yourself these questions:

    1. What frames do I really have to process
    2. What part of the frame is going to require the least amount of work
    3. Is there anything I can do to the footage to make it easier to pull a matte

    For example, someone on the forum recently posted a question about doing some roto on this footage so that some graffiti could be added to the wall.

    If this were my project I would start by positioning the graphic in the hero frame. A hero frame is the most important frame in the shot. Something like this:

    Because of the nature of the shot I figured the easiest way to track the camera movement and stick this graphic to the wall was to do corner pin tracking in Mocha. The shot also had a lot of rolling shutter problems during the camera move so the best approach was to apply rolling shutter repair and render a digital intermediate (DI) using a mezzanine codec (production quality visually lossless standard format using 10 bit or better color space) so I had the best copy of the original footage possible to do the rest of the work. Once the footage was repaired and replaced in the comp I determined that only 56 frames of the shot needed to be tracked in mocha because the actor was in front of the graphic for only 56 frames. The footage layer was duplicated and the top copy trimmed to 56 frames. I set up the track in mocha like this:

    This is after the tracking. The procedure was to animate a hold out matte manually the covered the movement of the actor. This took about a minute because the movement is very constant. Then the Track splines were added and the shot was tracked. The surface was adjusted to cover the part of the shot where the graphic is going to be and the track was checked for accuracy. I used the grid to fill the surface so I could see what was going on. Then the corner pin data was copied to the clipboard.

    Back in AE precomposed my trimmed footage layer moving all attributes and timing the pre-comp to the length of the shot. I added an animation preset that I use all the time that adds Corner Pin and CC power pin to a layer, ties the corners of CC Power Pin to the corners of Corner Pin using a simple expression created with the pickwhip, and turns on Unstretch in Power Pin. When you select Corner Pin in the Effects Control Panel and paste you get this:

    Now you can add the graphic and do the masking. I decided that the best approach would be to create a track matte for the graphic using a Rotobrush because of the movement of the actor. So the footage layer was duplicated, pre-composed and the comp set up like this:

    To help with the Rotobrush pre-composed the top comp again and added Colorama to help fix the footage and a mask to eliminate any parts of the frame that didn't need work. That looks like this:


    To Rotobrush the actor I selected the Paint workspace and opened the nested comp as a layer. I find it's easier to select a red matte when doing the roto so you can see what's going on a little better. The setup looks like this:

    Notice that I have the Track Matte Comp 1 set as an inverted alpha matte for the graphic. The blend mode for the graphic is set to Multiply so that It blends with the wall. As I propagate the roto I can instantly see what's going on in the matte and how well it's working. Only the holes that need to be fixed will be fixed. The color effect I added to the nested comp (Colorama - modifying the Ramp Gray preset) gave Rotobrush a better image to work with, and there's no wasted time going back and checking the matte later.

    I can switch to Refine Edge tools and clean up any errors and make the composite look perfect.

    Note that I didn't use refine edge on the whole matte, only on the parts that needed cleaning up.

    The last step is to turn off the bottom layer in the Corner Pin Copy comp so only the masked graphic remains, return to the main comp and paste the corner pin data to the nested comp. All Done in about 15 minutes. I only spend time on the pixels that needed work, and the composite looks great.

    To do further work on the graphic You can just replace or edit the layer in the nested comp.

    If the Rotobrush was longer than a couple of seconds or things got more complicated I would have rendered the rotobrush layer and replaced it in the comp. Make sure you freeze Rotobrush once you're done to speed up you work. If you don't choose to render and replace the rotobrush layer then expect your composition size to increase dramatically.

    Mylenium
    Legend
    November 26, 2016

    No, not possible. This stuff is hard-coded. And not to put too fine a point to it: If you are painting on every frame, you are working against how the tool is actualyl meant to work and have a very inefficient workflow.

    Mylenium