waiguoren
Participating Frequently
August 19, 2019
Answered

Staggered Rotation

  • August 19, 2019
  • 2 replies
  • 3065 views

Hi, relative newbie here.
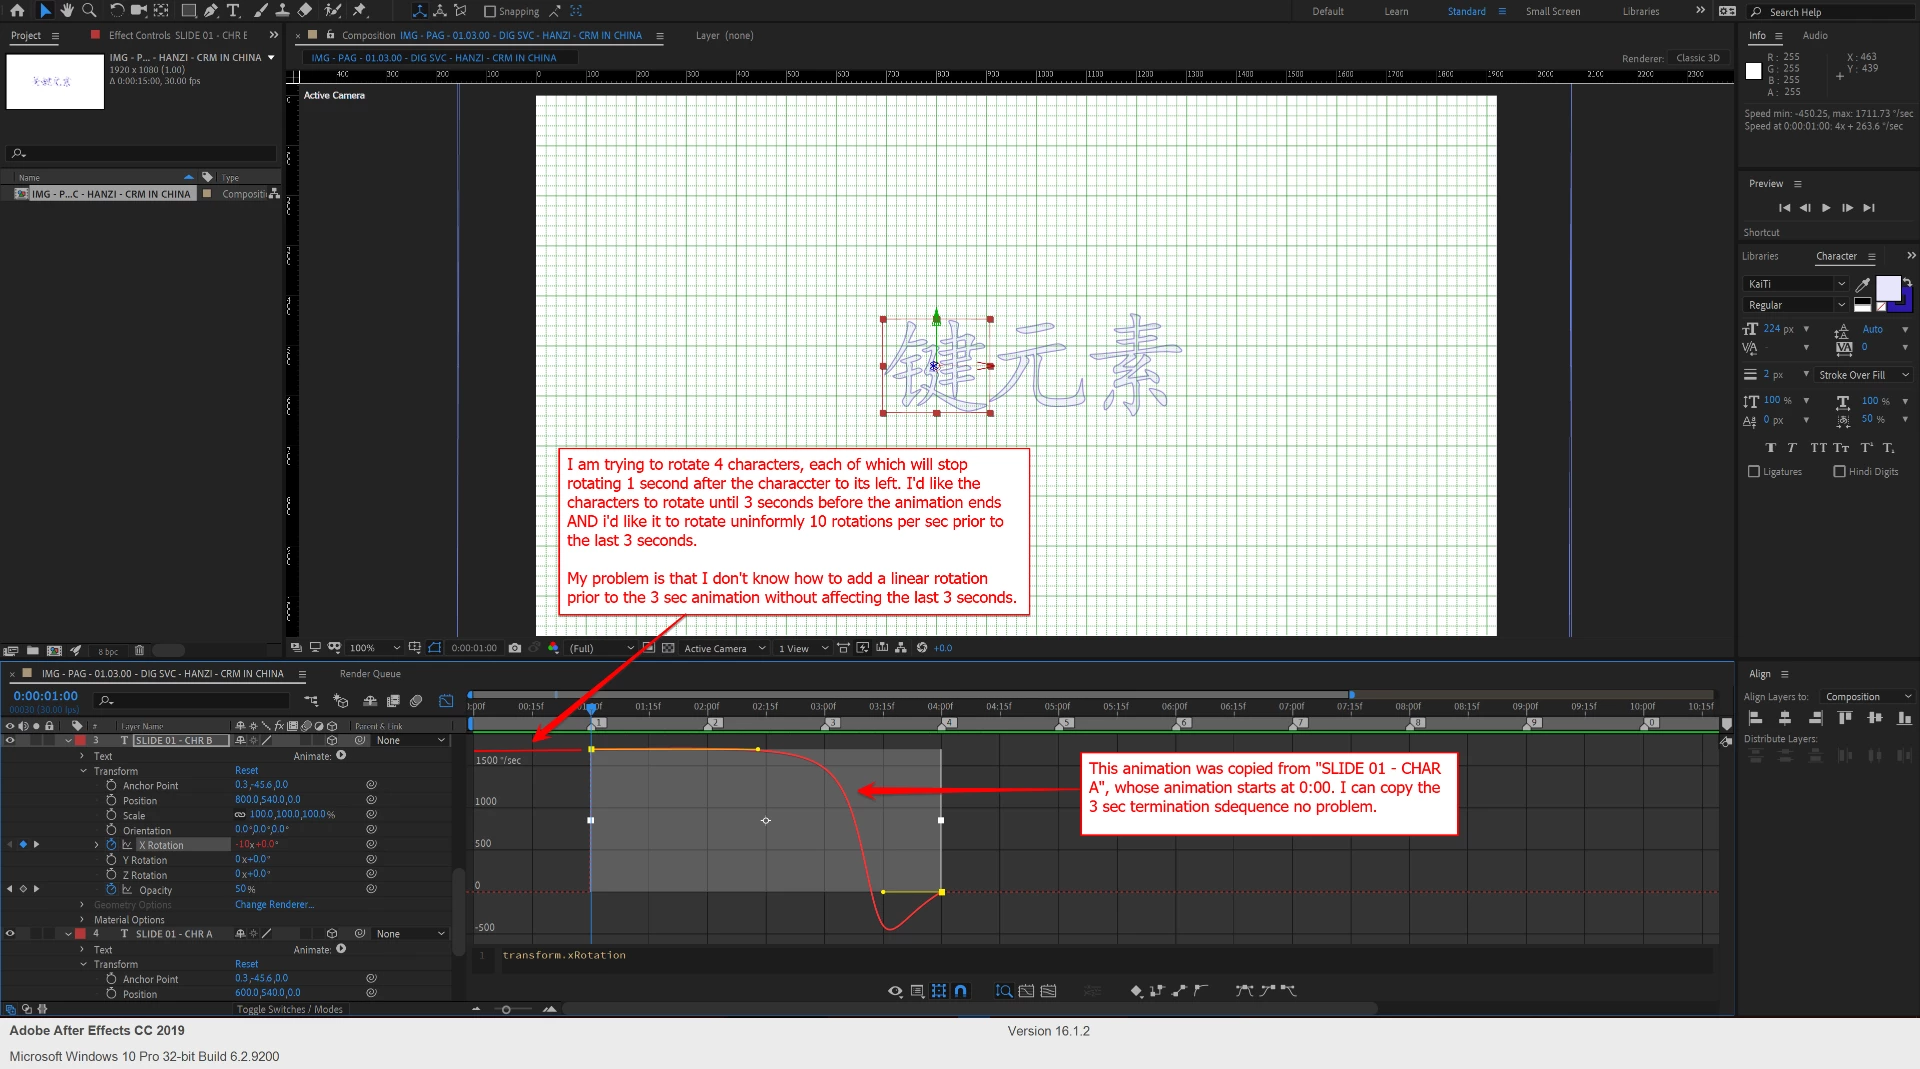
Use Case

I have 4 (Chinese) characters, each in a separate layer, horizontally aligned over a 15 sec timeline. 3D turned on for each character. I'd like to:

- start all 4 characters rotating at a constant 10 rotations per second and

- terminate each character's rotation on a staggered basis (character A stops at 4 sec, character B at 5 sec, character C at 6 sec and D at 7 sec.

The termination curve for each character should last 3 sec and should be identical (as shown in the attached screenshot)

-  to accomplish this, I've copied the termination sequence (a 3 sec keyframe) from character A and pasted it onto the rotation attribute for each successive character at 1 sec, 2 sec and 3 sec, respectively.

So far, so good.

Issue

I'd now like to add a constant rotation prior to the 3 sec terminating animation for each character so that all characters start spinning at 0:00. However,

- when I add a keyframe prior to the 3 sec termination keyframe, it distorts the 3 seq keyframe curve.

Questions

- Is there a way to have 2 separate keyframes that don't interact with each other? And if so, how would I do this?

- How do I  interpret / update the 2 parameters for rotation - nn x +0.0 (I've fiddled with these params and I'm, not getting enough consistent behavior to tell me how to interpret / use them).

Thanks in advance!

Screenshot

Here are the settings for the second character B with a red line from 0:00 to 1:00 where I'd like to have the constant rotation

    This topic has been closed for replies.
    Correct answer Martin_Ritter

    Motion always happens between 2 keyframes. So, what you need are 3 keyframes as you can see in the example from Rick of letter C. There is no linear rotation keyframe and no curved keyframe but a motion between two keyframes which is linear or eased (curved).

    Key 1 to key 2 is a linear rotation, you are using linear keyframes. From key 2 to key 3, you apply ease-keyframes making this to an non-linear motion. Play around with the speed editor to get used to it how to edit speed graphs. It's a bit confusing at the beginning but makes sense after a while.

    *Martin

    2 replies

    Martin_Ritter
    Legend
    August 20, 2019

    I admit it was a bit unclear explained.

    Usual, you start with linear motion, put in all keyframes and values and make a rough timing. In the next step you change the motion style to a more living, characteristically one by applying ease and editing the speed graph. So, in the end you'll have KF1 as linear (because that is what you want there), but KF2 and 3 as ease. Just like in Ricks screenshot - the letter C.

    To get to smooth transition from linear to ease (KF1 to 2), play around with the speed curve editor until you get used to it.

    Btw. nobody will ever be able to tell if your letters are rotation 10 times per second or less or more. There is no need to be 100% precise. Trust your eyes - if it looks good, it is good.

    *Martin

    waiguoren
    waiguorenAuthor
    Participating Frequently
    August 20, 2019

    I finally got it!

    For some odd reason, I thought that a keyframe was the begin point, end point and motion in between. I now understand that each point is a keyframe.

    so...I was grabbing both the beginning and ending keyframes (K1 and K2), but in so doing, I affected the motion between K2 and K3.

    I think I'm set for the moment.

    One observation about the many "how to" videos out there - they focus on the mechanics, not the conceptual framework. So, if you only need to replicate what these videos show, no problem. But, lacking a conceptual framework (i.e. what is a keyframe?), extrapolating to the next effect can be somewhat problematic...

    Anyway, thanks for your patience and explanations!

    Martin_Ritter
    Legend
    August 20, 2019

    Congrats!

    The concept of keyframes is to set different states and interpolate between them. Curves determine how this interpolation should happen.

    This goes back to classic animation, where the "chief draftsman" made the key frames, and the "draftsman staff" draws the in-betweens. In the case of AE, the staff is the computer.

    Your idea of a concept would be to apply a behavior, what is more the concept of programming. With expressions, this concept would be also possible, but AE is not the ideal environment for such. Meaning you'll have to write lot of code which executes fairly slow and after all you would be way faster by just keyframing this.

    *Martin

    Martin_Ritter
    Legend
    August 19, 2019

    The easiest and fastest solution would be to start over. Make the whole animation cycle for one character and copy it to the others.

    And you can get rid of the expression, since it doesn't do anything.

    A more sophisticated way would involve a loop before keyframe expression. I usual use this script as shorthand:

    https://aescripts.com/pt_autoexpress/

    *Martin

    Martin_Ritter
    Legend
    August 19, 2019

    I re-read your post and got an overall better idea: follow the leader.

    You create the complete animation cycle on the first character. Let it spin for some seconds, at least as much as the last character actual need. Then make the spin-out animation as you already did. For the spin-only part, you can use the script I posted above and loop it, or you set it up by hand once. You wrote 10 full rotations per seconds... should be easy to calculate how many rotations you need for, say 4 seconds of pure spinning, right?

    Next you activate expressions on the following character - the x-rotation property of course. And you'll add this line of code:

    thisComp.layer(index+1).transform.xRotation.valueAtTime(time-1);

    This takes to rotation value from layer index+1 (= the layer below the current one) at a time-1 (= one second earlier).

    You copy this line to every other character above.

    *Martin