Exporting from Flash to a format you want to share or utilize usually involves 2 steps.
1, Export a full quality (or very lightly compressed) great looking version of your video.
2, Import into a quality video encoder and compress it to MP4 H.264
When exporting (File->Export->Export Movie), hit the drop-down at the bottom and choose Quicktime (you have to have Quicktime installed, http://www.apple.com/quicktime ).I use QuickTime because all stock AVI and MPEG4 compressors are pretty terrible, except for Uncompressed (but you get a huge file size).
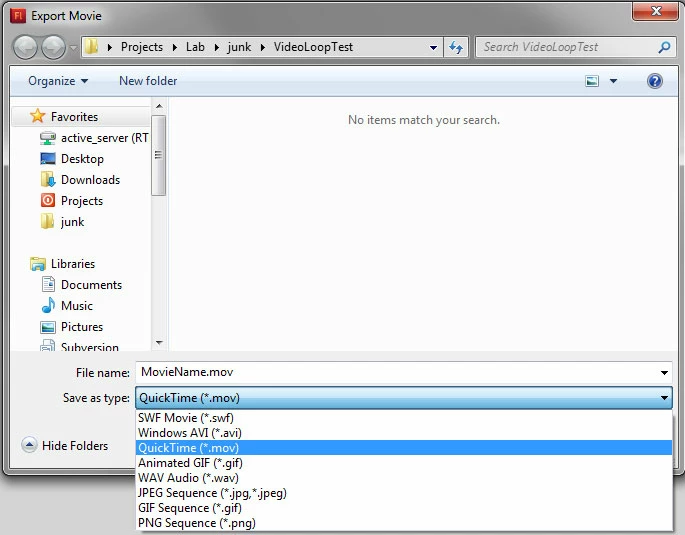
Name your video and click "Save". A new dialog comes up which I was referring to before for rendering via memory or disk:
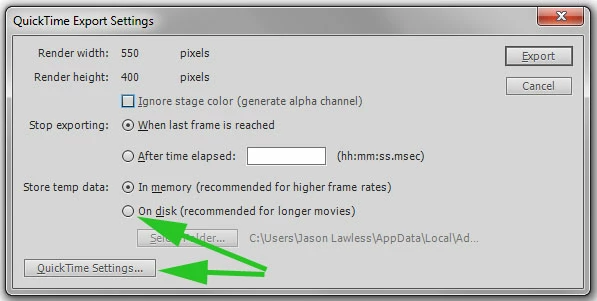
The top green arrow points to rendering in memory or disk. You should select the bottom option as it states it's "for longer movies". I have memory selected in mine so disregard that but remember that setting exists. If you use "On disk" then set the folder it will use to export to if you desire (using alternate hard drives can give performance bumps).
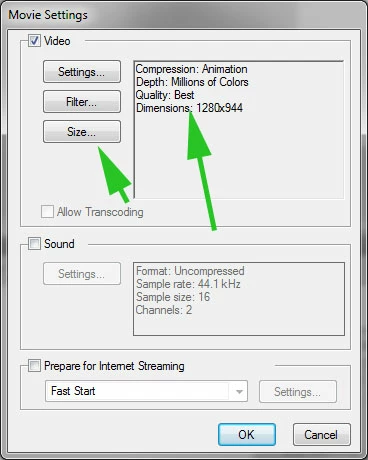
Click the QuickTime Settings button the bottom green arrow points toward. That brings up settings:
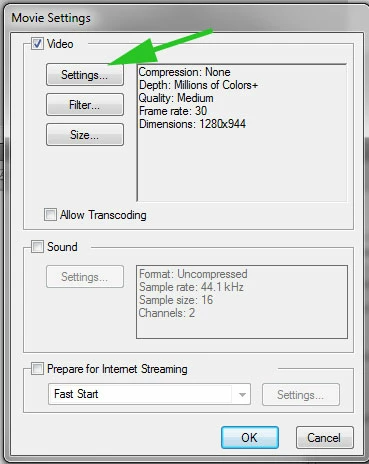
Mine is set to Uncompressed ("None" compression) but that will generate the huge file, just like AVI Uncompressed did. We don't want that. Audio below is unchecked for me (I have no audio in it) but either way you should leave audio Uncompressed anyhow and make sure it's checked if you have audio in your movie.
Next click the Settings button the arrow points to.
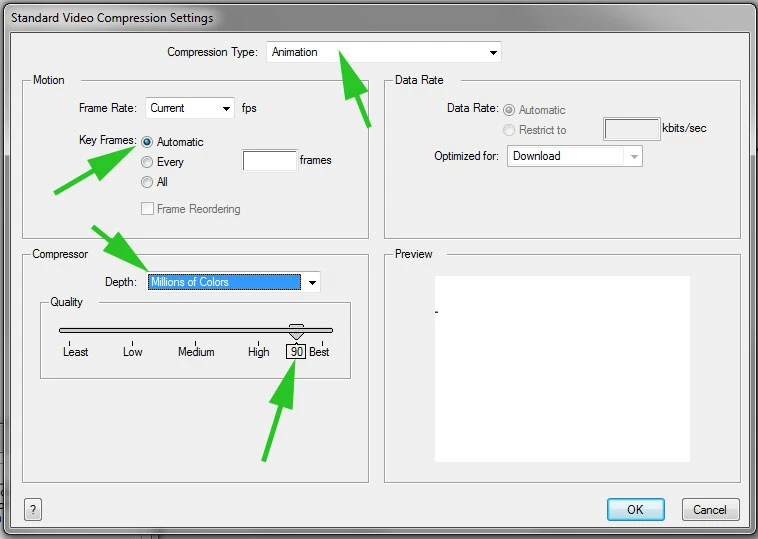
The important parts are pointed to. Choose the "Animation" codec which is lossless at full quality but still compresses slightly. I still set the quality down to 90. Make sure colors are set to "Millions of Colors" and not "Millions of Colors+". The + sign means encode an alpha channel so don't use that. Set keyframing to Automatic as it does a decent job. If it doesn't you can set that to keyframe every 1 second to be really aggressive but it adds to file size.
Click OK.
You return back to Settings but notice the size of the video is wrong.
Click the size button, you get this dialog:
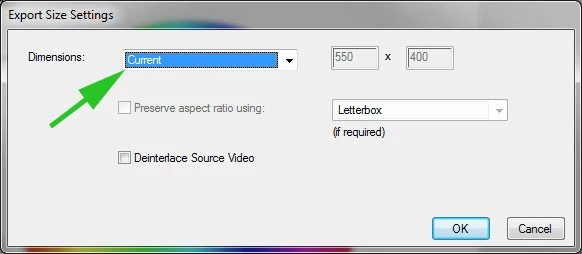
Change it to "Current" and you'll see the document size is your Flash document size.
Now after you press OK you won't see this take effect immediately, it may still say the wrong size, but it did work. To verify simply hit the OK button on Settings, then re-open QuickTime Settings again and it will say the correct size.
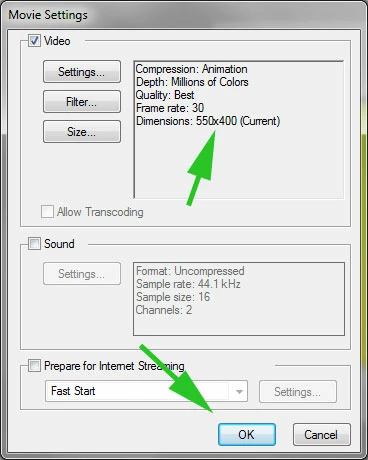
You're done with settings, click OK. Now you're on the first panel. Click the Export button.
After you're done with this you're going to want to take the .MOV file this generates (which should be great quality but a pretty big file size) and import it into your favorite encoder (Adobe Media Ecoder, Sorenson Squeeze, etc).
I'll use AME because you mentioned it.
Load Adobe Media Encoder (mine is CS5.5 yours may look different from what I'm describing). Import the video (click the [+] sign at the top next to Queue).
In the Format column hit the [\/] drop-down button and choose H.264.
In the Preset column you can click the drop-down and take a shot at the existing presets. If none really match up, close that drop-down and click the yellow link name of the preset it's currently on. That opens up settings for the preset.
The recipe for a good video differs video to video. On this part I can only tell you the basics. For sheer ease I'm going to suggest a 4.2 profile setting (you'll see in a minute) so you can access the most common settings used.
In the settings box, on the right:
Choose the "Multiplexer" tab and make sure it's set to "MP4". Stream Compatibility to "Standard".
Choose the "Video" tab. Look at the bottom of the Basic Video Settings and set the "Level" to 4.2. This is for basic full HD video but it also opens up a lot of otherwise locked options. At the top of that area set your videos resolution. Choose the proper frame rate below that. Set the "Pixel Aspect Ratio" to "Square Pixels". The "Profile" should be "Main". Bitrate settings is where you'll be playing most of the time. For under 1280x720 video I'd play around a minimum of 2Mbps and Max of 4Mbps. For 1280x720 mini HD I'd choose around min 3Mbps max 5Mbps. For full HD I'd probably choose 6Mbps min 10Mbps max.
If you have audio, choose the "Audio" tab. Typically for computer/net playback I'd set the "Frequency" to highly compatible "44.1Khz". The "Bitrate [kbps]" is up to you at this point. If high fidelity audio is pinnacle to the video then choose around 256-320. Otherwise It's somewhat difficult to tell the difference between 128-192. For anything on the web I never go over 128. The bitrate you set for a long video will greatly affect the overall file size. You may want to export a 128kbit version then a 320kbit version to see how huge the difference is.
Settings are done, get out of settings and click the play button to start the encoding queue.
Test your MP4 when it's done encoding and make changes as necessary. Too much "blockiness" and compression in the video? Increase the min/max Bitrate. Same with audio.
The good thing is you continue to have a high quality Quicktime source you can encode multiple times until you get the settings just right.

