• Global community
    • Language:
      • Deutsch
      • English
      • Español
      • Français
      • Português
  • 日本語コミュニティ
    Dedicated community for Japanese speakers
  • 한국 커뮤니티
    Dedicated community for Korean speakers
Exit
0

How to export specific frame ranges correctly with Adobe Animate?

Explorer ,
May 27, 2020 May 27, 2020

Copy link to clipboard

Copied

My animation is 5000 frames long.


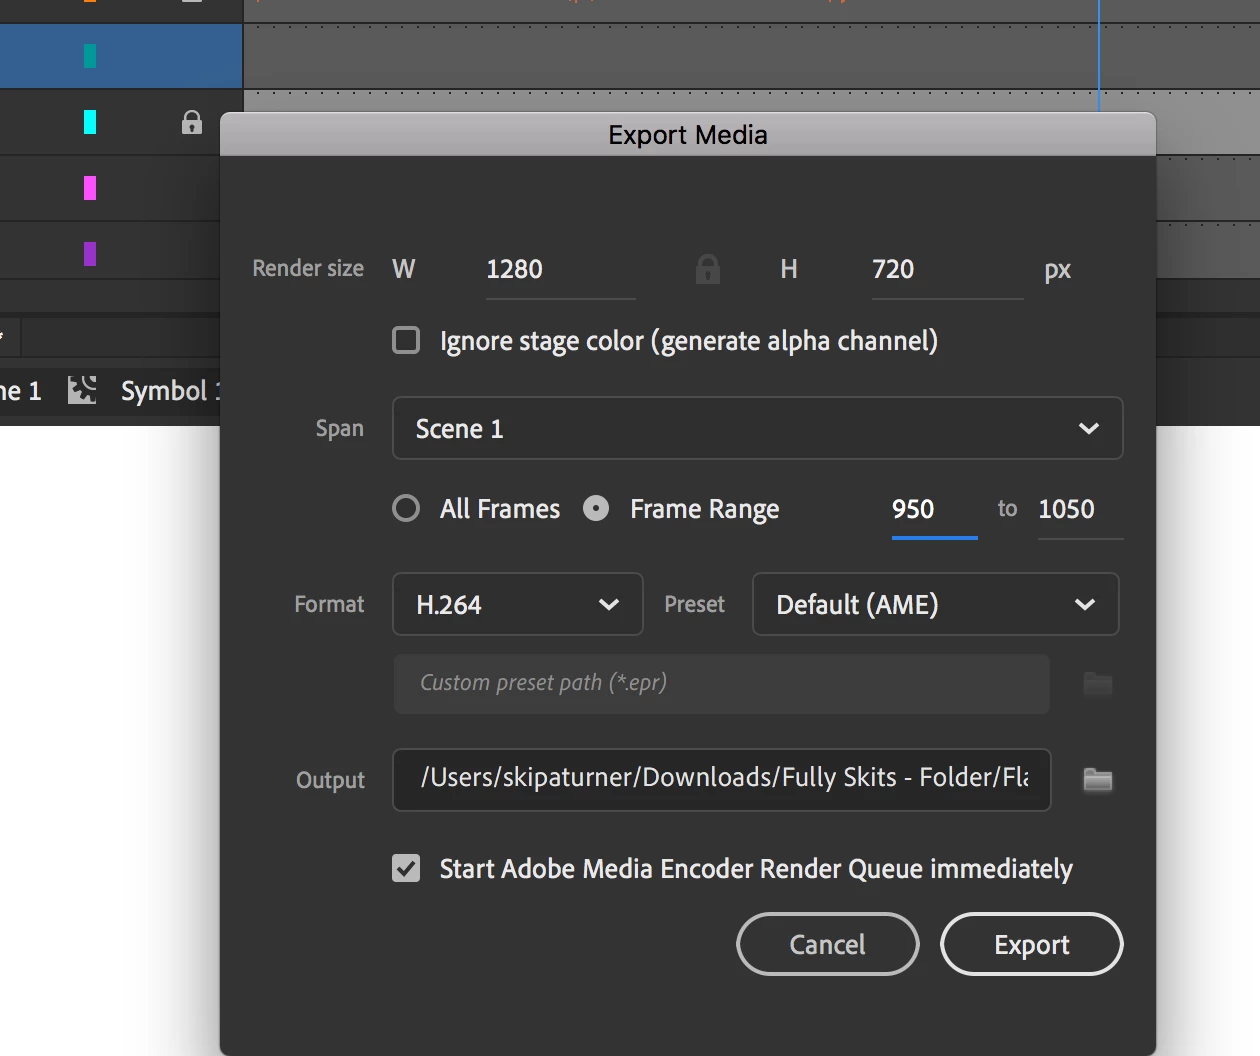
I am choosing to export frames 950 - 1050.


Screen Shot 2020-05-28 at 4.04.29 pm.png


After view the exporting video file, I can see it has exported frames 0 - 100.


Does anyone know why this is happening?


Any help would be greatly appreciated

TOPICS
How to , Import and export , Timeline

Views

6.3K

Translate

Translate

Report

Report
Community guidelines
Be kind and respectful, give credit to the original source of content, and search for duplicates before posting. Learn more
community guidelines

correct answers 1 Correct answer

Guru , May 28, 2020 May 28, 2020

Hi mate,


It was very late last night when I responded about the audio and missed completely the symbol issue.

What is that symbol? Is it a Movie Clip?

If so change the instance type to Graphic (you should do this for every keyframe in the Timeline) and looping setting to Loop. Let's hope that fixes the export.


(You should only use Movie Clips for interactive projects or if you have a good reason to. For animation all your symbols have to be Graphic.)
 

Votes

Translate

Translate
Guru ,
May 27, 2020 May 27, 2020

Copy link to clipboard

Copied

Hi mate,


Is it possible that you have a different range defined by the blue 'playback bar' at the top of Timeline?

It's supposed to define the video export range also.

Clipboard-1.png

Try to define your range with the bar and see if that works better.

Or at least check to make sure it is not interfering with your numeric input.

All these are new functions and may be full of undocumented bugs.


Also, make sure you choose export when on the main timeline.


Nick - Character Designer and Animator, Flash user since 1998
Member of the Flanimate Power Tools team - extensions for character animation

Votes

Translate

Translate

Report

Report
Community guidelines
Be kind and respectful, give credit to the original source of content, and search for duplicates before posting. Learn more
community guidelines
Explorer ,
May 28, 2020 May 28, 2020

Copy link to clipboard

Copied

Hey there thanks for responding,


Actually I did not have play back turned on (or any blue bar above in the timeline), I will try that let you know if it works

Votes

Translate

Translate

Report

Report
Community guidelines
Be kind and respectful, give credit to the original source of content, and search for duplicates before posting. Learn more
community guidelines
Explorer ,
May 28, 2020 May 28, 2020

Copy link to clipboard

Copied

Ok so it didn't work but Im getting somewhere.


This is my timeline below:


Screen Shot 2020-05-28 at 7.18.46 pm.png


Now this time AUTOMATICALLY, when I went to export the frames where selected, based on the playback section i had created. Which was 950 - 1350


After reviewing the export, the camera layer was correct, exported from 950 - 1350.


However the audio layer seems to have exported from 0 onwards, and the animations contained in the layer_7 symbol also starts from 0.


Maybe thats a clue for what is gonig wrong?

Votes

Translate

Translate

Report

Report
Community guidelines
Be kind and respectful, give credit to the original source of content, and search for duplicates before posting. Learn more
community guidelines
Guru ,
May 28, 2020 May 28, 2020

Copy link to clipboard

Copied

Hi mate,


Just right-click the audio layer and choose 'split audio' at the first frame of the export range.

Export and then undo the split.


Hope this helps!


Nick - Character Designer and Animator, Flash user since 1998
Member of the Flanimate Power Tools team - extensions for character animation

Votes

Translate

Translate

Report

Report
Community guidelines
Be kind and respectful, give credit to the original source of content, and search for duplicates before posting. Learn more
community guidelines
Explorer ,
May 28, 2020 May 28, 2020

Copy link to clipboard

Copied

Hi there,


It sorted out the audio issue, but still the animation layer still starts from from 0 in the export.


The camera layer exports correctly, but not the aniamtion layer..


I tried converting my animation layer into a motion tween to see if that change anything, but it didn't.


Any other suggestions?

Votes

Translate

Translate

Report

Report
Community guidelines
Be kind and respectful, give credit to the original source of content, and search for duplicates before posting. Learn more
community guidelines
Guru ,
May 28, 2020 May 28, 2020

Copy link to clipboard

Copied

Hi mate,


It was very late last night when I responded about the audio and missed completely the symbol issue.

What is that symbol? Is it a Movie Clip?

If so change the instance type to Graphic (you should do this for every keyframe in the Timeline) and looping setting to Loop. Let's hope that fixes the export.


(You should only use Movie Clips for interactive projects or if you have a good reason to. For animation all your symbols have to be Graphic.)


Nick - Character Designer and Animator, Flash user since 1998
Member of the Flanimate Power Tools team - extensions for character animation

Votes

Translate

Translate

Report

Report
Community guidelines
Be kind and respectful, give credit to the original source of content, and search for duplicates before posting. Learn more
community guidelines
Explorer ,
May 28, 2020 May 28, 2020

Copy link to clipboard

Copied

Thanks again for help me and replying so quickly.


The layers/symbols inside the main overall animation start correctly from frame 950 in the export, which is great. But the animations/layers contained within those sybols/layers start from 0.


So now I went through and converted every movie layer inside the main layer into a graphic layer with loop turned on.


Took a bit of time but it worked, thanks for assiting there. 


Votes

Translate

Translate

Report

Report
Community guidelines
Be kind and respectful, give credit to the original source of content, and search for duplicates before posting. Learn more
community guidelines
Guru ,
May 28, 2020 May 28, 2020

Copy link to clipboard

Copied

Glad you got it sorted out, mate!


There is a lot of confusion created by adobe themselves, producing and releasing tutorial material where they show Movie Clips used in non-interactive animation. They are not meant for that. Movie Clips exist to be controlled by code.


For animation one should only use Graphic symbols. They allow you to control their playback and all timelines are synced and will be properly exported.


Good luck!


Nick - Character Designer and Animator, Flash user since 1998
Member of the Flanimate Power Tools team - extensions for character animation

Votes

Translate

Translate

Report

Report
Community guidelines
Be kind and respectful, give credit to the original source of content, and search for duplicates before posting. Learn more
community guidelines
Explorer ,
May 28, 2020 May 28, 2020

Copy link to clipboard

Copied

Hey, back again.


It seems that changing the layers to graphic symbols has greatly slowed down my abiltiy to operate my Adobe Animate project. For example I am waiting about 5-15min for an 'insert keyframe'.


I've tried restarting, clearing space etc, and it is not helping. 


I am using a macbook pro, so I assume my computer may not be fast enough to process this. I tried upgr


Any work arounds that you know of that would help with this? Or maybe I need to get a computer with better processing abilities.

Votes

Translate

Translate

Report

Report
Community guidelines
Be kind and respectful, give credit to the original source of content, and search for duplicates before posting. Learn more
community guidelines
Guru ,
May 28, 2020 May 28, 2020

Copy link to clipboard

Copied

This is the most unusual thing I've heard recently.


Are you using a lot of filters or special effects?


I am not a mac user, so I will refrain from giving any specific advice here.


I'll only say that what you describe is not normal.


Please, make sure you save multiple versions of your file and have backups in case you get a crash or file corruption.

Do some experimentation with small new files to try and find out what may be causing this unusual behaviour.


Animate's performance in recent years has not been great, but what you describe is quite extreme.

It is possible to get slow-down if you have hundreds of containers that hold a common symbol nested in them and so on... Try to see if you can determine what in your file structure might be causing it.


Unfortunately without having the actual file to inspect, I don't think I would be able to help with this further.


Nick - Character Designer and Animator, Flash user since 1998
Member of the Flanimate Power Tools team - extensions for character animation

Votes

Translate

Translate

Report

Report
Community guidelines
Be kind and respectful, give credit to the original source of content, and search for duplicates before posting. Learn more
community guidelines
Explorer ,
May 28, 2020 May 28, 2020

Copy link to clipboard

Copied

No special effects, but it is a big file, the file itself in 240mb, and the symbols I use are complex in that the have multiple layers for lips, eyes, moving arms etc.


For now I have found a solution, in that I am going to break down my flash file into 4 seperate files, by going through and removing all frames before and after the segments I need for each part. Atleast this way I can still operate the flash file.


Just one more question if thats ok, is there a quicker way to select all frames from 0 - 1000 for example, instead of click hold and dragging?


Thanks very much for helping me through this really appreciate it


Votes

Translate

Translate

Report

Report
Community guidelines
Be kind and respectful, give credit to the original source of content, and search for duplicates before posting. Learn more
community guidelines
Guru ,
May 28, 2020 May 28, 2020

Copy link to clipboard

Copied

LATEST

Hi mate,


You are most welcome!


You can select frame blocks by clicking on the top-left ot bottom-left frame in the block and then using the scroll bar at the bottom of the timeline go to your desired frame number, hold down Shift and click on the opposite frame that defines the rectangulat block selection. There is still some scrolling involved, but it will not be slow and laggy.


As a final note: Over the years I have written a few articles on character rigging and file structure for character animation. I don't know if they would be of interest, but they may hold some useful information.

You can have a look here, here and here.


All the best!


Nick - Character Designer and Animator, Flash user since 1998
Member of the Flanimate Power Tools team - extensions for character animation

Votes

Translate

Translate

Report

Report
Community guidelines
Be kind and respectful, give credit to the original source of content, and search for duplicates before posting. Learn more
community guidelines