• Global community
    • Language:
      • Deutsch
      • English
      • Español
      • Français
      • Português
  • 日本語コミュニティ
    Dedicated community for Japanese speakers
  • 한국 커뮤니티
    Dedicated community for Korean speakers
Exit
0

Arm warping at the shoulder when moving it around

Explorer ,
Aug 31, 2020 Aug 31, 2020

Copy link to clipboard

Copied

contentcreator30_1-1598903802969.png 

contentcreator30_2-1598904037236.png


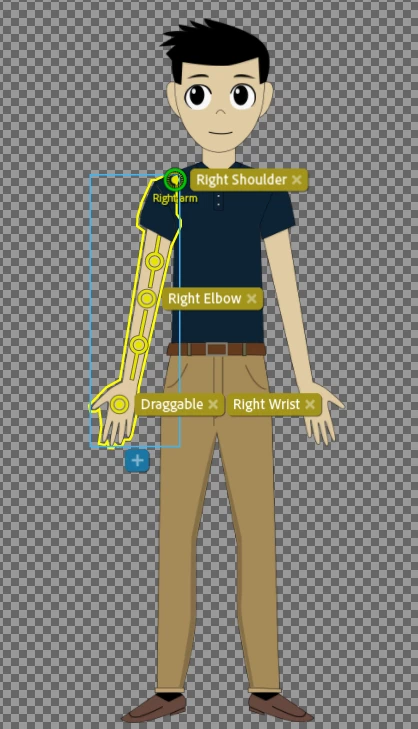
For some reason my shoulder gets warped like the picture above illustrates whenever I try to move the arm around. I have tried placing the pivot point in several different locations but the problem persists. I don't know what the issue is. The arms are fine at rest and move ok up to around 30-45 degrees and then start warping as I move upwards. Does anyone have any ideas?

TOPICS
Bugs , Puppet movement , Rigging

Views

539

Translate

Translate

Report

Report
Community guidelines
Be kind and respectful, give credit to the original source of content, and search for duplicates before posting. Learn more
community guidelines
LEGEND ,
Aug 31, 2020 Aug 31, 2020

Copy link to clipboard

Copied

What is the "Attach To" property of the arm layer? My bet is it is "weld". Try "Hinge" to see if it works better.


My explanation is like this. Imaging cutting out the two meshes in a thin sheet of rubber. It flexes a bit. Then overlap at the shoulder like you have. If you put a big dob of superglue on the joint, then the top part of the arm will not move relative to the body. So where will it flex? At the skinny part of the arm just below it.


Hinge is like sticking a thin pin through the arm - it will rotate at the joint. Great you may think! Well, your arm artwork does not overlap the body much, so when it rotates you are going to see the funny shape at the top of the arm. So I think you want Hinge, but I also think you will need to tweak the arm artwork so its a constant width all the way up into the shoulder, with a semi-circle on the end. Then pick the anchor point carefully so the arm looks good when rotating.

Votes

Translate

Translate

Report

Report
Community guidelines
Be kind and respectful, give credit to the original source of content, and search for duplicates before posting. Learn more
community guidelines
Explorer ,
Aug 31, 2020 Aug 31, 2020

Copy link to clipboard

Copied

Bingo! That did the trick thanks!


But now I have another issue like you outlined with the arm not covering the entire body when it moves.


contentcreator30_0-1598917669616.png


I'm not sure how to tweak the artwork so that it covers the entire body and doesn't have that gap. I made a new edit to the right on as you can see, but there's a huge gap when it gets raised. 


Votes

Translate

Translate

Report

Report
Community guidelines
Be kind and respectful, give credit to the original source of content, and search for duplicates before posting. Learn more
community guidelines
LEGEND ,
Aug 31, 2020 Aug 31, 2020

Copy link to clipboard

Copied

Imagine drawing a circle at the end of the arm (same width as the arm). Put the green "origin handle" in the middle of that circle, not right at the top edge of the shoulder. The green circle is where it is going to rotate around.


Why a circle and not a square at the end of the arm? So you don't get corners sticking out further which might be visible when the arm rotates around the joint. If its a circle and the origin is in the middle, you are guaranteed not to get any extra bits sticking out.


Imagine creating a paper puppet - cutting bits of paper out with scissors. You want the pin in just the right spot (the middle of the arm socket) to look natural. (It wont be perfect, but you can get it better.)


Sometimes I draw a circle at the shoulder on the puppet main body as well (so a half-circle extends beyond the torso) to help connect arms to the body. I don't think you will need it in this case.

Votes

Translate

Translate

Report

Report
Community guidelines
Be kind and respectful, give credit to the original source of content, and search for duplicates before posting. Learn more
community guidelines
Explorer ,
Aug 31, 2020 Aug 31, 2020

Copy link to clipboard

Copied

Thank you I've modified it and now it looks normal. 


contentcreator30_1-1598931420895.png


However I would like to put the arms in front of the body rather than the back but there is outline on the body where the arm attaches. Is it there a way to get out of that outline semi-circle line while keeping it for the outside of the arms and hands? Also the shoulders stick out if the arms are not in a specific position. I'm assuming this means that I would need to modify the design so that the shoulders are more rounded?


contentcreator30_0-1598931273038.png


Votes

Translate

Translate

Report

Report
Community guidelines
Be kind and respectful, give credit to the original source of content, and search for duplicates before posting. Learn more
community guidelines
LEGEND ,
Aug 31, 2020 Aug 31, 2020

Copy link to clipboard

Copied

LATEST

Yeah, it gets a bit tricky with outlines. Here are a few different things that can be tried, but it does take a bit of experimentation.


Idea #1: try using arms that are NOT independent. Draw the arms in a T position (arms going directly out sideways, or down a little. Use sticks on the edge of the body up to the top of the shoulder, so it spans across where the arm joins the body. The idea is to use a stick to stop the warping of the body when the arm moves. The outline then sticks with the arm artwork. I have got okay results with this, but not always. You will need to group the artwork properly so the hand group is in front of the lower arm group, which is in front of the upper arm group, which is in front of the torso group. That is, use groups for the different sections even though they are not independent. This is so when the arm goes in front of the body, the artwork of the hands will go in front. Otherwise you get strange effects like the outline goes in front of the body and the arm fill goes behind! Funky.


Another approach - create a color patch the same color of the clothes. Make this independent and put it in front of the arms. So you have torso at the back, the arms in front of that, then the color patch on top. Attach the color patch to the torso near the shoulder. The purpose of this patch is to hide the outline of the arm in front of the shoulder, so you need to put the patch right up to the edge of the torso (just inside the outline). That is, the arm still has an outline, but it is hidden by the patch. You want the patch as small as possible because if you move the arm it will go behind the patch (reaching up to the face for example might not work). This works when clothes are a solid color, but fails if the clothes have a pattern.


Another approach is to create the arm in two segments. The upper arm is at the rear, the torso in front, then the lower arm in front of that but attached to the end of the upper arm (at the elbow). The problem with this approach is you need a dragger on the elbow. in addition to the dragger on the wrist. Makes the puppet harder to use. I have used this approach, but don't like it much.


A frequently used approach is to have a swap set with two sets of arms, one behind the body and one in front. You might use Weld for the arm in front of the body so the outline stays in place, and hinge for freer moving arms behind the body. The idea basically is if it is too hard to get one arm to do all the desired movements, use a swapset to reveal a different arm intended for a different set of specific movements. Then each set of the artwork only has to solve a smaller range of arm movements.


Another approach which sometimes works is to not draw the outline of the arm clothes near the top of the arm. If it is a solid color where it overlaps the body, you wont notice a problem. (It might be there, but most people won't look for it.) This does not always work - depends how far you want the arms to move.


Oh, of course look at what the sample puppets do of course. See how they solve the problem.


Oh, regarding the bit on the shoulder sticking out, basically what you have to do is draw a circle representing the shoulder joint, make sure the outline artwork meets it at the right point, and get the shoulder pinned on at exactly the right point so moving the arm comes out right. I think you see the bit sticking out on the right because the pivot point is a little bit too far into the body.


In other words... yes, it is hard to get artwork with an outline to work well. I personally avoid independent arms and use sticks. Then if I really need to do more, I use a swapset for a second set of arms. But it depends on what the puppet is trying to do.

Votes

Translate

Translate

Report

Report
Community guidelines
Be kind and respectful, give credit to the original source of content, and search for duplicates before posting. Learn more
community guidelines