

- Home
- Illustrator
- Discussions
- Re: Blend Tool Unexpected Behavior--again.
- Re: Blend Tool Unexpected Behavior--again.
Blend Tool Unexpected Behavior--again.

Copy link to clipboard
Copied
I want to roughly simulate the perspective in hand tracing a photo. So I draw a simple rectangle and skew it slightly then modify to of it's endpoints to simulate the plane I want to create.
The bricks that I am simulating are crazily laid and terribly inconsistent in both size and material, but that doesn't matter. I am drawing a simple diagram for a pond and this is totally not critical. Being able to get Illustrator to operate the way I expect it to, however, is.
I take the first "brick" shape and ctrl-drag it to the end of the wall where the bricks end.
Using the scale tool, I scale the shape down to roughly match the bricks at the end fo the wall.
See Figure A.
 FIGURE A - BEFORE BLEND
Next, I modify the shape just a little to get the perspective closer by dragging two points.
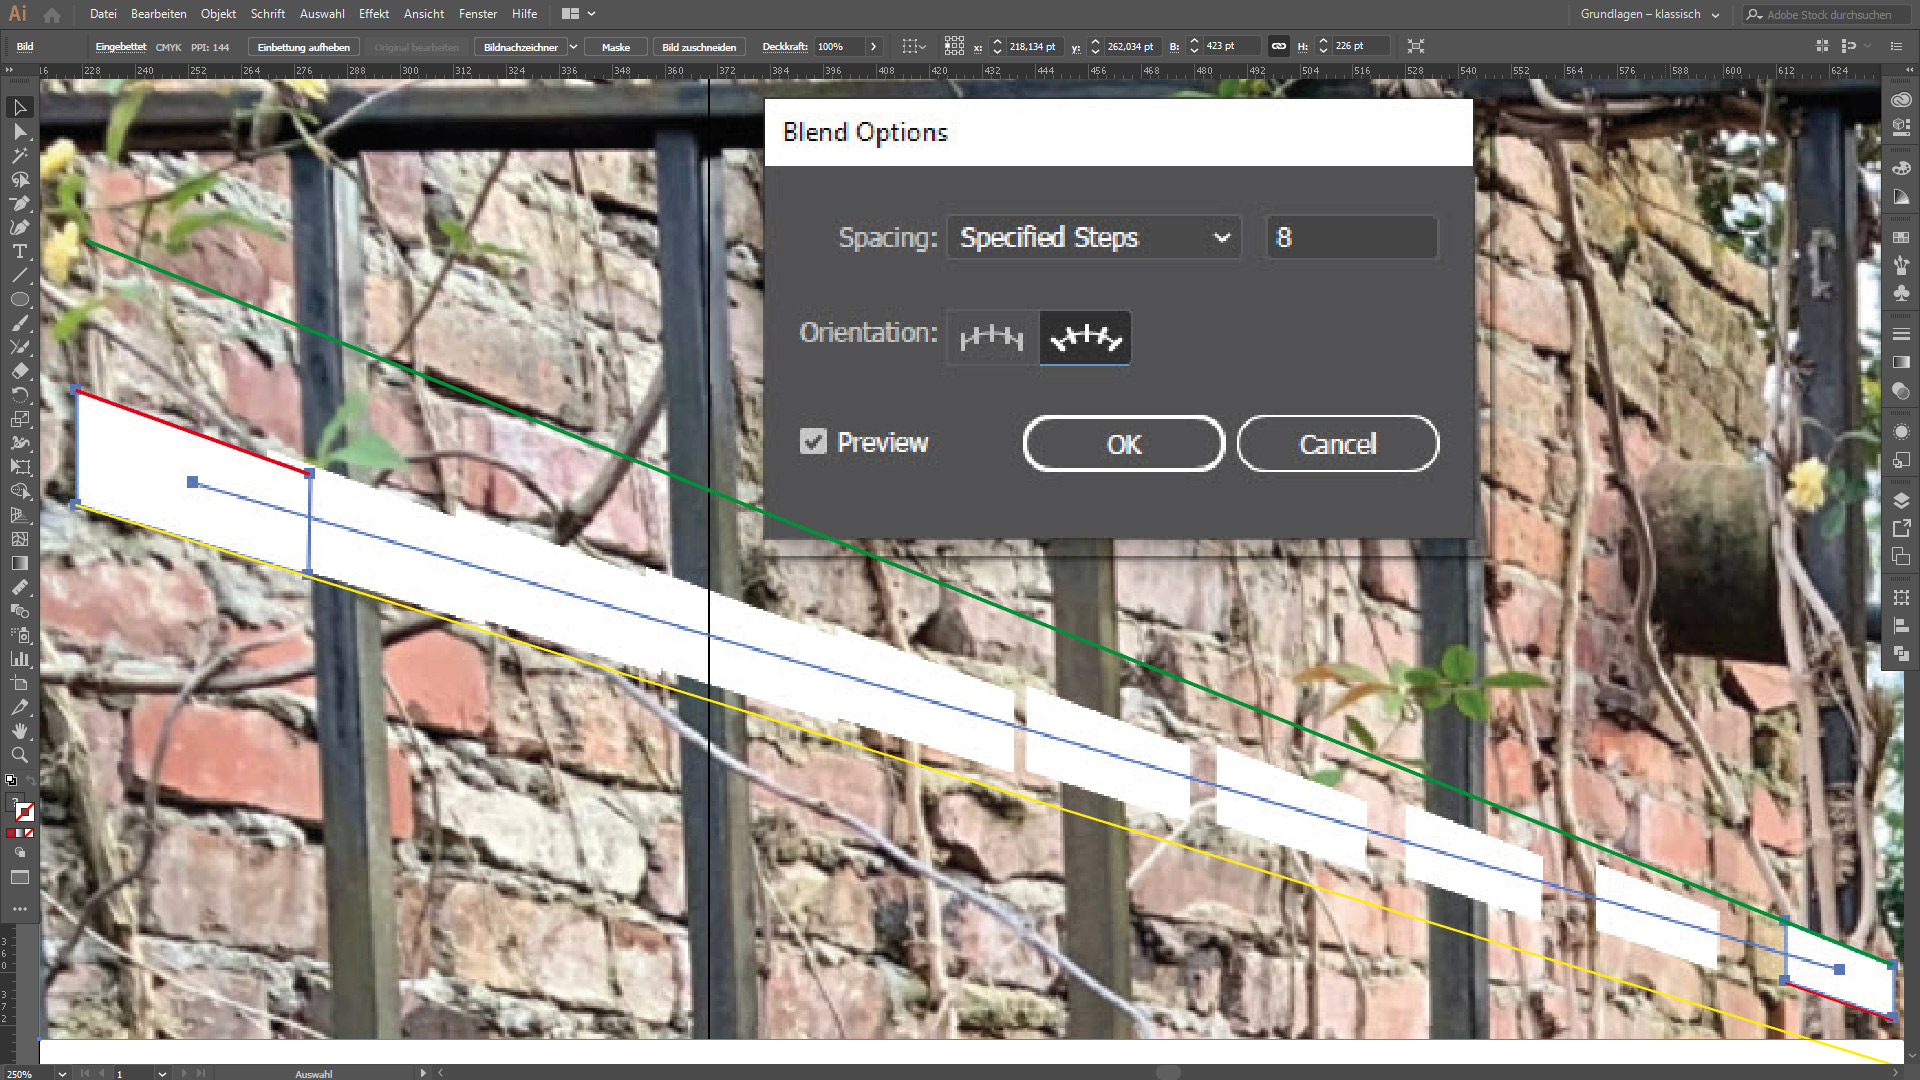
I then select the Blend Tool and blend from one shape to the other.
I don't want continuous color, but rather I want to pick the specificed steps to roughly match the number of bricks in the photo. I realize that I don't want to do the space between because the second shape is smaller so the space between will vary.

FIGURE B - Oriented Blend between specified steps.
Figure B shows the crazy distribution of the shapes if I select the second orientatiopn. In this figure, the new "bricks" are blended from one to the other and the shape transition is done correctlly, but they are not in any way distributed with any logic. So I try the other orientation.

FIGURE C - Straight Orientation Blend specified steps
FIgure C shows my biggest pet peeve and what I STILL CONSIDER to be a definite error in the blend tool. It modifies my starting and ending points and then incorrectly blends between the two showing inproper distribution. It DID NOT blend from my first shape to the second shape, it modified my first AND second shape and blended the modified shapes. Then rather than distribute the space between them, it bunched them up at the beginning. This is a problem and I just don't understand how anyone can say it's not. Who wants Illustrator to modify their blend endpoints? In what situation could this be useful?
Regardless, could someone tell me why this strange behavior (Figure B) is happening and what I can do to remedy the situation in the future? I would simply like to blend from one shape to another along a path with uniform distribution between the sames. If I modify the path, I can use the handles on the endpoints to modify the distribution and orientation, but I won't be able to get a mathematically accurate distribution of space along the line without a new script or a tool that does what the blend tool should do.
I have found that every time I report something like this as a bug that the developers return and say that is expected behavior--not a bug. My problem is that when I want to do precise design where I am concerned about pixel position, how can you predict anything that the blend tool does? The Devs would be wise to have a customer-participation exercise where they present a bunch of tools to do different things and explain what the tools are supposed to do, then see what the expected results are. Because I would be shocked if anyone could accurately predict both of these peculiar behaviors for the blend tool.


Explore related tutorials & articles
 13
Replies
13
13
Replies
13

Copy link to clipboard
Copied
Why don't you just blend rectangles and then use the perspective grip to make them perspective? Or the 3D effect?

Copy link to clipboard
Copied
+1
And the blend is correct and logical
(draw lines)
(make blends)

Copy link to clipboard
Copied
Thanks for your reply. I have never been able to understand the perspective grid. I have tried a dozen times to get it to work and it is not within my skillset to even grasp how it works. I've been using illustrator since Illustrator 88 and the perspective grid has never worked for me. After an hour or four of trying to make sense of it, I can't even delete the peculiar guides that now take up my entire document. I literally select all, copy and paste into a blank document.
If there was ever a function of illustrator that SCREAMS "plugin" this perspective garbage is it. This should not be a core feature, it should be perhaps a standard plugin or something--but not a core feature. When perspective is critical, I do my work in Sketchup, Cinema4D, Rhino, Blender, or literally any other program with a 3D interface.
Copy link to clipboard
Copied
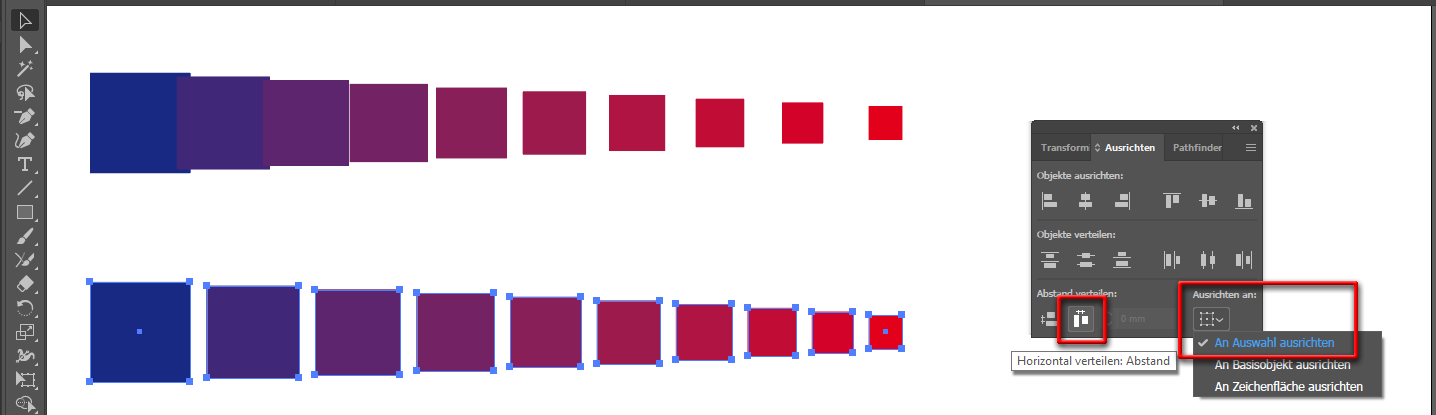
Easy going (three steps):
- Object --> Blend --> Release
- Ungroup
- Align (by selection; space between)
Copy link to clipboard
Copied
Honestly, life would be simple if I had just thought of that.
No, but seriously, you can't take my example, which shows the simplest possible demonstration of the problem and think that deriving a simplesolution like that is sufficient.
The space should be evenly distributed along the distribution path. Here is a better example of why the BLEND tool should do it rather than engineering a way around it. I should be able to make a sun with triangles that go from big to little for my kid to color. It should take about 30 seconds.
This is what happens when you use the blend tool to do it:

if the blend tool distributed space evenly around the blend path, this would look 1 million times better. But they don't distribute the space. They blend the space around the smaller image with the smaller image as though that's what you wanted. It's not. There should be even amounts of space between iterated objects. period.
And just another point, you can't drag the handlebars to distribute the space here. You have to expand the shapes and manually place them yourself. It sure would be nice if I could blend them and distirbute the space along the blend path like you'd expect the blend tool to do.
Copy link to clipboard
Copied
https://forums.adobe.com/people/Whirled+Creative schrieb
Thanks for your reply. I have never been able to understand the perspective grid.
The most important part of understanding it is: it's not 3D.
The function would be ideal for your wall and I wouldn't even think of using blends instead. Even if they had decent means of control and would work properly.
Copy link to clipboard
Copied
As pixxxel schubser says, the distribution is logical, by centers:

If you select the endpoints (one at a time) of the blend's spine and convert them to smooth points, you can adjust the handles to change the distribution.

Peter
Copy link to clipboard
Copied
Thank you for your explanation. I cannot imagine anyone on the planet that would say that the shapes blended between to differently sized objects are distributed linearly if the space between the iterations is not uniform.
What Illustrator is doing by using the center point for the distribution is basically drawing a boundary around the biggest shape and applying that boundary to the smallest shape. Then blending between boundaries. This makes more sense then because there is a lot of space around the small shape.
But if I had wanted a lot of space around the small shape, I would have enclosed it in a bigger shape that would preserve the space.
What I want and expect is that if I blend from one shape to another over 5 steps, the space should be identical between each iteration to blend correctly. Right now, the space between the last two elements is significantly bigger than the space between the first two.
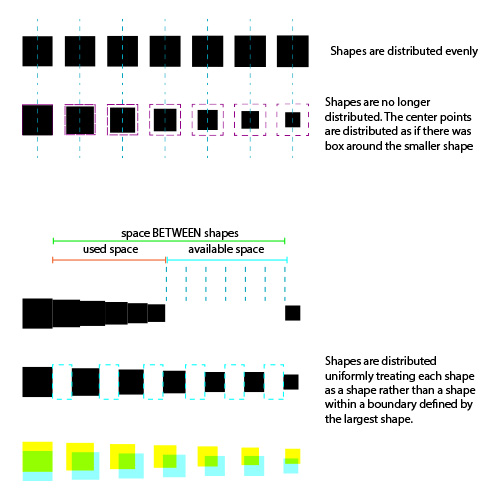
Hopefully this will make more sense:
Row 1 shows how identical shapes are spaced evenly and blended linearly
Row 2 shows the DEFAULT behavior of the blend tool--which shows uneven space between iterations UNLESS you enclose the smaller shape in a box as big as the largest shape and then blend the space as well as the shape (red dotted lines)
Row 3 shows the resultant shapes lined up with no space between them and the resultant available space to be distributed (NOT BLENDED AS THOUGH IT WERE PART OF THE SMALLER SHAPE)
Row 4 shows the even or linear distribution of space between shapes blending from one to the other.
Row 5 shows the two different methods overlapped to see the difference.
Regardless, I do appreciate your explanation. From my perspective it seemed like a total crapshoot. Now at least I see where the problem is.
I still think the blend tool is a mess and needs to be fixed for this and multiple other reasons, but at least I understand it a little better now. Thank you.
Copy link to clipboard
Copied
What would really be ideal is if the blend tool operated like this:
Instead of using the handles to change the distribution pattern, keep the handles associated with the shape of the path--not the distribution of the shapes. Then, yoiu would have something like the gradient tool handlebars to establish distribution of the shapes. So if you wanted them distributed evenly along the blend path, you could grab round anchors along the path to fine tune them like you would with the various points on a gradient curve.
Then you could have several different distribution curves as defaults that would distribute the space between the objects along the blend path. One could be "distribute by center" which would be the same as "distribute as if you wanted extra space around one of the endpoints", another could be "linear" and "equal/consistent" space between shapes. Another could be "exponential" distribution where the shapes would be bunched up and overlapping on one end, but then spaced way out on the other.
This would make the most sense.
Copy link to clipboard
Copied
Post your wish on Adobe Illustrator Feedback
(Knowledge Base – Adobe Illustrator Feedback )
Adobe staff members will read this site.

Copy link to clipboard
Copied
Whirled Creative,
Just to throw another spanner into the cogwheel,
I take the first "brick" shape and ctrl-drag it to the end of the wall where the bricks end.
Using the scale tool, I scale the shape down to roughly match the bricks at the end fo the wall.
The shape of the last brick is fundamentally different from that of the first brick because it is seen more along the wall including at a different angle; that is part of the perspective aspect of the matter; you can also see it by the misfit between the first two bricks in the blend.
If you wish to retain the wavy laying of bricks, you need to proceed in one of multiple possible quite different ways.
A simple one may be to create the first brick from its known dimensions (as seen perpendicular to the wall) make a copy to be the last, then blend including the perpends (mortar/gaps) (and later the beds for multiple courses); probably it is preferable to Expand the blend. After that you can Create a shaping path with the Pen Tool that follows the course with vertical ends and slightly wavy sides drawn on top of the image (or you can straighten out and just create a quadrilateral. Lastly you can select both the (expanded) blend and the shaping path and use Object>Envelope Distort>Make with Top Object.
Copy link to clipboard
Copied
Thanks for taking the time to reply and to suggest other ways of accomplishing the task at hand.
I would like to clarify my position here so you know. I wasn't tasked with doing this at all. It was something I thought I would whip up quickly to provide a general idea of what was happening with this pond. So, it's not that I couldn't find better ways to do it and in fact I did find a better way to do it.
The reason I posted this topic was that in absent-mindedly just grabbing some tools to do a quick semblance of a wall, i realized that I could not, for the life of me, figure out why this tool was behaving the way that it was. In fact, every time I grab this tool I can rest assured that I will never be able to accurately predict the results on first go round. In fact, I would be surprised if many people could accurately predict the way this tool works in advance given two shapes and a designated blend path.
You are kind and generous to offer alternative means of accomplishing something similar, but in the end I sampled the bricks adjusting for perspective in Photoshop and saved the bricks as a material then rendered the entire thing in Cinema 4D in no time at all.
And thanks to the other generous folks on this thread, I learned a thing or two about the blend tool regardless of the fact that it hasn't changed my mind about the default behavior being in error.
RANT: It's just not an error that is important enough for management to prioritize fixing it over inroducing some fancy new feature that less than a dozen people will ever use but gives the illusion of added value to justify the monthly charge for the software. Rather than focus on fixing some of the basics (which only serves to underscore the current problems rather than promote increased value), it is management's decision that we need to be able to add some new feature that really should be a plugin: 3D video editing in Illustrator--coming soon!
Copy link to clipboard
Copied
For my part you are welcome, Whirled Creative.

Find more inspiration, events, and resources on the new Adobe Community
Explore Now
 AdChoices