

- Home
- Illustrator
- Discussions
- Re: Closing the gaps between 2 shapes
- Re: Closing the gaps between 2 shapes

Copy link to clipboard
Copied
HI All,
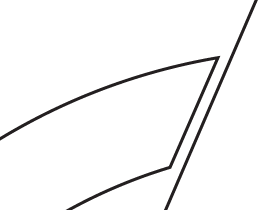
What is the neatest way to close the gap between 2 shapes and removing the path inbetween? I am trying to close this gap below to form a complete compound shape. I tried dragging the shape next to the path and unite but failed. Plus the paths inbetween still exists.


 1 Correct answer

In that special case:
- At first close the path.
- give a fill color and remove stroke color
- use Offset path to close the gaps.
- pathfinder unit
- offset path (with the same value, but negative)
- restore fill and stroke
The result is your logo with closed gaps. Remove the other resulting elements.
Have fun

Explore related tutorials & articles
 12
Replies
12
12
Replies
12

Copy link to clipboard
Copied
Can you please show some context of those lines?
Also: what did not work? Was snapping turned on?
Copy link to clipboard
Copied
Snapping was on.
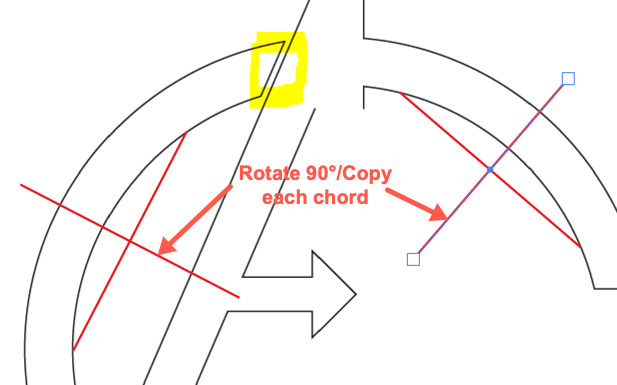
The full object is shown below. I was trying to merge the yellow area.

Copy link to clipboard
Copied


Peter

Copy link to clipboard
Copied
Ken,
Please forget my suggestion in post #3: with the exquisite chord creation/rotation to create the centre Peter has shown the (possible) way(s) of doing it accurately (I believe it may be possible to select (Alt/OptionClick with the Direct Selection Tool) the leftmost path and rotate a copy of it by the centre a bit more than enough to cover (up) the gap, then Pathfinder>Unite).

Copy link to clipboard
Copied
Can you zoom out and show a screen shot of both elements in the entirety?
Otherwise from the minimal parts we are seeing, I would use the pen tool and draw four points to create a slightly overlapping shape that connects both of the left and right shapes, and then use the unite pathfinder option to connect all 3 shapes together.
Copy link to clipboard
Copied
Ken,
Presuming you wish to keep the right straight segment in its current place and stretch the left object, in addition (or alternative) to the exquisite suggestion by Megan, you may, after deselecting, Smart Guides being your friends:
1) With the Direct Selection Tool Click the upper corner Anchor Point to also reveal the Handle pointing left, then with the Line Segment Tool ClickDrag from the Handle into the Anchor Point to create a helpline, then ClickDrag it by its leftmost end to snap to the Anchor Point and intersect the straight segment, then with the Scissors Tool Click at the intersection (or go a wee bit further) and delete the rightmost part;
2) Depending on preference:
2A) Copy the helpline and move it to snap to the lower end Anchor Point, then Join the two to form the overlapping shape;
2B) After deselecting, ShiftClick both end Anchor Points of the left object, then ClickDrag the upper one to snap to the end of the helpline at the intersection, which hopefully brings the lower Anchor Point at least to reach the straight segment;
3) Select all/both paths and Pathfinder>Unite.
The slight difference between the two ways is between stretching of curved segments and small straight end bits.

Copy link to clipboard
Copied
Are you trying to do this so you can use Live Paint or ?
I tend to cheat and create invisible lines sometimes with no fill.
So I have the original line art in black or color or whatever. I make sure everything is expanded. Then I create a copy of the expanded artwork in a new layer... I then draw in new lines to close shapes. I expand those as well in that layer. Then I turn that layer completely invisible with no fills and no strokes. Then I make it Live Paint... and bam I do whatever I want. So then it looks like the black lines are not closed in the final piece. 
Copy link to clipboard
Copied
In that special case:
- At first close the path.
- give a fill color and remove stroke color
- use Offset path to close the gaps.
- pathfinder unit
- offset path (with the same value, but negative)
- restore fill and stroke
The result is your logo with closed gaps. Remove the other resulting elements.
Have fun

Copy link to clipboard
Copied
Another exquisite way, Hans-Jürgen
Copy link to clipboard
Copied
Let us see if the TO gives a feedback
Copy link to clipboard
Copied
Maybe it is too late, Hans-Jürgen, and we shall never know.

Copy link to clipboard
Copied
Did you try to use Shape Builders?

Find more inspiration, events, and resources on the new Adobe Community
Explore Now
 AdChoices