- Home
- Illustrator
- Discussions
- Re: create 3D object with line graphic 360 degree
- Re: create 3D object with line graphic 360 degree
Copy link to clipboard
Copied
how to make 3D object with line graphic, arround to the 3D object about 360 degree without space
 1 Correct answer
If you want a clean result do not use stickers in the materials. They get distorted.
Make the objects like in the screenshot below (make sure the stroke is not too thin, because strokes and 3D also do not always work well. Then group those parts, then apply 3D
Explore related tutorials & articles
Copy link to clipboard
Copied
You want to know how to create this pill?
Draw one half of it and then use Effect > 3D & materials > Revolve
https://helpx.adobe.com/illustrator/using/create-3d-graphics.html
Copy link to clipboard
Copied
See monika's answer, for making the pill, see my screenshot below (in blue you'll see the original shape, and the yellow pill is the result once the revove have been applied)
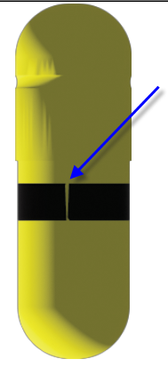
Regarding appliying the black band around the pill without any gap:
use the graphics tab on the material and graphics section.
Note that it will always leave a gap, but you can resolve that by copying your material and place it exactly where the gap is. (CTRL+F)
The gap is now covered. It's a hack, I don't know why there is always this gap by default
Copy link to clipboard
Copied
If you want a clean result do not use stickers in the materials. They get distorted.
Make the objects like in the screenshot below (make sure the stroke is not too thin, because strokes and 3D also do not always work well. Then group those parts, then apply 3D
Find more inspiration, events, and resources on the new Adobe Community
Explore Now


