Copy link to clipboard
Copied
Hi iam new on illustrator how can I delete the bottom line, without changing the shape like it is on the left side?
 3 Correct answers
If you have an _open_ shape, the fill will always create a straight line from the beginning and end points.
You could do it with a couple of shapes: one without a stroke but with the bottom curve, and a copy with just the open stroke.
Here's a simple way to do this using the Layers Panel. First make sure that the stroke on your object is aligned to center. Then make a copy of the object's layer (drag the layer on top of the icon of the square with a + sign in it on the bottom of the Layers Panel) (First picture below). Then turn off the top layer (picture two). Now change the color of the stroke for the object on the bottom layer to "None" (removing the stroke) (picture three). Then turn the top layer back on and delete the
...Triexy,
I believe you wish to have a nice curved ending of the strokes at the bottom corners.
In this case a simple way is to build it from the original ellipses as follows, easiest if you work vertically/horizontally then rotate, but you can work wit a rotated bottom shape:
1) Create the one with the top shape with stroke and fill;
2) Create the one with the bottom shape as desired on top; it is easier to see what you are doing with no stroke and no fill, but easier to show with fill and
...Explore related tutorials & articles
Copy link to clipboard
Copied
If you have an _open_ shape, the fill will always create a straight line from the beginning and end points.
You could do it with a couple of shapes: one without a stroke but with the bottom curve, and a copy with just the open stroke.
Copy link to clipboard
Copied
As you can see, the same answer was given three times (at the time of this posting) --some just with more verbiage....
Copy link to clipboard
Copied
David,
I find them quite different.
Copy link to clipboard
Copied
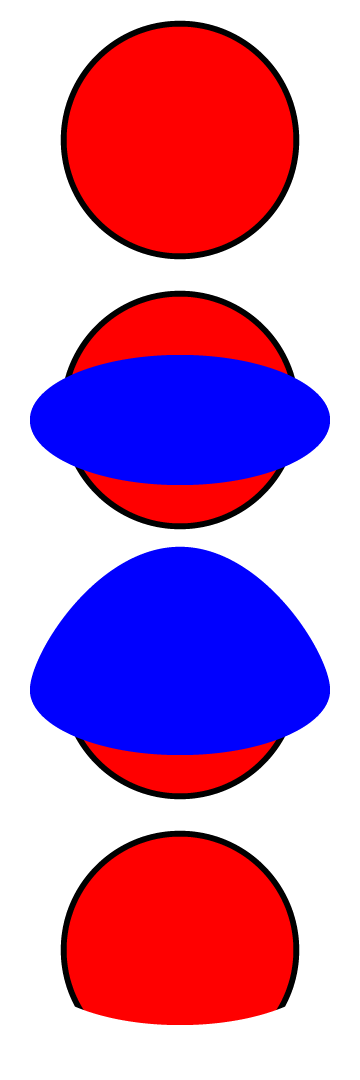
Here's a simple way to do this using the Layers Panel. First make sure that the stroke on your object is aligned to center. Then make a copy of the object's layer (drag the layer on top of the icon of the square with a + sign in it on the bottom of the Layers Panel) (First picture below). Then turn off the top layer (picture two). Now change the color of the stroke for the object on the bottom layer to "None" (removing the stroke) (picture three). Then turn the top layer back on and delete the part of the stroke that you don't want from the top layer object (you can use the add a point tool to click on the the unneeeded segment and then delete that same point using the direct selection tool). The result should now look like picture four.
Copy link to clipboard
Copied
Triexy,
I believe you wish to have a nice curved ending of the strokes at the bottom corners.
In this case a simple way is to build it from the original ellipses as follows, easiest if you work vertically/horizontally then rotate, but you can work wit a rotated bottom shape:
1) Create the one with the top shape with stroke and fill;
2) Create the one with the bottom shape as desired on top; it is easier to see what you are doing with no stroke and no fill, but easier to show with fill and no stroke, so that is done below;
3) Deselect and ClickDrag the top Anchor Point of 2) upwards so it covers the top part of 1);
4) Select both and Ctrl/Cmd+7 to make a clipping set (with 2)/3) as the Clipping Mask).
Edit: And what Hans-Jürgen is about to say.
Hi Hans-Júrgen.
Copy link to clipboard
Copied
All types of mask are suitable to achieve your desired goal.
- clipping mask
- opacity mask
- draw inside
Copy link to clipboard
Copied
You COULD use a dashed line, but it's not very controllable and the line ends are ugly if it's slightly out, and if you change the line length you have to fiddle with the dash and gap sizes again... but you COULD... but not recommended...
Find more inspiration, events, and resources on the new Adobe Community
Explore Now


