


Copy link to clipboard
Copied
I need to distort or add edges to a outlined font in Illustrator to match what was previously done by someone that no longer works here. The client is going to have a change and I need to figure out how to do this. Please see the image attached to see what I am trying to do any assistance on how to do this would be greatly appreciated.


 1 Correct answer

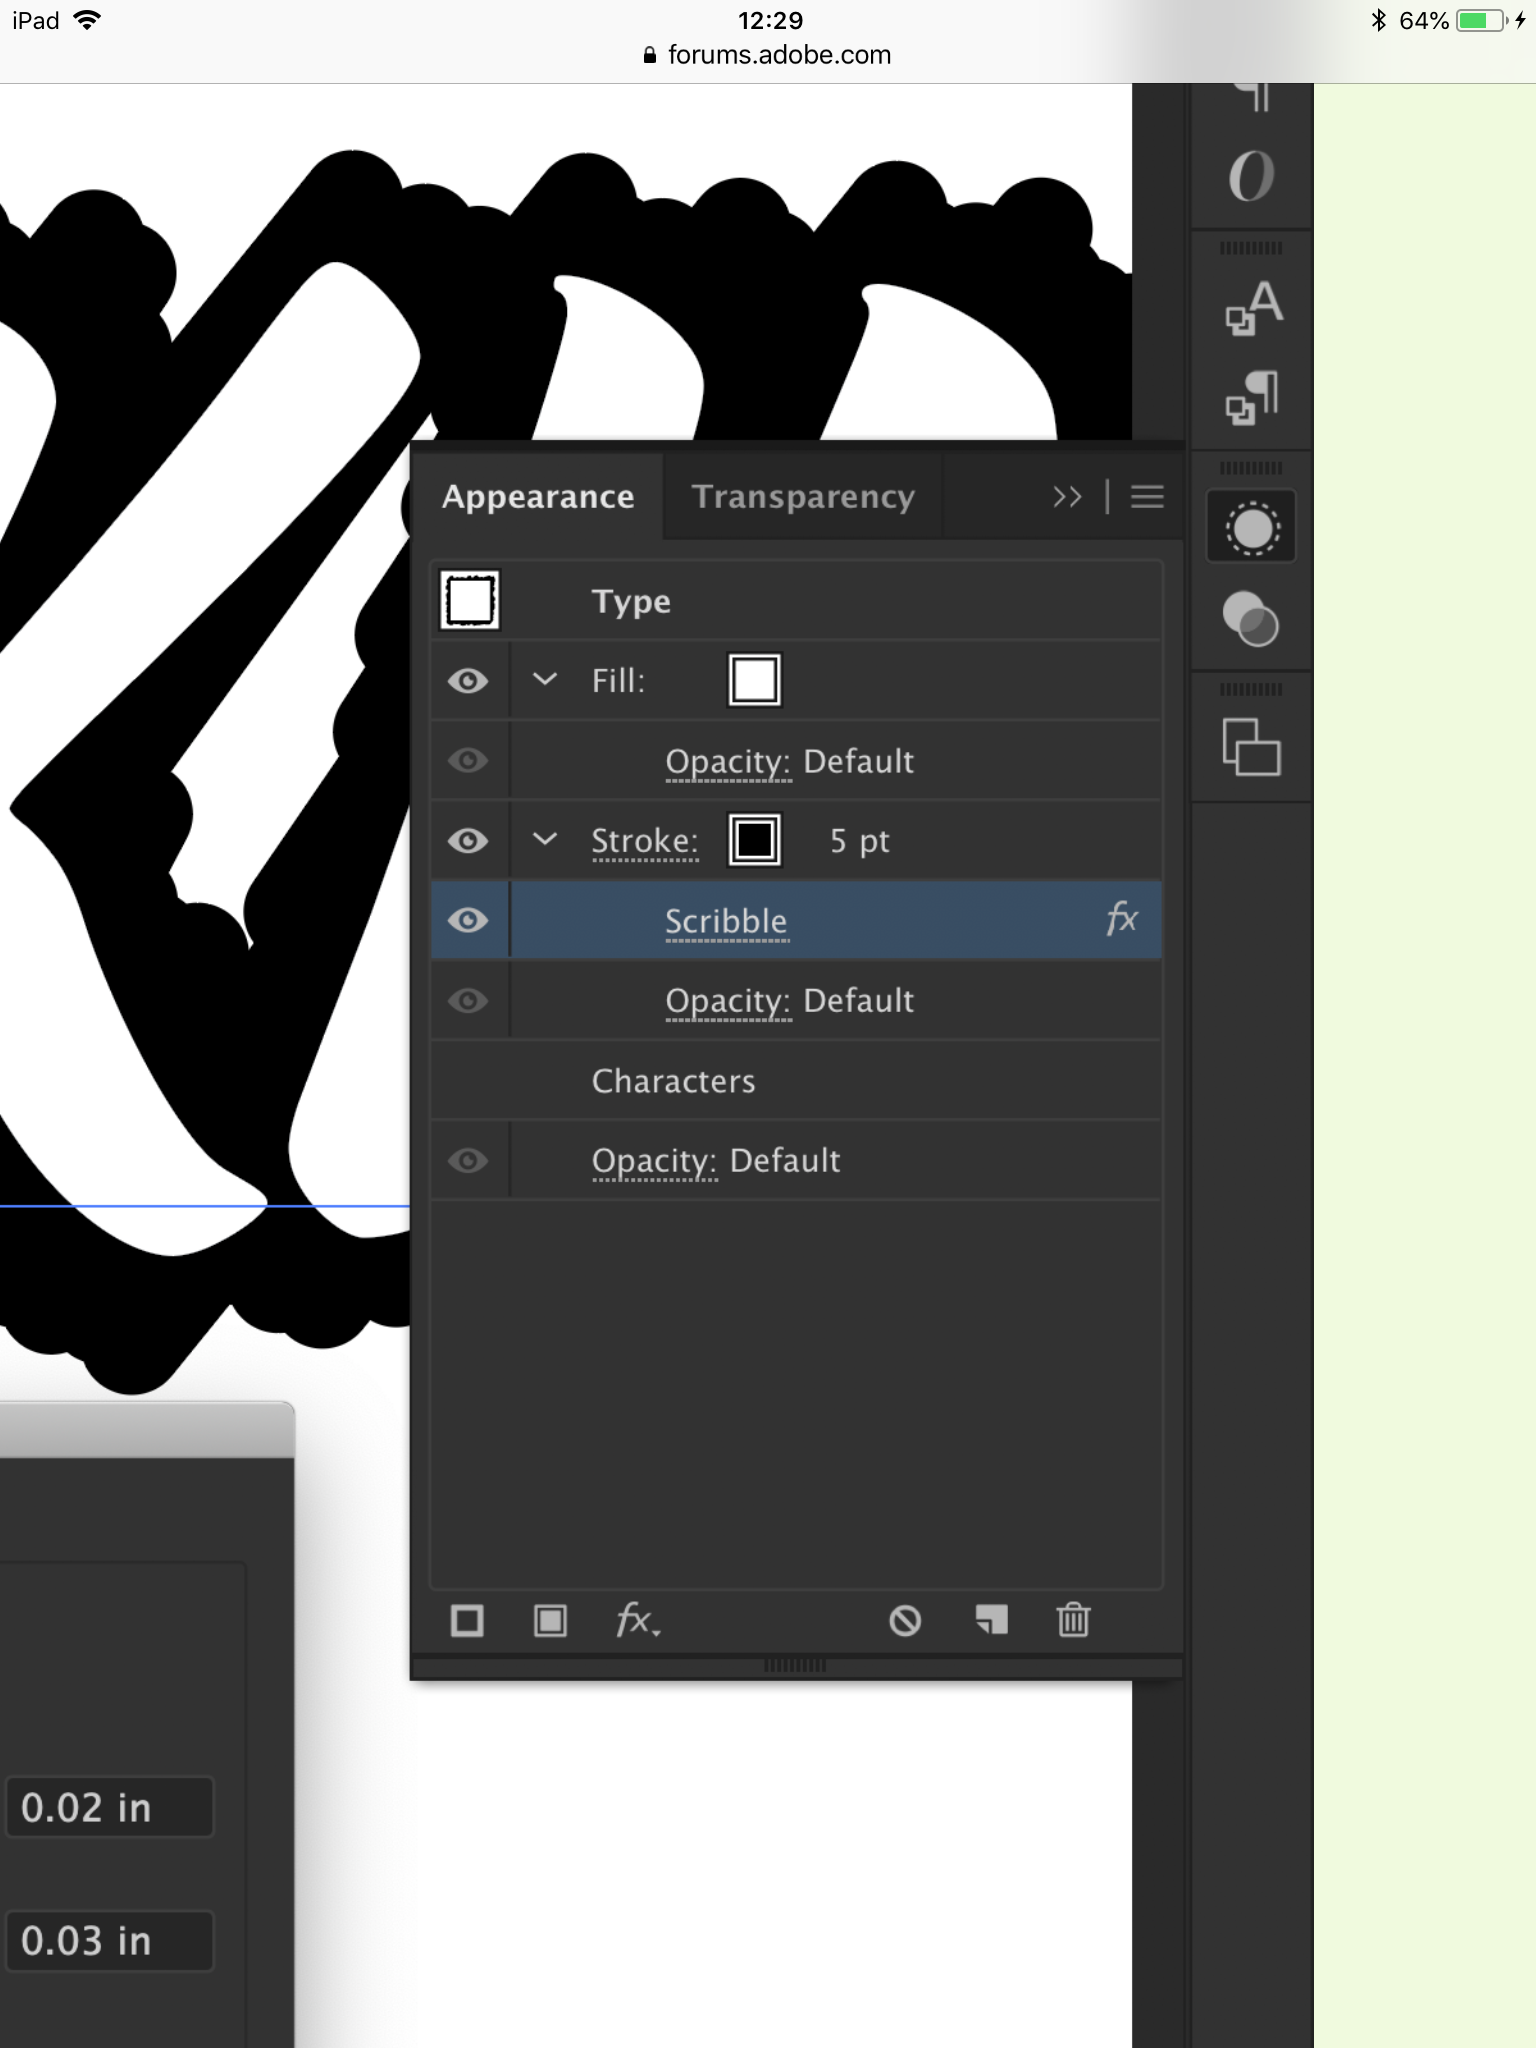
This could be a Scribble Effect added to just the Stroke in the Appearance panel. See screenshot below.
But before we get to that, you have to get your Stroke behind your Fill of the type.
Here's a video about how to do that in the Appearance panel: http://www.jeffwitchel.net/2013/03/adding-typographically-correct-strokes/
Once you have the Stroke behind the Fill, try the following:
- Select just the Stroke listing in the Appearance panel (Window > Appearance) Don't bother trying the Properties panel
Explore related tutorials & articles
 18
Replies
18
18
Replies
18

Copy link to clipboard
Copied
It honestly looks like they created single lines behind the the lettering and numbers.
Granted they used the same for each duplicate letter. For example: The '4s' has the same strokes painted under it. The 'Ls' also use the same. And the 'I's
So my thought is to do the yellow for each letter/number on a different layer. This way you can duplicate the yellow layer for each '4' for example.
But all they did was set the stroke on a brush and draw it.
If I was not busy working today I would do it for you. But I have a meeting tomorrow. 
Let me know if this thought helps or if you need me to explain it more in detail.

Copy link to clipboard
Copied
Does the type need to stay editable with the upcoming changes?
If it does, the only way I can think of is using a custom brush shape and the Width Tool.
It might take a little time to manipulate it the way to make a matching custom brush, but this is what I threw together real quick on the fly.

The top is the plain text. The bottom is the goofy custom brush I threw together real fast. The middle text is where I used the Width Tool in order to apply that custom brush to the stroke. Like I said, it might take a bit to get a brush that will make it work well for you, but definitely doable.
This way it would remain editable text that could easily be updated again and again and used for other things as well. But if its just a quick, down and dirty job, you could always just paint in something behind the letters with the blobby brush on a separate layer and call it good.

Copy link to clipboard
Copied
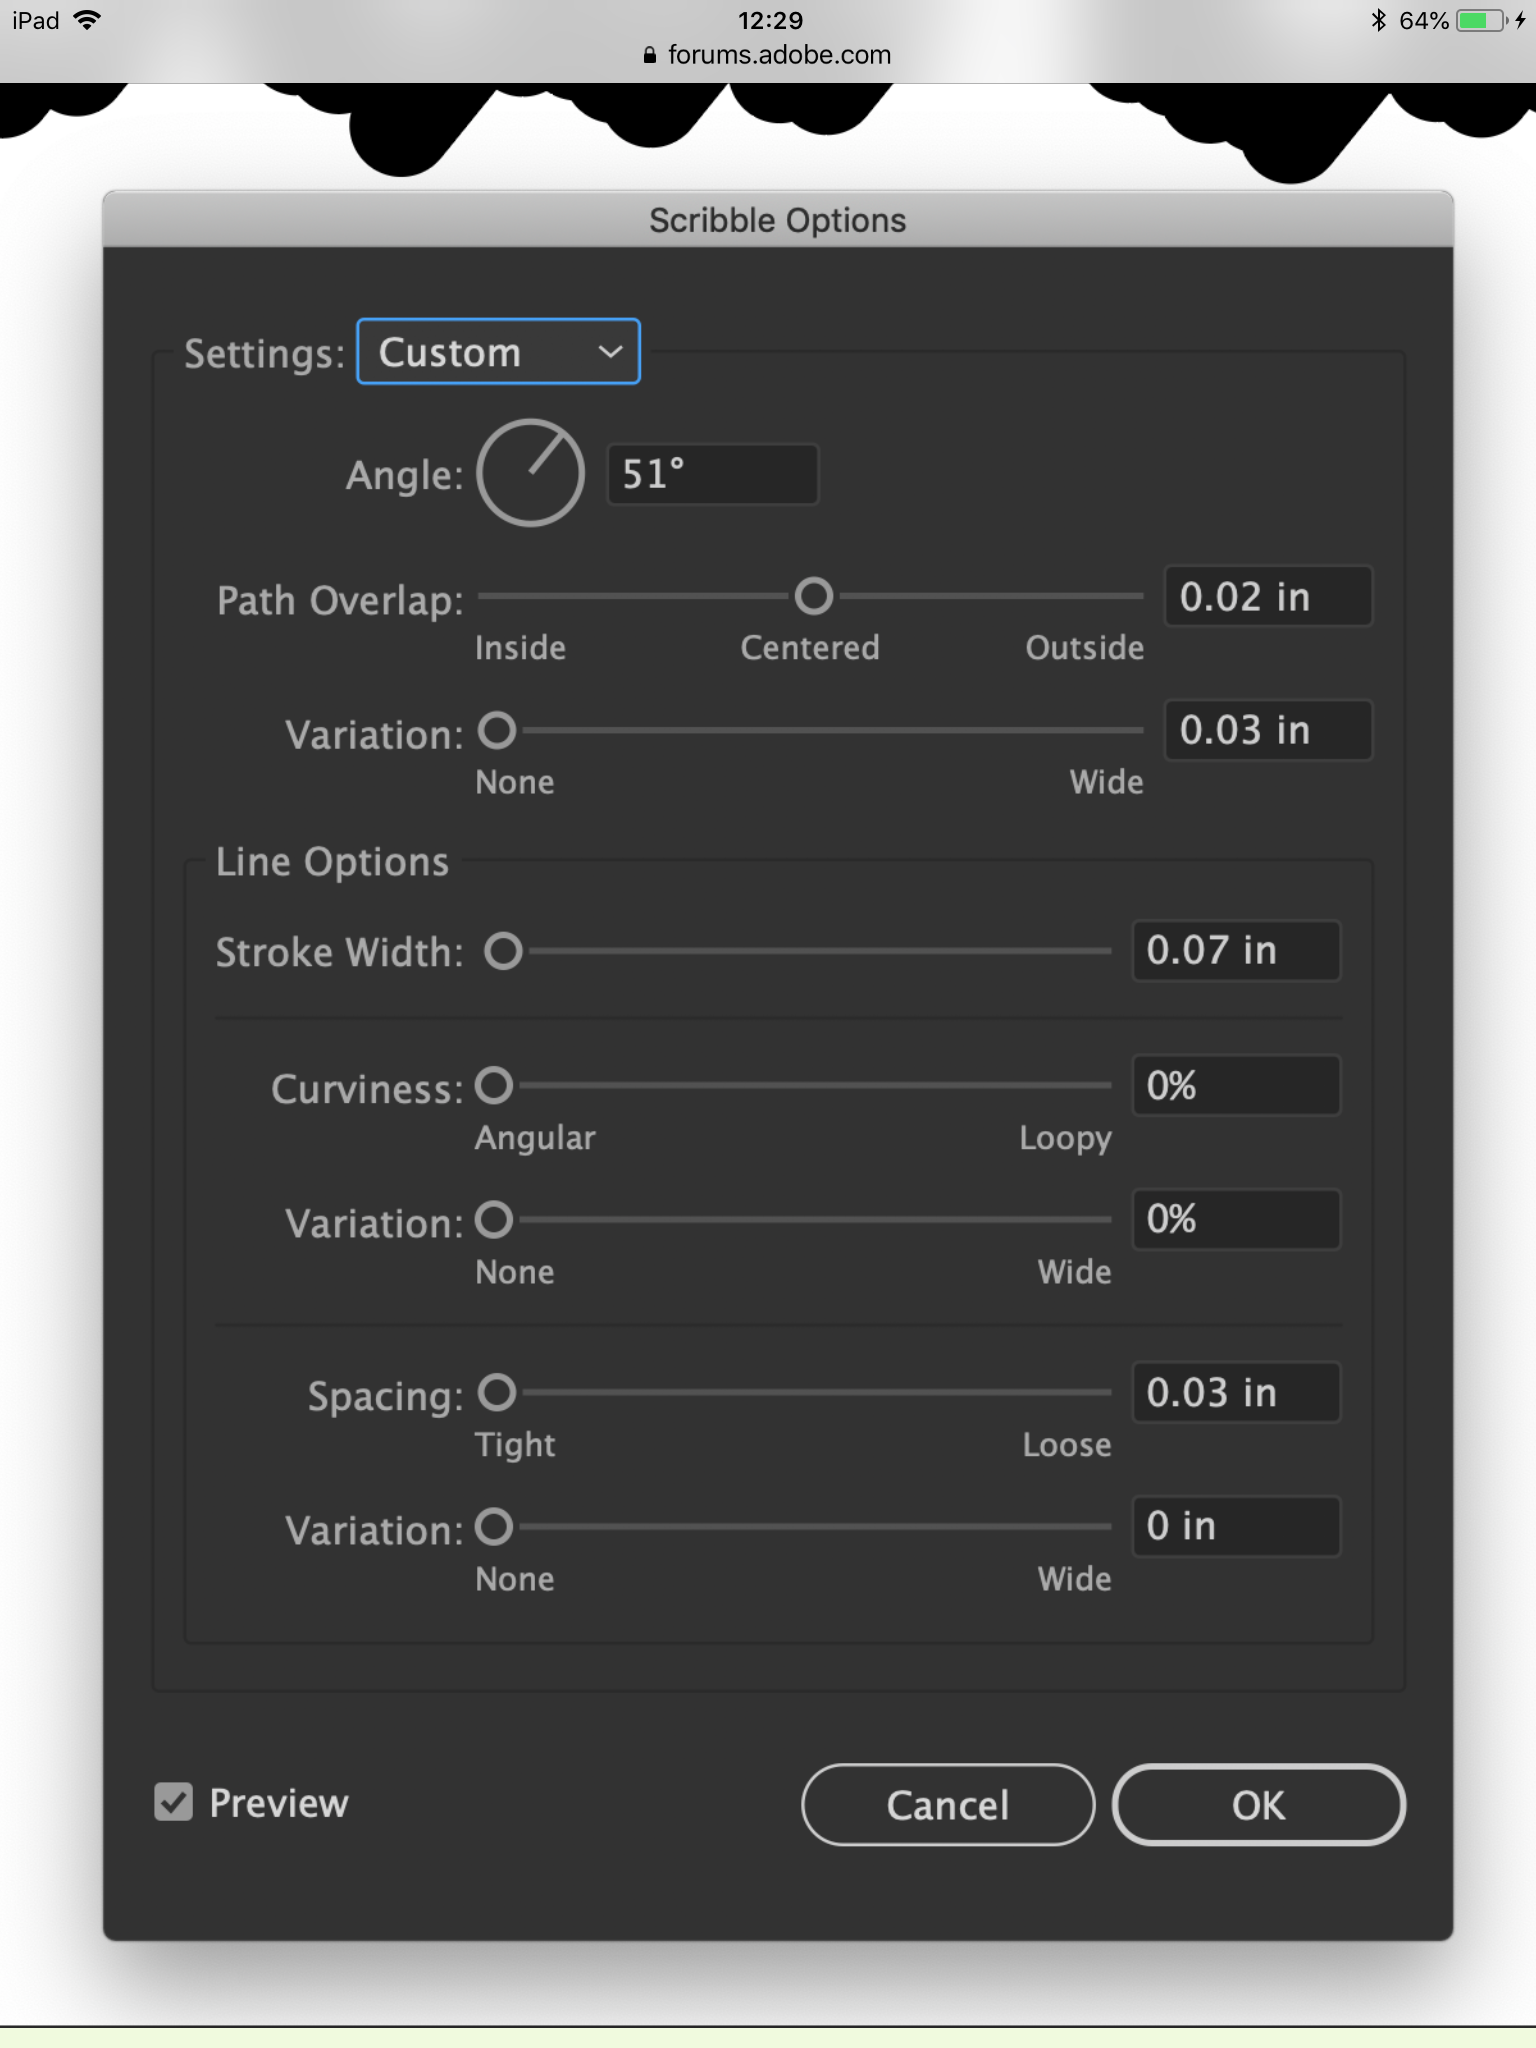
You may also apply an instance of the Scribble effect (see Effect menu) to an additional fill or stroke to get a similar look.
Play with the settings in the Scribble Options dialog.
Copy link to clipboard
Copied
This could be a Scribble Effect added to just the Stroke in the Appearance panel. See screenshot below.
But before we get to that, you have to get your Stroke behind your Fill of the type.
Here's a video about how to do that in the Appearance panel: http://www.jeffwitchel.net/2013/03/adding-typographically-correct-strokes/
Once you have the Stroke behind the Fill, try the following:
- Select just the Stroke listing in the Appearance panel (Window > Appearance) Don't bother trying the Properties panel Appearance, it does not work here.
- To that selected Stroke, add a Scribble Effect similar to what I'm showing in my screenshot. Some of your settings would be different depending on the thickness of the Stroke, the size of the type and the typeface used. Play with it until you have that you want.
Hope this helps!


Copy link to clipboard
Copied
I agree with Jeff Witchel. Apply a Scribble to an added Stroke using the Appearance panel.
You might open the Appearance panel with the text selected that was done by someone else. Does it still have the settings? If so, you can create a Graphic Style and reuse it.
The text does not need to be outlined for this technique to work, by the way. Keep it live.

Copy link to clipboard
Copied
The effect will need to be expanded and any overlapping paths welded if the artwork will be sent to something like a vinyl cutter. I often do that anyway if the artwork will be used outside Adobe Illustrator and/or scaled to different sizes.
Copy link to clipboard
Copied
By the way, changing some of the settings by as little as 1/100" can make a huge difference.
Copy link to clipboard
Copied
Definitely what was done with that text! Great find! I've never used the scribble effect that way to make it look like that and still be editable text. Learn something new every day I guess!

Copy link to clipboard
Copied
Similar to other ideas:
- Outline duplicate of text
- Stroke
- Cut/Paste-in-Place random path sections
- Expand Compound Paths
- Assign Transform effect on path level
This will stretch path sections to mimic the look you're after without re-drawing lines. Although re-drawing is a reasonable approach as well.

Copy link to clipboard
Copied
I have been trying everything under the sun and I just can get this effect to my stroke. 
Copy link to clipboard
Copied
Hi crispprinters
With your text selected, show your Appearance panel.
And can you tell us some of the things "under the sun" that you have tried so we don't repeat them?
Copy link to clipboard
Copied
I have tried
scribble
zigzag
tweek
twist
all using multiple settings within those.
Copy link to clipboard
Copied
crispprinters wrote
I have tried
scribble
zigzag
tweek
twist
all using multiple settings within those.
Instead of multiple settings, try scribble on the stroke using the appearance panel and try to exactly match the scribble options in Jeff’s screenshot.
Then post a screenshot of your selected image, the Appearance panel with the Stroke selected, and the Scribble options panel. It’s the only way we can see what is going wrong.
Copy link to clipboard
Copied
For some reason I am not seeing Jeff's post or a screenshot
Copy link to clipboard
Copied
click above where it says "Show More"
Copy link to clipboard
Copied
crispprinters wrote
For some reason I am not seeing Jeff's post or a screenshot
Click this link:
Copy link to clipboard
Copied
Jeff’s images are at the top in “Correct Answer“, but here they are, bigger:
Appearance panel: 5 pt stroke, Scribble on stroke (not Type or Fill)
Scribble settings from Jeff. Try these “as is” first. They can be tweaked if it’s not exactly what you want.
Copy link to clipboard
Copied
I had done that and it didn't give me this desired effect. This is different from the first photo as it has cut lines on it and I didn't realized till I clicked on it that the cut lines were more jagged and not roundish. 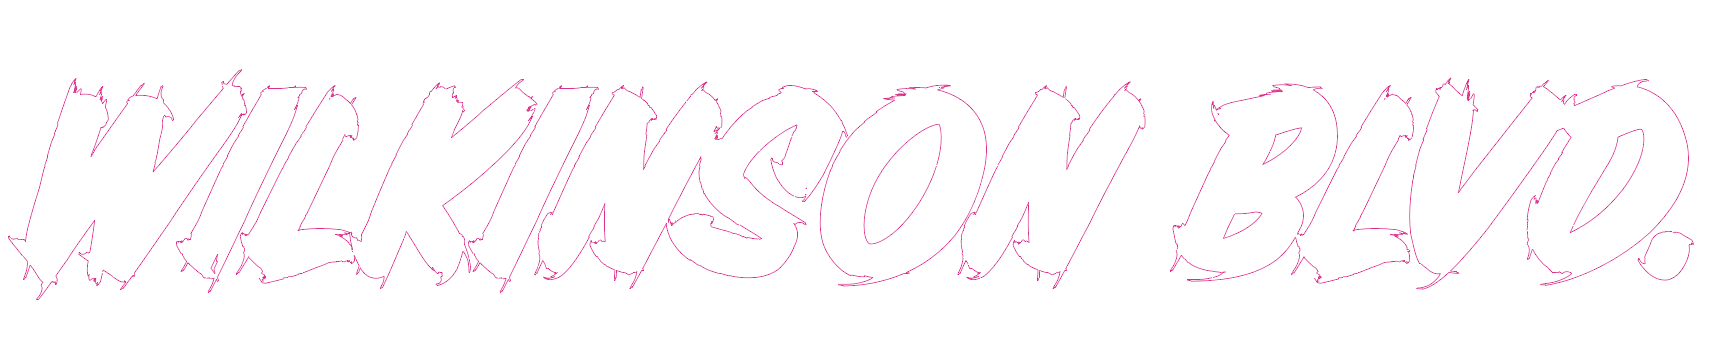

Find more inspiration, events, and resources on the new Adobe Community
Explore Now
 AdChoices