

- Home
- Illustrator
- Discussions
- Re: editing vector brushes in Illustrator
- Re: editing vector brushes in Illustrator

Copy link to clipboard
Copied
I'm using vector brushes in IL. And I have a client that wants the value range of the brush to be less than what it is now. I managed to get it down somewhat by "re-coloring" artwork, but still need it knocked down more so that my value range may fall from 4 to 8 range on any particular color I'm drawing with. has to be vector at this point. Here is a sample which shows the colors and strokes. Where do I go to edit the range contained within the brush and how do I control that? Thanks in advance.


 1 Correct answer

How does this look?

I did kind of a rudimentary approach but it worked pretty well I think.
I just used the recolor artwork dialog like many have been suggesting.
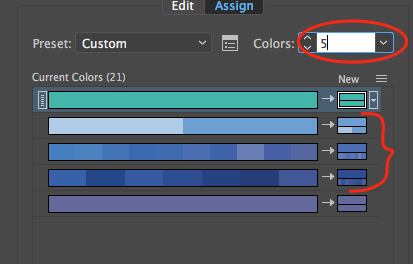
First I reduced the amount of colors down to 5 just so there weren't so many colors to mess with. Illustrator actually ended up making a nice light, medium, dark grouping automatically.
Then I just double clicked the box next the darker group under the "new" column.

Then I just moved the dot up this imaginary line to stay within the same h
...Explore related tutorials & articles
 23
Replies
23
23
Replies
23

Copy link to clipboard
Copied
I don't understand your request.
For example, what do you mean by "value range" and "fall from 4 to 8 range" in this context?
Can you clarify what you are going to do?
Copy link to clipboard
Copied
Value range. White is 0 (zero void of any pigment and Black would be 10. (totally dark)
so looking for a "mid range" in coloration/highlight. When I open one of these brushes, it may list 14 different colors that make up the stroke, from the lightest to the darkest. But I can't select and delete these colors out of this control window or whatever it is.
I would like to find a way to control the value of the color range, keeping it in the mid range_ 4 to 8. Does that help?
I am painting areas of color, then using a clipping path to "crop" the color to a letter shape. The letters in this illustration spell out words and are arranged in a circle, and they overlap each other. I'm using 8 different colors in this pallet.
Copy link to clipboard
Copied
I still don't understand.
You say "When I open one of these brushes, …". What does that mean? Are you double clicking the brush item in the Brushes palette in order to open the Brush Options dialog? Or are you dragging the brush definition onto the artboard in order to edit its content? Or does it mean something else?
Are you perhaps referring to the colourization methods in the Brush Options dialog?
Copy link to clipboard
Copied
What I am referring to in opening a brush is in the "re-color" artwork palette. 'Edit' - 'Edit colors' - 'Recolor artwork' a range of color shows in a selected stroke I am using in my project. So my question is how to edit those colors. There's HSB, reversing colors, and a myriad of other options, but none that give me a simple way to limit the value of the color range within the brush. I'm studying some tutorials now on creating brushed in Illustrator, hoping I'll find something that will allow me to create my own brushes that deliver what I'm looking for. Here is a sample of where I was, to where it is now. The clipped letters show a brush painting that has a wide value range of dark to light. The sample strokes above these letters show a much smaller range, but I want it smaller yet, no highlights, no dark saturated shadows. That's as well as I can explain it, sorry.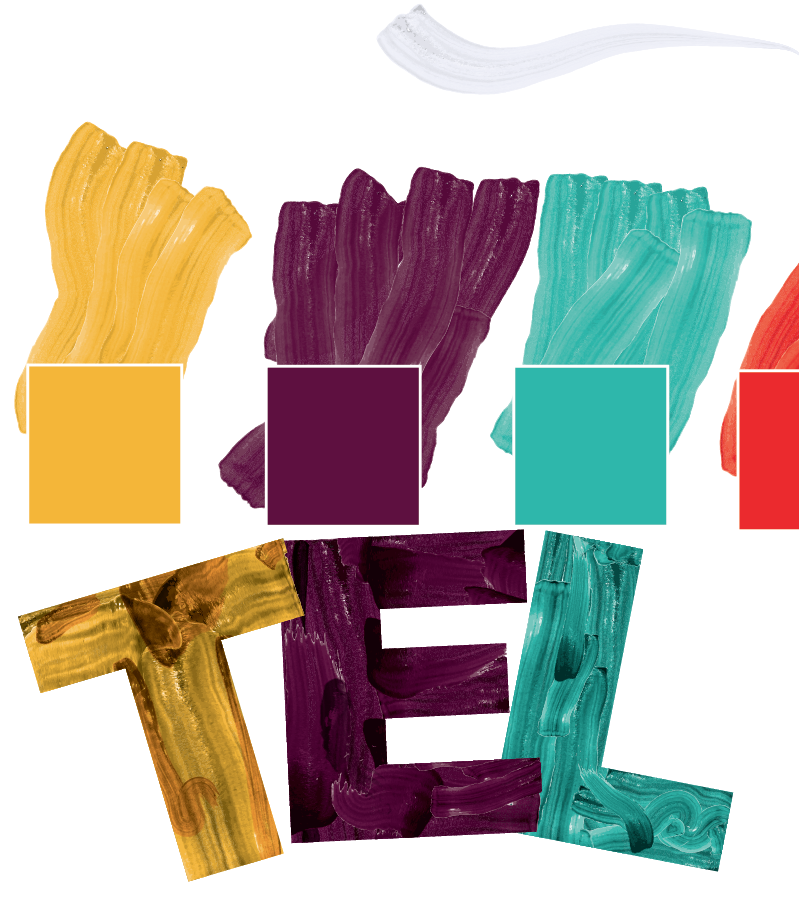
Copy link to clipboard
Copied
looks like this


Copy link to clipboard
Copied
I'm confused.
Why are you using Recolor Artwork to change the color of a Brush, Just change the color of the Stroke as in my screenshot above. The amount of variation light to dark, transparent to opaque, is controlled in the Brush Settings. Just double-click on the Brush listing in the Brushes panel and change Opacity and Stiffness.
Copy link to clipboard
Copied
My experience using brushes in Illy is VERY limited. Just now getting into them. I'm a pen and pencil kind of guy.
Copy link to clipboard
Copied
Me too!
Copy link to clipboard
Copied
Can you share a sample .ai file?
Copy link to clipboard
Copied
I'd love to share a sample file, but these are upwards of 180mb in size. Even the smallest. I guess the strokes are extremely complex? I know if I convert to paths or outline stroke, there's an extreme amount of points in them.
Copy link to clipboard
Copied
I'm pretty sure that a simplified sample file with just one of the various brush stroked paths would probably be sufficient to have a look at it. Then it should be just a small fraction of the 180 MB file size.
Also, tell which version of Illustrator you are using and try to be as precise as possible to explain your goal (that may still not be obvious at all).
Copy link to clipboard
Copied
it tells me that type of image is "forbidden". So no .AI allowed on the .ai help forum. alright. I had to delete almost all brushes from my sample file (which I can't upload) to get it below 8MB.
Copy link to clipboard
Copied

Here's another screen shot. This is the .ai file I tried to upload.

Copy link to clipboard
Copied
Do you have a free Dropbox account?
you could upload the file there and link it here.
Copy link to clipboard
Copied
Copy link to clipboard
Copied
So I've gone ahead and just used a bristle brush. found settings that kind of worked. they are transparent though (the air showing through) so I had to also clip in a white block to keep whatever was behind those letters to not show through. Maybe this will work. I've sent samples to the client. Other than that, I give up. Too many hours wasted on this one, I'll teach myself how do it the proper way some other time.
Thanks for all of the suggestions and help!! This is a good forum.
Copy link to clipboard
Copied
You are actually using art brushes and Ed is right that you could do some experiments with the Global Adjust setting in the Recolour Artwork dialog (see post 10).
On the other hand, if you are searching for more unobtrusive brushes, you could create your own brushes or take a look at the various brush libraries.
Your art brushes are cluttered up with paths and if you expand the appearance of the red brush, for example, you can see that it contains more than 5000 paths and almost 45000 points. Nice to look at, but pretty overkill.
Copy link to clipboard
Copied
If you're looking for these Brushes to be flat and not transparent (less paint-like), you might be better off using Art Brushes or Calligraphic Brushes instead of Bristle Brushes.
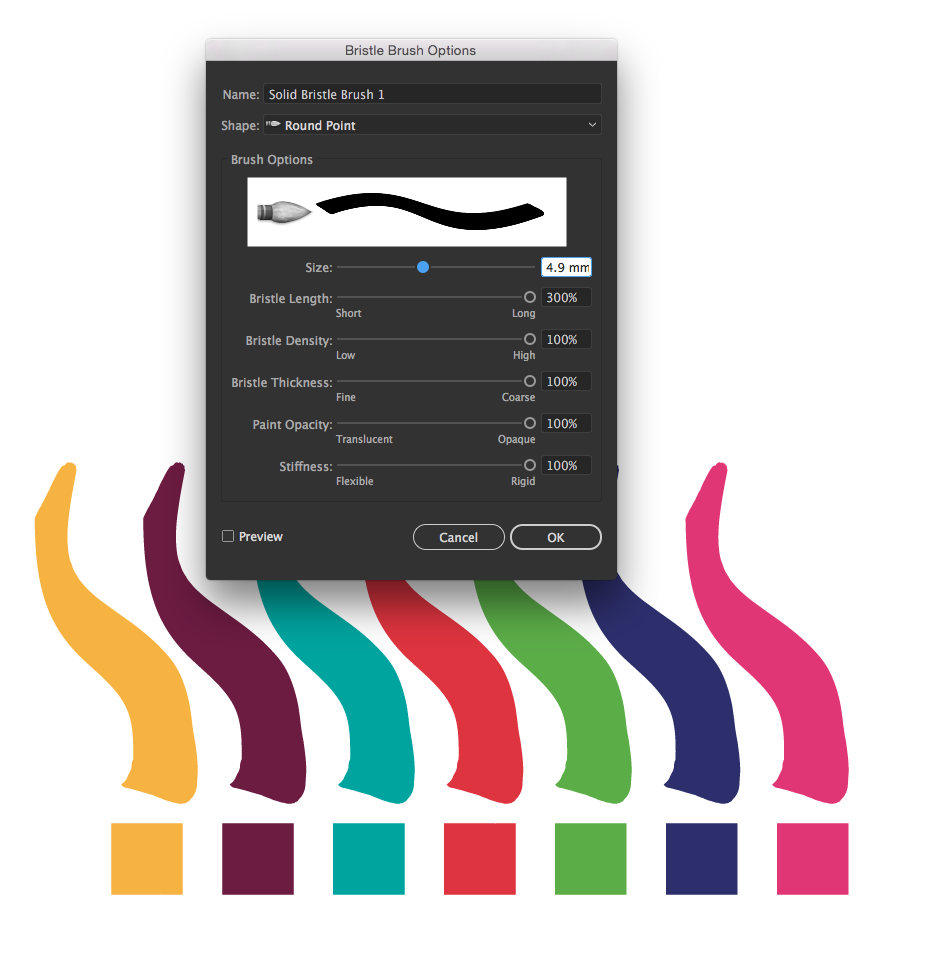
But if I'm understanding your question correctly, you want as little variation as possible in your Bristle Brush. If that's the case, drag all of the settings in the Brush all the way to the right. (See screenshot below.) This will give you a solid-color Brush with no variation, no holes, just solid flowing color.
I've found that the Settings that will result in the most opaque and even brush strokes are Paint Opacity and Stiffness. So dragging those settings all the way to the right to 100% as a starting point, should give you more of what I think you're looking for. Adjust all the other settings to the look you like.
Copy link to clipboard
Copied
Thanks Jeff. So what I'm using is a Calligraphic brush, in a set I downloaded from the net. I don't get the controls you've shown in your screen shot. Playing a bit with a bristle brush might get me to where I need to go. Thanks for the direction. I did find another way to alter or re-color the art using that RC controls, but very complex. There is a way to eliminate some of the values in there.

Copy link to clipboard
Copied
Perhaps this will help you. From the dropdown select Global Adjust. You can change the luminosity, temperature, saturation etc.

Copy link to clipboard
Copied
edgrimley I'm not finding that window in my doc.
Copy link to clipboard
Copied
I agree with Kurt entirely!
For what you're trying to do, you're fighting the way the brushes have been set up to make them look the way you want.
You'd be far better off setting up your own custom Art Brushes.
Here's a link to an older video tutorial (CS4) about creating custom Art Brushes: http://www.jeffwitchel.net/2011/11/the-art-of-art-brushes/
Hope it helps!
Copy link to clipboard
Copied
How does this look?
I did kind of a rudimentary approach but it worked pretty well I think.
I just used the recolor artwork dialog like many have been suggesting.
First I reduced the amount of colors down to 5 just so there weren't so many colors to mess with. Illustrator actually ended up making a nice light, medium, dark grouping automatically.
Then I just double clicked the box next the darker group under the "new" column.
Then I just moved the dot up this imaginary line to stay within the same hue but just make the darks lighter.
Then I just did the same thing on the lighter only moved the dot down the imaginary line to make the lights darker.
Essentially this is moving all the colors closer together in the levels of darkness/lightness.

Find more inspiration, events, and resources on the new Adobe Community
Explore Now
 AdChoices