 Adobe Community
- Home
- Illustrator
- Discussions
- Re: Expand appearance creates loads of new paths.
- Re: Expand appearance creates loads of new paths.
Expand appearance creates loads of new paths.

Copy link to clipboard
Copied
Hello,
I'm trying to learn illustrator. I apologise if this has been asked before but I did a search and could not understand if the answers were right for my question.
I have been following this Jason Secrest tutorial. Beginner Adobe Illustrator CC Tutorial: Teddy Bear Beginner - YouTube
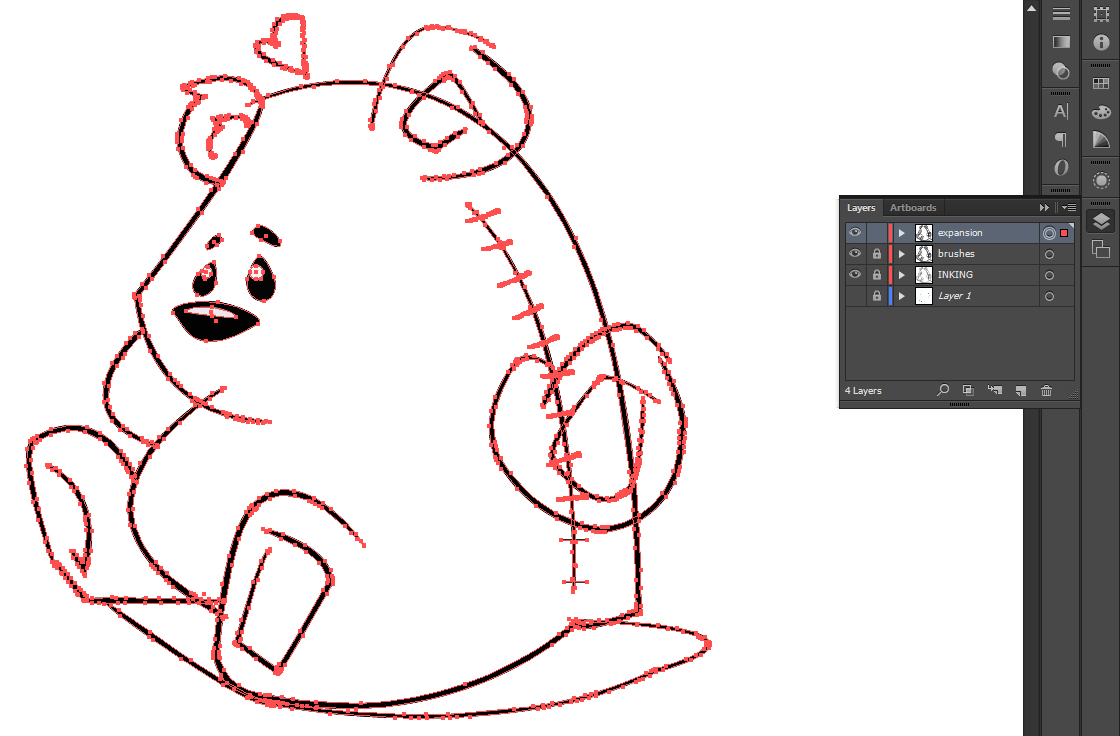
I used the pen tool and hit 'P' everytime I was finished with one line. I then I hit 'Shift +C' to curve my line. Then I hit 'P' again to start my next stroke. When I got to the part where you have to select all your brush strokes and expand appearance loads of new paths were created.
Here is the amount of points I had before expansion:

and here is the amount I had after I selected all and hit 'expand appearance'
Can someone tell me if I've done something wrong? I asked in a comment on his video but I don't think he reads comments anymore.
Thanks in advance.


Explore related tutorials & articles
 35
Replies
35
35
Replies
35

Copy link to clipboard
Copied
The paths show that you may use stroke width tool,
When you expand the shape, you will get loads points:
you may try to simplify the path from:
object -> path -> simplify
but this could change the appearance of curves.
or i would suggest using a third party plugin from Astute graphics and use "point removal" .
check the link VectorScribe v3 - Astute Graphics
Copy link to clipboard
Copied
I don't remember selecting the stroke width tool. I used the pen and then changed the shape in the brushes panel ( I used his cartoon brushes). I tried object - path - simplify and it duplicated all my lines and changed the curves (as you said).
I followed his tutorial step by step. I wish I could figure out what I've done wrong. He even says in the tutorial "Oh it all worked out great this time, sometimes it can be a mess". I wish he explained what he meant by that and how to fix it if you do end up wit a 'mess' like I did!
Thanks though.

Copy link to clipboard
Copied
missface wrote
He even says in the tutorial "Oh it all worked out great this time, sometimes it can be a mess". I wish he explained what he meant by that and how to fix it if you do end up wit a 'mess' like I did!
Thanks though.
missface - What you need to understand is that when you expand etc.. you are asking (for example) the computer to work out and calculate what your strokes etc should look like if they were a path or shape.
Even when following instructions it is easy to end up with something that looks (to the eye) similar to what was intended... but in actual fact is not identical (to the computer).
Therefore he means that sometimes the computer - depending on all the various variables - will make something that is only 95% similar to the intended result rather than 99%....
Are you following?
I don't personally see anything to worry about.
Perhaps - because of your lack of experience with Illustrator - you are getting slightly lost in what is actually a minute detail - the Bear looks like the one in the tutorial - So well done!!
Copy link to clipboard
Copied
Yes it's definitely my lack of experience. I'm good with photoshop but this is a whole new ball game. I think I'll have to learn work arounds if there is no 'wrong' way. I wasn't even sure of the purpose of 'expand appearance'. I just did it because that's what he did in the tutorial but when I researched what expand appearance does I had trouble understanding.
Thanks for all the advice I really appreciate it.
Copy link to clipboard
Copied
If you want any advice or help - feel free to shout.
Copy link to clipboard
Copied
@eternal I'll try ungrouping. Thanks!
Copy link to clipboard
Copied
If however, you want a smoother (more simple line, curve or path) then some of the suggestions above may help.
With Illustrator it is worth pointing out there are many ways to do the same thing... therefore generally there is no right or wrong way to do something (only "better ways")  .
.
Copy link to clipboard
Copied
In my experience I would prefer the "Quick" and "time saving" techniques .
Copy link to clipboard
Copied
@Mohammed I agree I much prefer quick. I just wasn't sure if there was a 'correct' way. I see now that there's not.
Copy link to clipboard
Copied
I would agree with you 80% of the time.
However, I would say there are occasions (that 20%) where you're going to be using something over and over and over again... and in those situations, I prefer techniques that are "relatively quick" but significantly more accurate than say just image tracing something.
The trouble with going down the quickest route sometimes is that unless your going to use something only once > if you ever decide to improve the way something looks or make a circle more circular than in the image trace > sometimes it's better to just take that little bit longer in the beginning than doing it all over again at the end.
Copy link to clipboard
Copied
I don't think so... I think his video had just as many path points but you are worrying only because you had the direct selection tool in use rather than the selection tool.
The path points aren't a major thing - the more you have generally the more complex the shape or the more texture appearance there is.
Best,
EW

Copy link to clipboard
Copied
@Eternal Warrior: The problem is when I go to erase the lines that need to be erased it doesn't work like his does in the video. It erases whole parts of the link instead of just the parts that should be in the back.
Copy link to clipboard
Copied
line not link*
Copy link to clipboard
Copied
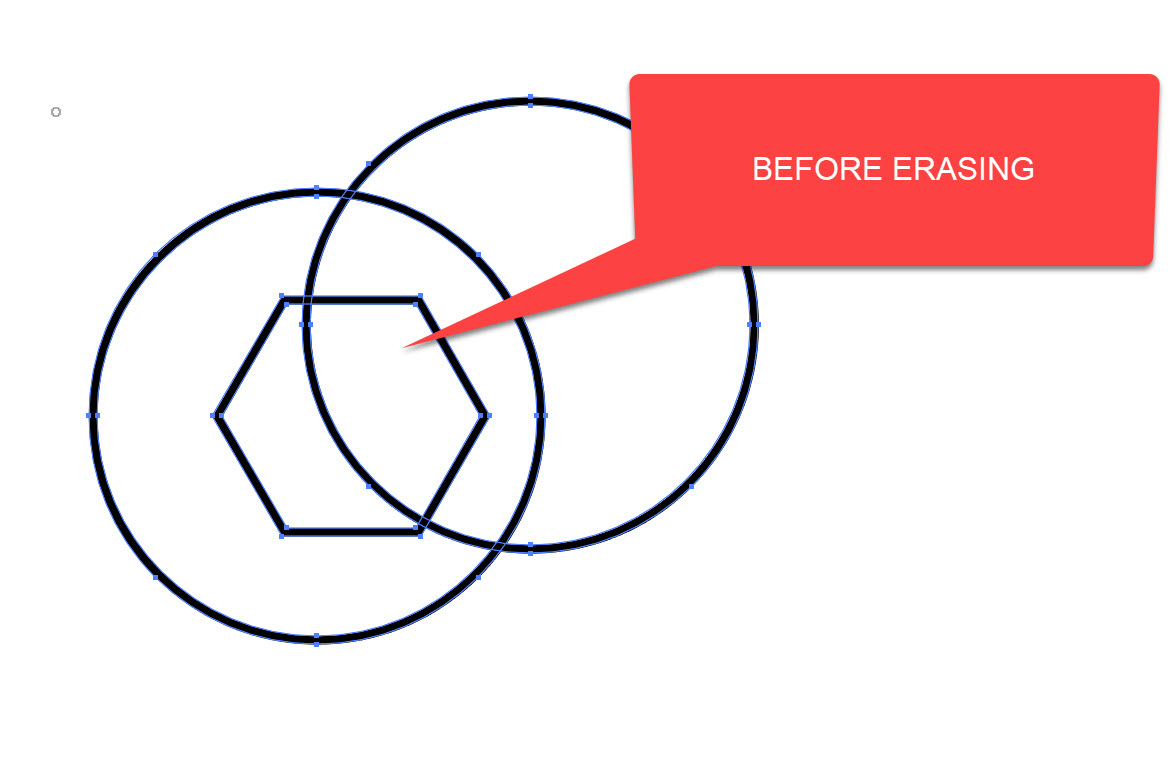
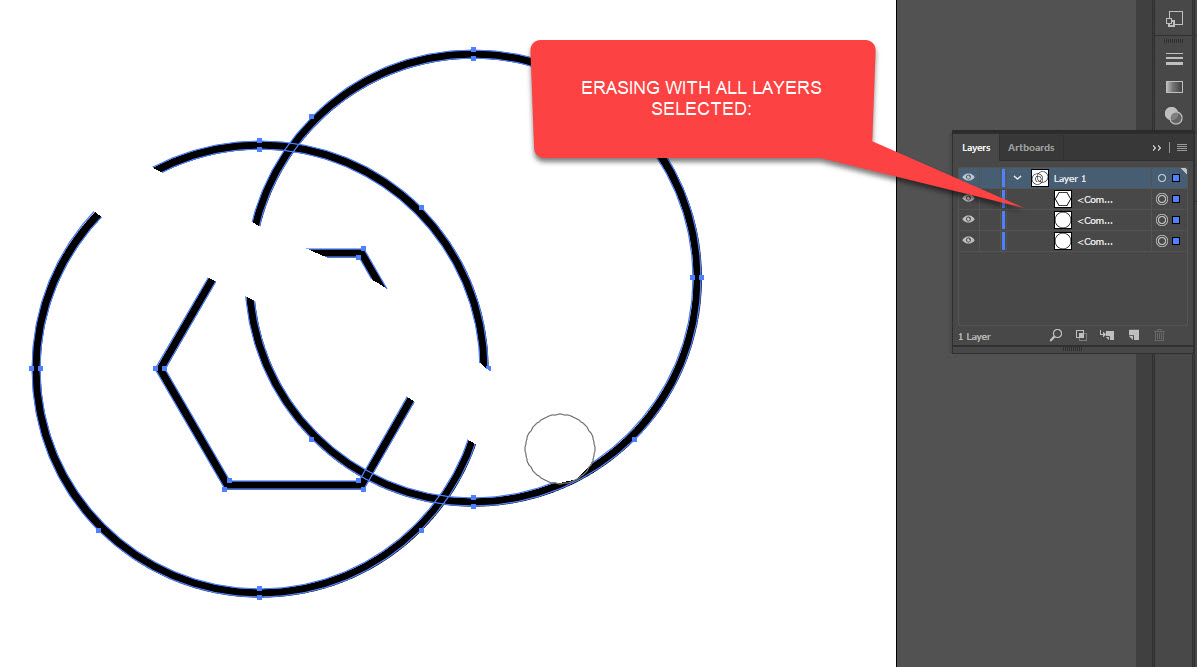
Ok - this sounds like you have multiple paths selected when you are erasing...
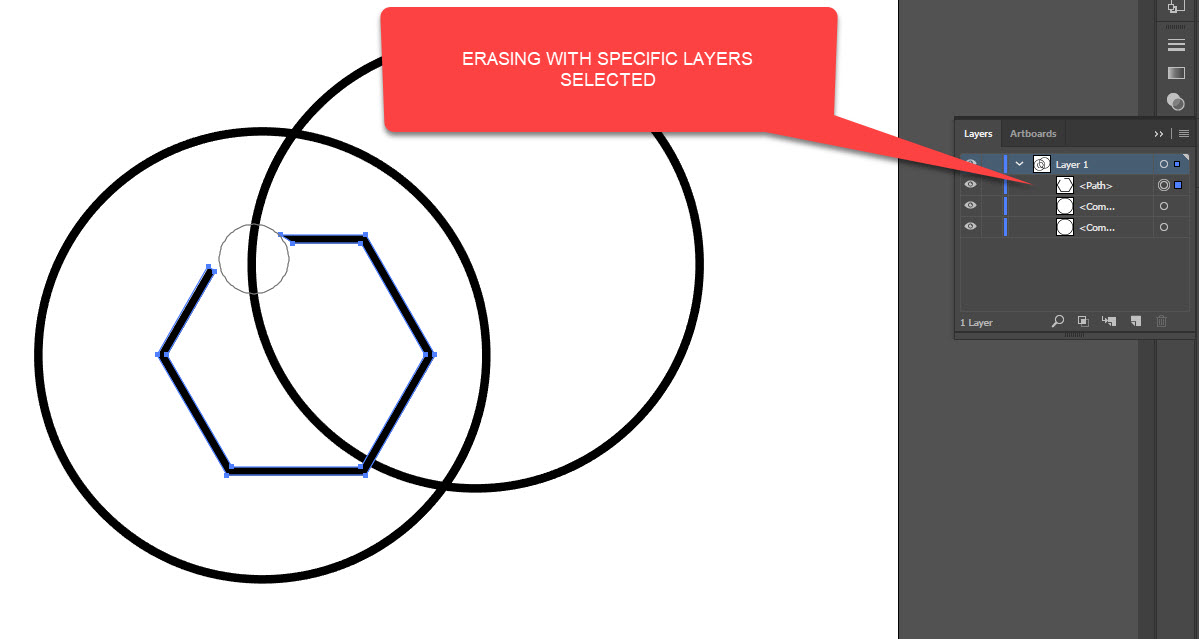
If you want the eraser to work on only one specific path rather than the entire group > you need to ensure that you are only selecting that SPECIFIC layer.
I'll post some screenshots to help.
Copy link to clipboard
Copied
Hope this helps!!
Copy link to clipboard
Copied
Thank you for those pics eternal. This issue might be that all my lines are on the one layer?
Copy link to clipboard
Copied
It might be more likely that all your paths are in one "grouped" layer. You may have to isolate the specific layer to erase more effectively.
You can do this either by double clicking multiple times on the portion or object you want to isolate - until nothing but that layer is selected
OR right click on the layer and click Isolate... and repeat if necessary...

Copy link to clipboard
Copied
missface,
Is there a good reason for you to outline the strokes of the paths (which is what happens (depending on your Expand settings)?
You can do many things just as well, or better, with stroked paths.
Outlining strokes will always lead to many more Anchor Points.

Copy link to clipboard
Copied
I used the pen and then changed the shape in the brushes panel ( I used his cartoon brushes).
Many features in vector programs are so-called "live effects." This just means they are other artwork "piled onto" the paths you draw, and that additional artwork is automatically re-drawn on-the-fly whenever you make changes to the paths you are deliberately drawing.
Brushes are an example of just such a "live" construct.Someone else has already drawn paths and stored them in the Brushes palette. When you apply a Brush to a path you are drawing, the program is just stretching a copy of the paths contained in the Brush along the direction of the path you are drawing.
All the while, so long as the Brush is being applied to your path in "live" mode, the interface is only displaying the anchorPoints of the base path you are deliberately drawing. But be assured: all the anchorpoints of the artwork contained in Brush are still there; they're just not being displayed.
When you invoke an Expand command, you are essentially telling Illusrator to stop the automatic re-drawing and "nail down" the distored artwork from the Brush. That exposes the actual paths which resulted from the paths in the Brush having been distorted along your path.
It can be a bit alarming (as it was for you), because you think you are drawing nice, tidy, elegant paths (which you may have). Then, when you're happy with the shape of your paths, you invoke the Exapnd command. The actual artwork that you have been stretching along the paths you are drawing become fully exposed as ordinary paths. You see all those kazillion anchorPoints and think "Egads! What a mess."
And you're right. Here's why:
Vector-based graphics are, by their mathematically-defined nature, smooth. That's part of their reason for existence. Vector graphics lend themselves to smooth, efficiently-defined shapes, which are generally devoid of "texture."
Raster graphics, on the other hand, are just a grid of tiny squares, each assigned a color. That lends itself to highly irregular shapes and grainy texture (because the "shapes" are not actually defined at all).
That's why vector-based graphics programs have long been metaphorically called "drawing programs" while raster-based graphics programs are called "painting programs." That's why both exist and why a well-rounded illustrator needs to be proficient with both.
Somewhere along the development of vector-based drawing programs, users demanded more "painterly" effects in drawing programs: they wanted to "paint" with paths. Well, you just don't get high degrees of irregularity and "texture" from vector graphics without using a lot of jagged paths with a kazillion anchorPoints.
So vector-based Brushes which try to emulate the appearance of so-called "natural media" (chalk, paint, etc.) tend to contain convoluted jagged paths with a lot of anchorPoints.And they vary wildly in their elegance, depending upon who created them.
And yes, it can be a problem. In attempts to emulate "paint" textures, with paths you can easily reach a point at which the inherent data-efficiency of vector-based graphics is lost and the resulting file sizes exceed those of comparable--or even more convincing--raster images. This is one reason why many drawing programs provide raster-based Brushes, which step and repeat or stretch raster images along a vector path, and then flatten them to a single raster image.
Now back to your specific example:
You are using a vector-based Brush which contains very jagged paths in order to suggest the "texture" of natural media. But depending on the final scale of the intended reproduction, there may very well be far more roughness in the resulting paths than are needed to make that visual suggestion. That's where the Simplify command may serve to at least reduce the file size. With the Expanded artwork selected:
1. View>Hide Edges. This turns off the display of paths and anchorPOints. The artwork will appear to be unselected, but it's not.
2. Object>Path>Simplify...
3. In the resulting dialog, make sure the Straight Lines checkbox is off. Set the Curve Precison slider all the way to 100%. Turn on the Preview checkbox.
4. The dialog will tell you how many anchorPoints are currently in the artwork and how many will result from the current Simplify settings. Right now, they will be equal.
5. Slowly move the Curve Precison slider leftward. Watch the artwork. Stop sliding when the artwork loses too much of its texture-suggesting roughness.
It depends on scale, but savings of 50-75% are common.
JET
Copy link to clipboard
Copied
Perfectly explained JET!!
I need your patience and the particular choice of words to explain this as well as you have just done!
Copy link to clipboard
Copied
Wow thank you SO much for that detailed explanation Jet.
I am out at the min but when I'm home I'll sit down and have a read and try your suggestions.
I really appreciate the time you took to explain all that.
Copy link to clipboard
Copied
Ok I tried all that and it made no difference. I still cant erase the lines like he did in the video. I think I'll just move on to another tutorial or I'll just end up ripping my hair out.
Thanks for all the help!
Copy link to clipboard
Copied
I tried another of his tutorials and the exact same thing happened. I just don't know what I'm doing wrong. I followed it to the letter and after I expand appearance the eraser doesn't work. It takes a line away and then it pops back again. 
Copy link to clipboard
Copied
I just did it without expanding the appearance and it worked fine.
-
- 1
- 2

 AdChoices