Participating Frequently
September 19, 2021
Answered

HELP!! Scaling pieces of a shape/ arching without manipulating size/etc./etc.

  • September 19, 2021
  • 2 replies
  • 1263 views

I am quickly running out of time, and have a lot of problems to tackle. So I figured I'd reach out.


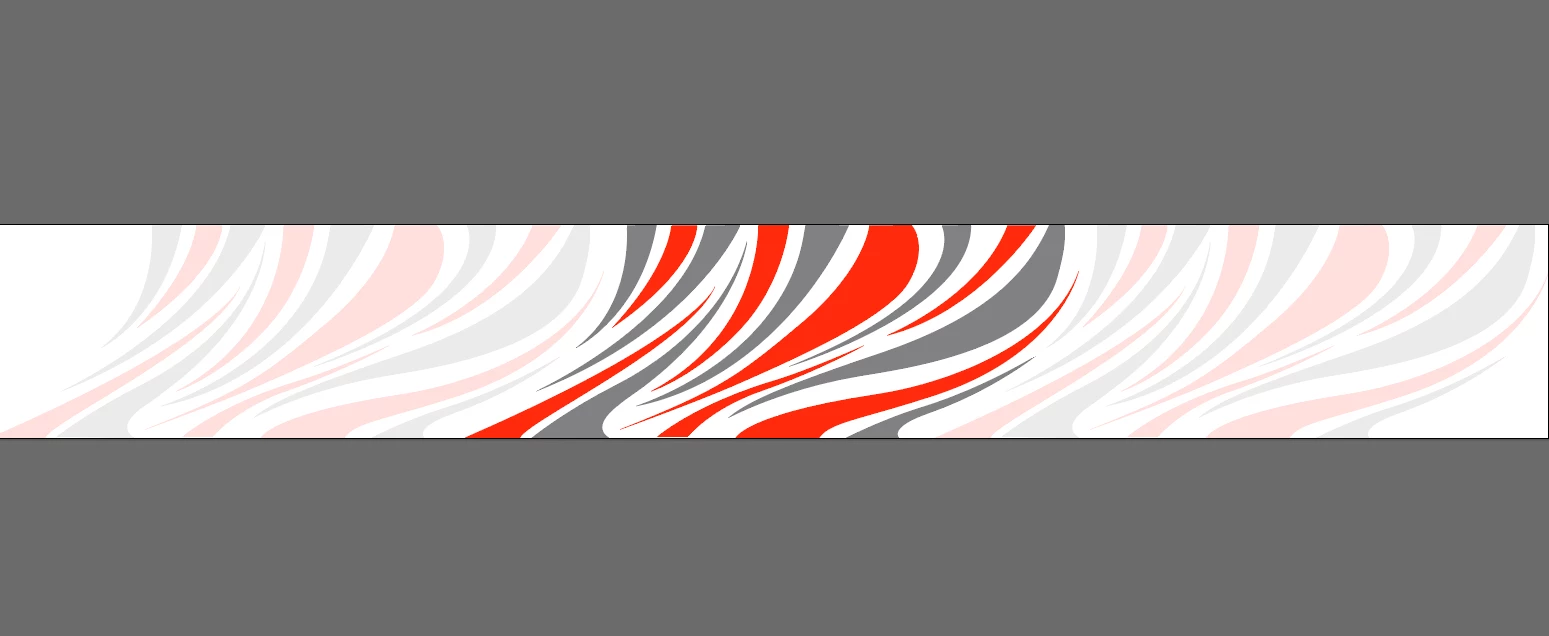
I am creating print files for a wrap that will be applied to cement mixer drum. It's shaped kind of like an egg, and will be almost 100% covered. Ive taken measurements and created a 2D template to work on. The template is displayed as if you stood the drum up on its back end and then split it open like an orange. The design is oriented in the same way.  Ive attached photos for reference.


In order to make this work, I will have to chop the design up so that it fits within the template and all of the stripes align on the edges, without losing any parts of the design. Though, because the drum is tapered the art has to scale proportionately so that once wrapped around fully, the art will be seemingly endless.


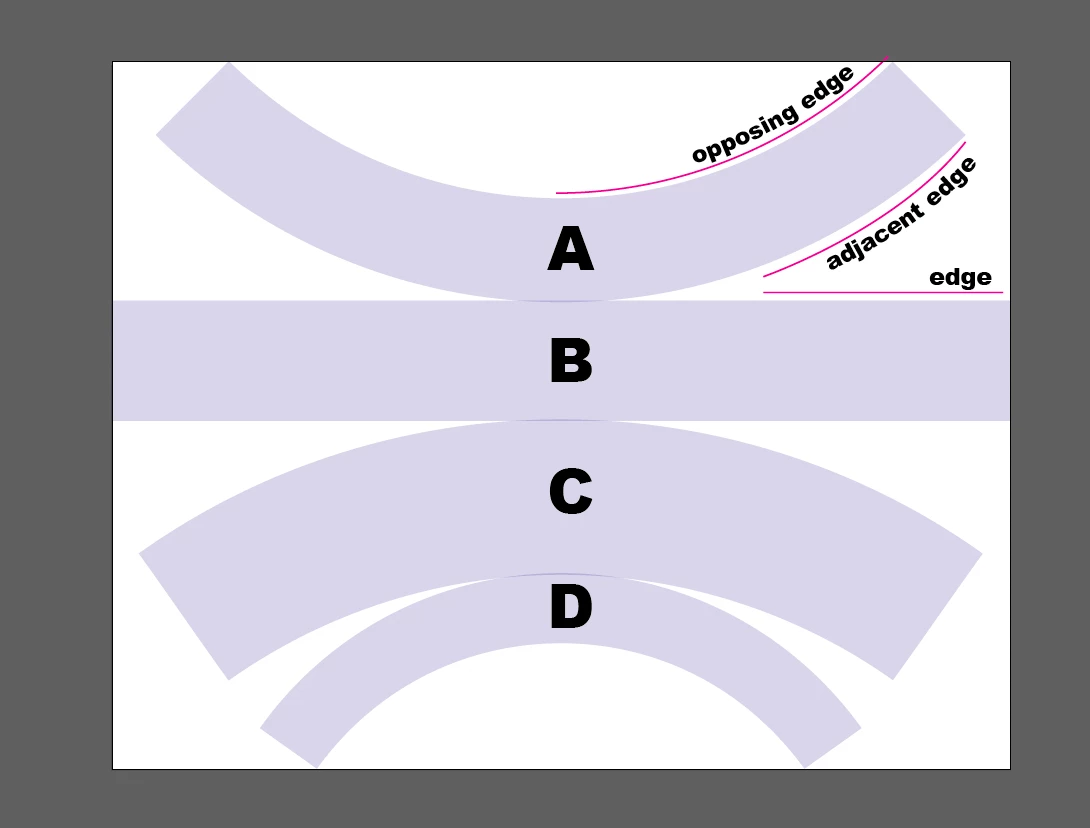
The easy part is Panel B, it is a normal rectangle. Though when we move onto the others, it gets a little hairy.

In the photos, you can see that the other three panels are arched to accommodate the bi-directional curve of the drum. Problem 1: Now if I take a clipping mask of the part of the design that I need and then use envelope distort to arch it, then it does just that. It arches it AND distorts it, so that the end of my stripe no longer aligns with the stripe on adjacent edge. (Question 1) Is there another way to manipulate the design to where it doesn't distort the distance between anchor points? I would venture to say no, and that it would have to be created at the desired orientation from the get go. But I don't want to underestimate the power of the program. Plus, it would make life a little bit easier.


Because they are arches, the length of the top arch is longer than the bottom arch. So as the design moves across a panel to the opposing edge, it has to scale down. (Question 2) Is there a way to transform whats in my bounding box in a way that allows me to tell illustrator, I want to scale the bottom down by x% while leaving the top as is, and Is this possible within the free transform tool? 


 I hope that this makes some sort of sense to some of you. Let me know if I can fill in any gaps for you. I would say question 2 is more important that question 1, as I don't think it would be too difficult to rotate each piece of the art at the proper degree to achieve the right orientation.


This topic has been closed for replies.
Correct answer Jacob Bugge

Sacha,


I apologize for the rather obvious set of errors in steps 2) and 3), which I have corrected in the original post here,

https://community.adobe.com/t5/illustrator-discussions/help-scaling-pieces-of-a-shape-arching-without-manipulating-size-etc-etc/m-p/12392048#M291831


namely shorter > longer in step 2) and longer > shorter in step 3). I have done it that way to make it easier for everyone, not least new readers.


It is impossible to get it right with the errors, of course.


I hope it will work when you try it with the corrected steps 2) and 3).


2 replies

Jacob Bugge
Community Expert
Community Expert
September 19, 2021

Sacha,


I believe that you will like the Effect>Warp>Arc with negative bend for A and positive Bend for C and D.


To get adjacent edges to match you will need to shorten the width of the original rectangular artwork for A, C, and D, progressively with the degree of bending, more for D than for A and C; each must have a height equalling the length of the end segment(s).


You will need to match the short edge of A and C to the (identical) edge(s) B, and then match the short edge of D to the long edge of C.


You can do it iteratively from scratch by trying and failing until you get there. In the process of each you can:


0) Create a rectangular representation of the part (A/C/D);

1) Apply the Arc with a Bend in % equalling the angle between the end segments divided by 1.8;

2) Copy the longer curved segment (deselect then select it with the Direct Selection Tool and hold Ctrl/Cmd and press C then F then X then F to get an independent path;

3) Calculate the proportion between the length of the path from 2) and the width of B (for A and C) or length of the shorter curved segment of C (for D);

4) Shorten the width of the rectangular representation by the reverse proportion from 3, and start over from 0), until you have a (sufficiently accurate) match.


You can print a scaled version of A+B+C+D and use tape to test the fit.


It is possible to get there/get close in the first go by using a customized calculation based on the actual proportions.


Edit: Hi Scott. Birds of a feather?


Edit edit: I have corrected a rather obvious set of errors in steps 2) and 3), namely shorter > longer in step 2) and longer > shorter in step 3). This is done to make it easier for everyone, not least new readers.


The errors made it impossible to get it right as it appears from this post, sorry Sacha,

https://community.adobe.com/t5/illustrator-discussions/help-scaling-pieces-of-a-shape-arching-without-manipulating-size-etc-etc/m-p/12396312#M292013


sachad29Author
Participating Frequently
September 21, 2021

Hi Jacob, hope all is well.


So your method was pretty spot on with cuving the art on the first go. Very useful information to know. My problem is that once it is curved, it stretches the art to accommodate the curve, to be expected. Though when the stripes move from panel to panel, in order for them to lign up, the beginning and end points of the stripes along the edge have to match the beginning and end points on the adjacent edge. Here is an image of panels B and C. Keep in mind that the length of these to edges are equal in length. Using the large red stripe as an example here. When it meets the edge of a panel, the distance of the stripe from the far end of that edge has to match the distance from the far end of the adjacent edge.  


Using the pen tool I added an anchor point along the path of template, then copied and pasted that segment along side it. I then measured the length of that path to get the distance of the stripe from the far end of the edge. Notice that they are not equivalent. 


Do you have any pointers on how to go about addressing this? Is there a formula to figure out how much the art is going to stretch/ shrink based on the percent that we arch the design? Maybe I can reverse engineer it to accommodate the changes.


Thank you for all of your time and help.


Jacob Bugge
Community Expert
Jacob BuggeCommunity ExpertCorrect answer
Community Expert
September 22, 2021

Sacha,


I apologize for the rather obvious set of errors in steps 2) and 3), which I have corrected in the original post here,

https://community.adobe.com/t5/illustrator-discussions/help-scaling-pieces-of-a-shape-arching-without-manipulating-size-etc-etc/m-p/12392048#M291831


namely shorter > longer in step 2) and longer > shorter in step 3). I have done it that way to make it easier for everyone, not least new readers.


It is impossible to get it right with the errors, of course.


I hope it will work when you try it with the corrected steps 2) and 3).


Scott Falkner
Community Expert
Community Expert
September 19, 2021

I hope I understand your issue. Try this:

Make your arkwork a rectangle with width of panel B and height of the combined panels if they were rectangles. I think this can be obtained by measuring the height of the template at the centre.

Slice the artwork into four rectangles with heights of panels A, B, C, and D. So now you have your panels, but they are just flat and not curved. Also some will be too long. Shorten the panels as necessary. Make the width match the corners on the inside or the curve. Do this by scaling the artwork, not just the mask.

Next add masks if necessary. You want the artwork for each panel to be a rectangle, so if there is an image or continuous paths, make masks and duplicatethe artwork for each mask.

Go to Effect > Warp > Arc and apply an arc effect to each rectangle. You will probably want to move the top rectangles up to meet the top of the shape in the template, then move the bottom rectangles down to meet the bottom of their respective arcs. (See that A has moved up and C and D have moved down).

Finally apply an arc effect using Effect > Warp > Arc. Do this for each curved panel. You can fine tune the effect by clicking on it in the Appearance panel for selected artwork.


The effect is not great and you won’t get perfect precision. I find that when I change the value of the arc distortion by small amounts, like 0.2, sometimes I see no change. You probably won't get perfect seams where the panels meet up or where panels wrap around and meet themselves.


One other good resource is hte company providing the wrap. They have experience with this exact issue so they might be ablel to help you better than I can.

See attached file for reference. I only used the image you provided as an example.

Template.ai (Dropbox) 

sachad29Author
Participating Frequently
September 20, 2021

Thank you Scott, your illustrations were helpful. I appreciate your time!