

- Home
- Illustrator
- Discussions
- How can I add filling background to images like th...
- How can I add filling background to images like th...

Copy link to clipboard
Copied
Hello
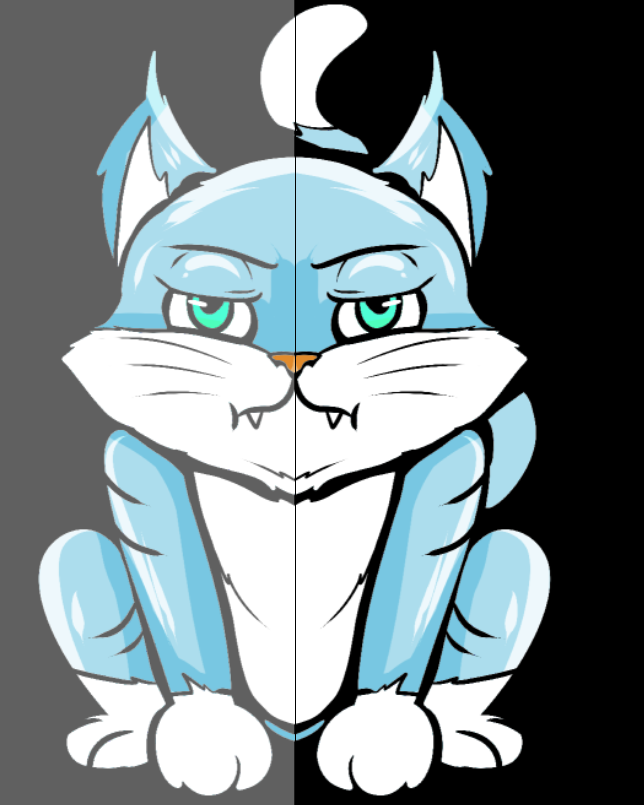
As you can see in the image there is grey or black, in between that cat, which is empty space.
I would like to fill that in with black how can I do this so it adds up to shape?
I was thinking filling it black but also outline the complete cat with a dark line so it matches.
Or some sort of automation shape recognition to add a background fast?
I have a lot of images like that left over from a designer of my past, where I need to do this.
If you have video links, can explain or else
please let me know
thanks in advance


 2 Correct answers

Sergeant,
As I (mis)understand it, you can obtain the black filling and outlining so the cat appears the same on top of any background as follows (two alternative ways described):
You can either:
0) Create a pale/contrasting background and lock it if not already;
1) Select all the cat parts and Ctrl/Cmd+G to Group, then Ctrl/Cmd+C+F to copy to the front and lock the copy cat (which hides the original Group);
2) Click on the copy cat to select the original Group and apply a black fill and n
...
Sorry for just replying now. I was longer off than expected with vacation and other...
What you describe is exactly what I want to do.
My Problem is step 2 and 3 - How do I add a black fill to the copy cat and how do I create a compound path out of it.
It does not work!
I should mention: the cat and the rest of work I have, was made by a designer I paid and he used photoshop to create it.
Because the full adobe package is so expensive, I deleted all the backgrounds from all the work he did, saved
...Explore related tutorials & articles
 13
Replies
13
13
Replies
13

Copy link to clipboard
Copied
Can you please show the outline view? Also I don't think I fully understand what you want to do.
Copy link to clipboard
Copied
Sergeant,
As I (mis)understand it, you can obtain the black filling and outlining so the cat appears the same on top of any background as follows (two alternative ways described):
You can either:
0) Create a pale/contrasting background and lock it if not already;
1) Select all the cat parts and Ctrl/Cmd+G to Group, then Ctrl/Cmd+C+F to copy to the front and lock the copy cat (which hides the original Group);
2) Click on the copy cat to select the original Group and apply a black fill and no stroke to it, then Ctrl/Cmd to turn it into a Compound Path;
3) Object>Path>Offset Path with a positive offset value that is sufficient to close all the gaps between the (locked) cat parts of the Compound Path, this will create a single larger path beneath the Offset Path;
4) Click on the copy cat to select the Compound Path and delete it so you just have the larger path, showing beyween and round the copy cat;
5) Object>Path>Offset Path with a smaller negative offset value that gives you the desired thickness of the outline round the copy cat which is the difference between the positive and negative offset values (for an outline of 2pt, the negative value needs to be 2pt less than the positive value), this will give you a smaller black path on top of the larger one;
6) Click the the larger black path (near the edge) and delete it;
7) Delete the pale/contrasting backgroundfrom 0).
You may need to try 3) and 5) a few times using Undo in between until you are satisfied.
Or as an alternative way, in order to more clearly work with the black shapes without the copy cat in 2) - 5), you can (without the pale/contrasting background:
1) Select all the cat parts and Ctrl/Cmd+G to Group, then Ctrl/Cmd+C+F to copy to the front and hide the copy cat;
2) Select the original Group and apply a black fill and no stroke to it, then Ctrl/Cmd to turn it into a Compound Path;
3) Object>Path>Offset Path with a positive offset value that is sufficient to close all the gaps between the cat parts of the Compound Path, this will create a single larger path beneath the Offset Path;
4) Click on the Compound Path and delete it so you just have the larger path, then show the copy cat;
5) Object>Path>Offset Path with a smaller negative offset value that gives you the desired thickness of the outline round the copy cat which is the difference between the positive and negative offset values (for an outline of 2pt, the negative value needs to be 2pt less than the positive value), this will give you a smaller black path on top of the larger one;
6) Click the the larger black path (near the edge) and delete it;
Copy link to clipboard
Copied
Sorry for just replying now. I was longer off than expected with vacation and other...
What you describe is exactly what I want to do.
My Problem is step 2 and 3 - How do I add a black fill to the copy cat and how do I create a compound path out of it.
It does not work!
I should mention: the cat and the rest of work I have, was made by a designer I paid and he used photoshop to create it.
Because the full adobe package is so expensive, I deleted all the backgrounds from all the work he did, saved the files as PSD and I am now editing with Illustrator only.
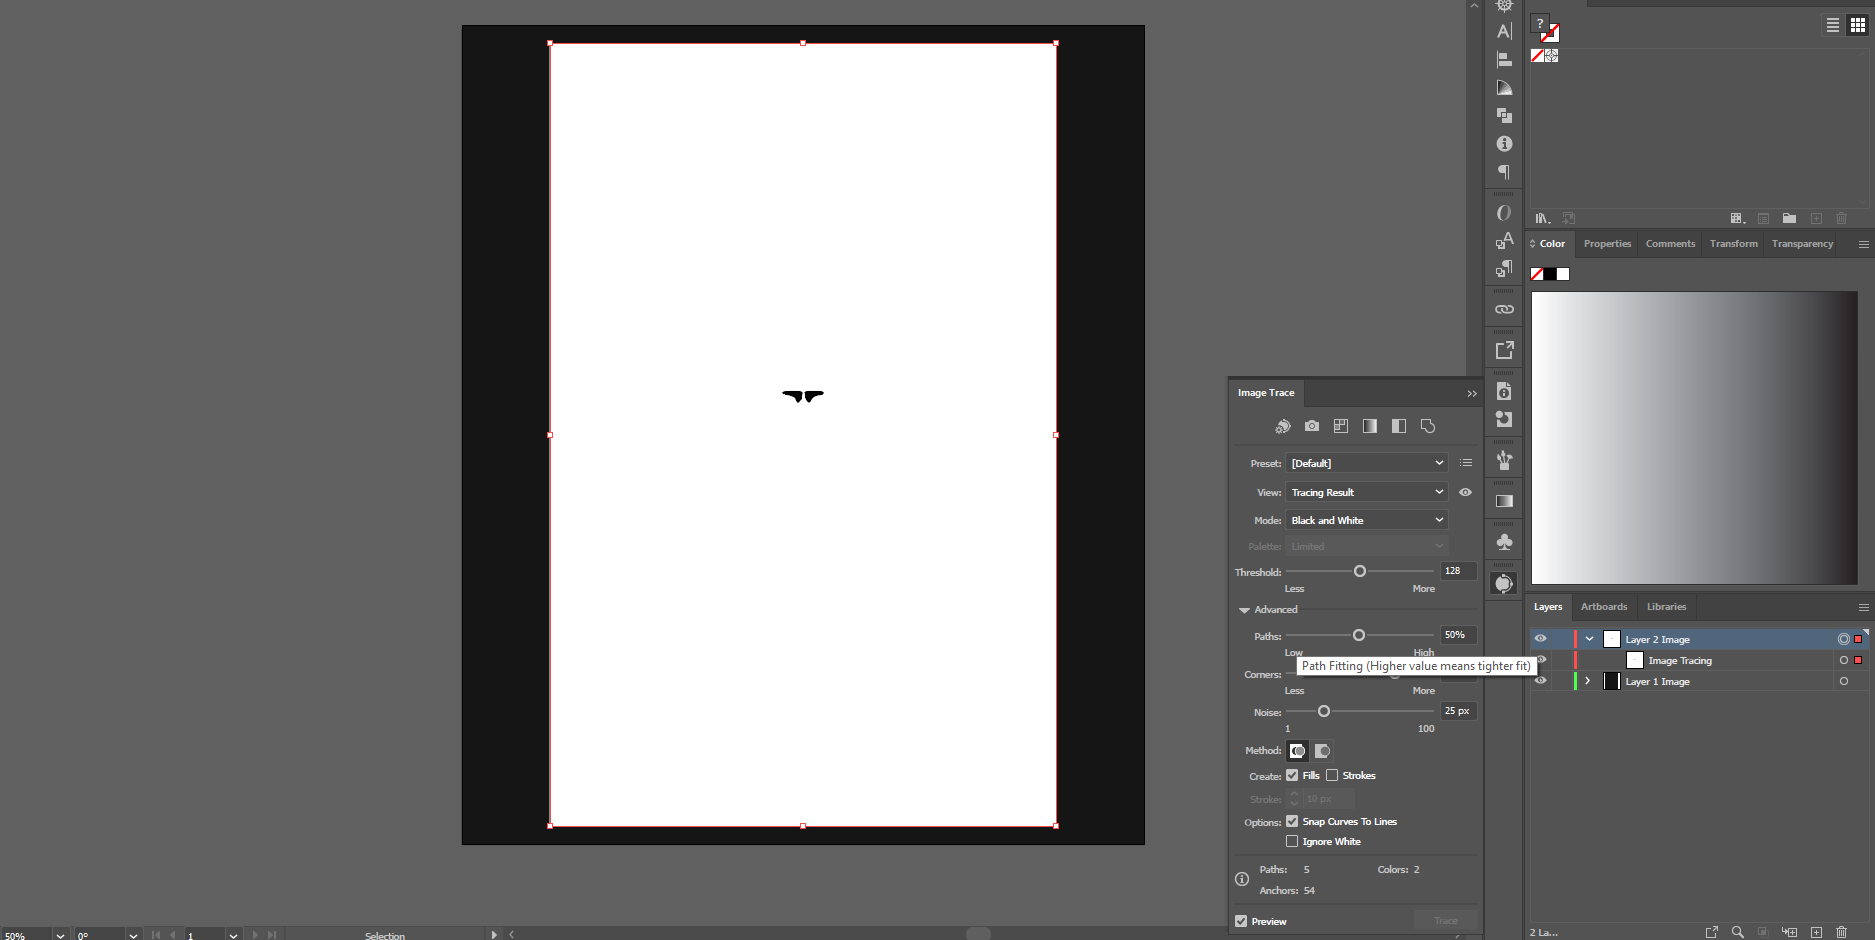
If I select the cat, I always have a rectangle around it. I think it is an image. I tried Image tracing but for some reason it is deleting / ignoring the white parts.
Will I need photoshop to do what I want to do, or is there a way in Illustrator?
Coloring it with the buckettool also doesnt work for same reasons.
The original work files from him also do not contain his full "steps".
Copy link to clipboard
Copied
Sergeant,
"Because the full adobe package is so expensive, I deleted all the backgrounds from all the work he did, saved the files as PSD and I am now editing with Illustrator only."
I hope you have kept the original files.
"If I select the cat, I always have a rectangle around it. I think it is an image. I tried Image tracing but for some reason it is deleting / ignoring the white parts."
I believe it is an image. If you switch the View to Outline, an image will show as an empty box.
With regard to pricing, the least expensive plan is the Photography, a bit cheaper than Photoshop alone which is the same price as Illustrator,
https://www.adobe.com/creativecloud/plans.html
All in all, you may be better off using Photoshop, which is very different; and if you have yet to create artwork, it will probably be far better to continue with the same application that was used for the artwork so far.
Copy link to clipboard
Copied
Yes I do have the original of course. Everything for me is saved on different mediums and shapes.
Your right. The thing is Illustrator is just better for me creating shirt designs. In a lot of things it is so much quicker, perphaps its just more experience and use but initially I had all applications and learned both of them, then decided and realized Illustrator better/ ( or maybe jsut easier) for me.
I had a first run with image trace, where I could do all your steps and it worked just fine! The end result just had a outline on the knee - where for some reason on one side it was perfect on the other the outline was messed up thicker/thiner than on the opposite side. So I went back and tried to redo it multiple times but then it wouldnt work again, yet im certain I did everything the same way. I do not understand. Sometimes I do the image trace and all thats left from the cat is the nose!! lol. Most of the time I have the blue parts perfectly matched but then the part with white filling gets earased. Program can sometimes drive me crazy as the outcomes are differing or maybe I did something slightly different which I do not understand.
Best for me would be photoshop + Illustrator.. but there is no plan for that, only all applications, which while I am not profitable is too much for me currently. And sometimes I just have no time for weeks or days because main work and other duties.
On the weekend I will try again with the input you guys gave me. Thank you.
If u have any more info to give here beforehand I try my hours again 😄 I be thankful.
Coming back soon.
Copy link to clipboard
Copied
Sergeant,
"Yes I do have the original"
I believe it is worth trying to Image Trace the original, with the background, remember to avoid Ignore White ("but then the part with white filling gets earased")
Hopefully useful links:
https://helpx.adobe.com/illustrator/using/image-trace.html#tracing-option-preset
https://helpx.adobe.com/illustrator/using/combining-objects.html#pathfinder
For an all vector solution, I hope it is possible to do it as follows (some of the steps involve creation of backups to fall back on if needed, they can be omitted if you durst):
1) Place the image (as a link) and Ctrl/Cmd+C+F (Hold Ctrl or Cmd and press F) to create a copy in front, then lock and hide the original in the Layers panel;
2) Image Trace, concentrating on settings that make the background form one contiguous path including both what is within the cat and what is round it, remember to Expand it;
3) Change the colour of the background path to black if not already, then lock the background path and Ctrl/Cmd+A to select the actual cat, then Ctrl/Cmd+G to Group it, then Ctrl/Cmd+C+F, then lock and hide both cat Groups, so you only see the background;
At this stage you can show the original image from 1) temporarily to see that the background path fits (if all goes well), remember to hide it again; the background path is a Compound Path;
4) Unlock and select the background and Ctrl/Cmd+C+F to create a copy in front, then lock and hide the original background path in the Layers panel as backup;
Now you can work with Offset Path as described ealier, only with the background and in a reversed way as follows:
5) Select the (copy) background path, then Object>Path>Offset Path with a negative offset value that equals the desired outer stroke thickness round the cat;
If this has removed all the inner parts that formed the gaps within the cat, you can jump to 8), otherwise Ctrl/Cmd+Z to Undo and:
6) Object>Path>Offset Path with a negative offset value that is sufficient to remove the inner parts that formed all the gaps within the cat;
7) Object>Path>Offset Path with a smaller positive offset value that gives you a gap equalling the desired outer stroke round the cat (subtract the desired outer stroke thickness from the value in 6));
Now the whole in the background (compound) path is exactly the background you need, so time for the final part:
8) Ctrl/Cmd+C+F to create a copy in front, then lock and hide the copy in the Layers panel as backup;
9) Ctrl/Cmd+A to select the live background path (again), then Object>Compound Path>Release to get two solid paths, then delete the outermost one;
Now you have a solid background that ought to fit the actual cat parts as desired, so:
10) Unlock and show and select one of the actual cat Groups from 3) in the Layers panel, then Ctrl/Cmd+X+F to bring it to the very top;
Now you (hopefully) have the cat Group on top of the background path which forms both the black inner cat parts and gives the desired black outline; then finally:
11) Ctrl/Cmd+A and Ctrl/Cmd+G to form a Group of the artwork.
If all is well, you can copy the Group from 11) to a new Layer, and keep or delete the original Layer to get rid of all the unneeded parts (if you durst).
The full background will prevent gaps/anti aliasing ugliness between the cat parts and the background.
Copy link to clipboard
Copied
Sergeant,
Especially if the Image Trace of the actual cat parts is unsatisfactory, it may be better with another solution reusing the original raster image with background, I hope it is possible to do it as follows (some of the steps involve creation of backups to fall back on if needed, they can be omitted if you dare):
1) Place the image (as a link) and Ctrl/Cmd+C+F (Hold Ctrl or Cmd and press F) to create a copy in front, then lock and hide the original in the Layers panel;
2) Image Trace, concentrating on settings that make the background form one contiguous path including both what is within the cat and what is round it, remember to Expand it;
3) Change the colour of the background path to black if not already, then lock the background path and Ctrl/Cmd+A to select the actual cat, then press Delete, so you only have the background from the Image Trace;
At this stage you can show the original image from 1) temporarily to see that the background path fits (if all goes well), remember to hide it again; the background path is a Compound Path;
4) Unlock and select the background path and Ctrl/Cmd+C+F+F to create two copies in front, then lock and hide the first copy and the original background path in the Layers panel, the latter as backup;
5) Select the (top copy) background path, then Object>Path>Offset Path with a negative offset value that equals the desired outer stroke thickness round the cat;
If this has removed all the inner parts that formed the gaps within the cat, you can jump to 8), otherwise Ctrl/Cmd+Z to Undo and:
6) Object>Path>Offset Path with a negative offset value that is sufficient to remove the inner parts that formed all the gaps within the cat;
7) Object>Path>Offset Path with a smaller positive offset value that gives you a gap equalling the desired outer stroke round the cat (subtract the desired outer stroke thickness from the value in 6));
8) Show and unlock and select the first copy of the background path from 4) and Ctrl/Cmd+X+F to bring it on top of the offset background path from 7);
9) Ctrl/Cmd+A to select both background paths, then Pathfinder>Minus back to form one single Compound Path.
Now you have a Compound Path that correspons exaclty to the filling inside the cat parts and the contour, so time for the final part:
10) Ctrl/Cmd+C+F+F to create two copies in front, then lock and hide both copies in the Layers panel, one as backup;
11) Ctrl/Cmd+A to select the original Compound Path from 10), then Object>Compound Path>Release, then Pathfinder>Add to shape area (Unite) to form a black (non compound) path;
12) Unlock and show the original image from 1);
13) Ctrl/Cmd+A, then Ctrl/Cmd+7 to use the path from 11) as a Clipping Mask for the image from 12);
14) Unlock and show one of the copies from 10), then Ctrl/Cmd+A and Ctrl/Cmd+G to Group everything.
Now you (hopefully) have the clipped original image with the Compund Path forming both the black inner cat parts and the desired black outline.
If all is well, you can copy the Group from 14) to a new Layer, and keep or delete the original Layer to get rid of all the unneeded parts (if you dare).
The original image in the background will prevent gaps, and the Compound Path on top will ensure sharp and crisp edges for the image.
Copy link to clipboard
Copied
Sergeant,
You can try both ways (if you have hours enough) and decide which way to use, also for the other images you have.
Or you can use a temporary monthly (not anually) Photoshop subscription, just for a month or a few, to get it done in a Photoshop way, then unsubscribe.
For that you can seek help over here,
https://community.adobe.com/t5/Photoshop/bd-p/photoshop
Copy link to clipboard
Copied
Thank you for all your effort so far already.
I have no clue whats going on here and I´m getting depressed over it xD Never had so much issues for one thing to learn. The thing is IT DID WORKED ONCE the way you said it on my first few runs. I do not recall doing anything special. I just redo it because like I said the outline on the knee was messed up on one side, even tho its identical on both sides. But now I can never replicate anything of that. Not in my file nor the original. Always the same bad outcome.
Here is what I could done with all the image tracing....
please have a look is there something wrong about it maybe that u can spot?
Copy link to clipboard
Copied
I now bought all applications, since I cannot buy subscription for Illustrator + photoshop seperately for around 48€/$. I hate this subscription model adobe gives. Instead I gotta go for the 60$/€+ option and get all of them instead. Alternative would be to switch the subscriptions, but they would loose me money.
Asked in the photoshop community and will see what comes around there.
Just would be nice if u can check my pictures here, maybe some settings off and Illustrator is a option. Be short on your answer unless u see the real mistake.
I appreciate all your time, help and energy !
Copy link to clipboard
Copied
Sergeant,
It is possible to have two subscriptions, one for PS and one for AI.
But you may be able to cancel the extended subscription and stay with AI:
I may have come up with a new approach, only using AI based on Image Trace with the setting(s) Black and White and start with a Threshhold 128 (it can be different values for different images, but it seems to work for the cat with 128);
https://helpx.adobe.com/illustrator/using/image-trace.html
1) Place the cat image, with or without a black background, within whole pixel values, in other words having the top left corner at whole pixel values, such as X = Y = 0 (as in the corner of the Artboard which must also start there);
2) Ctrl/Cmd+C+F to create a copy on top of it, then lock the original;
3) Create a rectangle with the same size as the image and align the two, then select the rectangle alone and Ctrl/Cmd+X+B to bring it to the back, then give it a black fill if there is no background, then lock it;
This is the initial setting;
4) Ctrl/Cmd+A to select the copy image, then run Image Trace and Expand;
Now you ought to have white cat parts on black;
5) If you have the black background, Click somewhere on a black part, then Select>Same>Fill Color to select all background parts, then delete;
6) Click somewhere on a white cat part, then Select>Same>Fill Color to select all cat parts, then Ctrl/Cmd+G to Group them, then give the cat Group a colour such as red;
Now you ought to see red cat parts on a black background, time to fill the gaps and create the contour:
7) With the red cat Group selected, Object>Path>Offset with a poistive offset equalling the desired contour width;
If this has filled all the inner parts that formed the gaps within the cat, you can jump to 10), otherwise Ctrl/Cmd+Z to Undo and:
8) Object>Path>Offset Path with a positive offset value that is sufficient to fill the inner parts that formed all the gaps within the cat; lock and hide the original cat Group (it is on top of the offset path);
9) Object>Path>Offset Path with a smaller negative offset value that gives you a gap equalling the desired outer stroke round the cat (subtract the desired outer stroke thickness from the value in 8));
Now for the final part:
10) Unlock and show the original image from 1) which will be (partially) hidden beneath the red cat parts (which will become invisible in the next step), then unlock the rectangle from 3);
11) Ctrl/Cmd+A, then Ctrl/Cmd+7.
Now you ought to have a Group forming a Clipping Mask with the right appearance, the black background formed by (part of) the original background if any, or by (part of) the rectangle in the back.

Copy link to clipboard
Copied
Another option would be to group the cat together and add a stroke behind the group. Have the appearance palette open so you can click and drag the stroke below the word "Content" after adding the stroke. Increase the size of the stroke until spaces until it appears like you want. This is an easy fast way to get fill in the spaces if you are also wanting the stroke around the whole thing. The screenshot attached shows what I mean by clicking and draging the stroke line to be below the Content, when you first add the stroke, it appears above it.

Copy link to clipboard
Copied
I'd use image trace.

Find more inspiration, events, and resources on the new Adobe Community
Explore Now
 AdChoices