


Copy link to clipboard
Copied
I made an arc by first creating a circle, then snipping it. I want to join this arc plus two copies of it in a triangle like shape, like this:
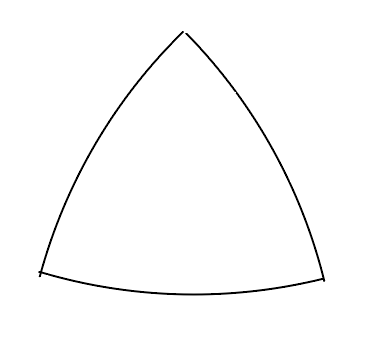
In this image, you see them roughly positioned. But I want to position them exactly with all endpoints coincident with the neighbor's endpoints, and then join the three segments. How do I do that?


 1 Correct answer
If you want it to really be mathematically correct, you'll have to employ a different method.
Here's a way (but you'll have to start over with the circle):
- Create a circle
- Copy / Paste in Front
- Use Transform > Move to move the copy horizontally a distance equal to the radius of the original circle
- Paste in Front again
- Use Transform > Move to move the copy horizontally a distance equal to one-half the radius of the original circle, and vertically a distance equal to the radius of the original circle.

- Se
Explore related tutorials & articles
 9
Replies
9
9
Replies
9
Copy link to clipboard
Copied
If you want it to really be mathematically correct, you'll have to employ a different method.
Here's a way (but you'll have to start over with the circle):
- Create a circle
- Copy / Paste in Front
- Use Transform > Move to move the copy horizontally a distance equal to the radius of the original circle
- Paste in Front again
- Use Transform > Move to move the copy horizontally a distance equal to one-half the radius of the original circle, and vertically a distance equal to the radius of the original circle.

- Select all and click the Intersect button in the Pathfinder panel

Copy link to clipboard
Copied
That's pretty cool, John. I did one thing different, which was to use the Shape Builder tool to subtract the unwanted regions. I did this because I've been confused about the Pathfinder tool... whenever I use it, I end up with a complex or compound path that has parts of the original shapes still in it, plus I can't seem to be able style it with path and fill the way I want. But that's another question (one of these days I'm going to have to learn the Pathfinder tool properly).
Copy link to clipboard
Copied
madobe1127 wrote
I did one thing different, which was to use the Shape Builder tool to subtract the unwanted regions.
Of course that's a perfectly valid (and more tactile) way to do it. There's almost always more than one way.
I did this because I've been confused about the Pathfinder tool...
That's not surprising. Pathfinder is rather cryptic unless you really delve into its operations to gain an under-the-hood understanding. All us partially fossilized users who had to learn it forward and backward well before the introduction of Shape Builder, Live Shapes, and the Shaper tool will often reach for Pathfinder first, even if the newer shape wrangling features are more "intuitive," whatever that means.

Copy link to clipboard
Copied
https://forums.adobe.com/people/John+Mensinger schrieb
... will often reach for Pathfinder first,
I definitely wouldn't.
There are several shapebuilding functions available and they all have their specific pros and cons. It makes sense to learn them all by heart, so you can make an informed and deliberate decision based on what the task demands.
Pathfinder is really efficient when there are many base shapes, but it's destructive.
On the other hand live paint is non-destructive, but often not too efficient.
The shapebuilder tool is neither non-destructive nor too efficient, but when there are only few shapes, it just does the job.
The shaper tool is non-destructive, but sometimes not too intuitive. But when using a touch device it makes a lot of sense.
And when just punching a hole all of those methods are inefficient compared to Cmd+8.
And then there's also the dangerous situation that shapes get uninentionally deleted when you use pathfinder functions in a row. You can watch 3 videos with a total length of 45 minutes. Mordy Golding's video sums it all up: Understanding Compound Paths in Adobe Illustrator - YouTube He also has the links to the other 2 videos in the description.
Copy link to clipboard
Copied
Thanks for adding all that insight to the thread, Monika (although I believe you may have unwittingly admitted to being 'partially fossilized').
You've made me think harder about the efficiency and destructiveness of various methods than I normally would. In my thinking, the concept of destructive v. non-destructive editing has never been a major consideration when it comes to vectors. I suppose its possible that by nature, vector objects, especially simple ones like those used in the construction of other shapes, are generally more expendable than the original pixels of a raster image (acknowledging the value of non-destructive methods in raster image editing). Surely there are many scenarios in vector editing where a destructive operation is preferred, if not required. In the case of the OP's example, I'd say a destructive method is appropriate.
As for efficiency, I realize now I rarely consider that also, perhaps until I find myself with a series of operations that will or must be repeated more than a few times. Under my normal working conditions, finding a way to get what I want is more important than knowing in advance how to do it quickly, but I understand that's a luxury not everyone has.
Copy link to clipboard
Copied
https://forums.adobe.com/people/John+Mensinger schrieb
I believe you may have unwittingly admitted to being 'partially fossilized').
That has happened in full control of my senses 🙂

Copy link to clipboard
Copied
Select two neighbors points with the direct selection tool, then right clock and select average (or ctrl+ alt + J and select both) then Join (ctrl +j)

Copy link to clipboard
Copied
A Youtube video, someone uploaded here, similar to John's elegant solution
How to Make a Reuleaux Triangle with Rounded Edges | Illustrator Tutorial - YouTube

Copy link to clipboard
Copied
madobe,
For an arbitrary arc/angle case like the one shown in the first image, there is an accurate and simple way without use of Pathfinder/Shapebuilder/whatever, Smart Guides being your friends.
As I (mis)understand it, you can just snap the two copy arcs into place with the help of Smart Guides, see the full description below.
You may:
1) Create the arbitrary arc;
2) Rotate a copy 120 degrees (you may use Object>Transform>Rotate and choose Copy), then deselect and then ClickDrag the relevant end Anchor Point to snap to the original arc;
3) Repeat 2) for the third arc;
4) Select all and Ctrl/Cmd+J.

Find more inspiration, events, and resources on the new Adobe Community
Explore Now
 AdChoices