

- Página inicial
- Illustrator
- Discussões
- Re: How do I create a transparent stroke above oth...
- Re: How do I create a transparent stroke above oth...

Copiar link para a área de transferência
Copiado
Hello 
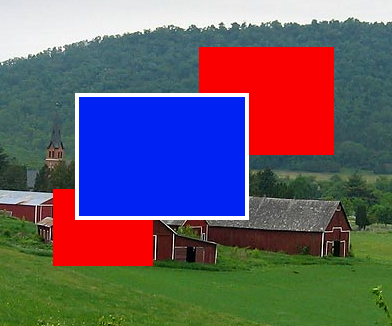
I have the following shape:

What I'm trying to do is give the blue box a transparent stroke that will "cut through" the red boxes and show the background underneath, whatever that may be ...white, another color, or a photo.
I can easily achieve this when I give it a white stroke. It'll look like this:

When I change to a background color other than white or even a photo however, I end up with this problem:
How do I make it so that I have a transparent border (not white) around the blue box? Which effectively cuts a "transparent stroke" (space) between the parts where the blue and red boxes intersect?
Thank you very much for any advice I've been trying to get this done for days without success, so you're my last hope!


 1 resposta correta
1. Select the blue rectangle with the white stroke, then do as Silkrooster suggests to set the stroke's opacity to 0. The white stroke will disappear.
2. Select all three rectangles and group them.
3. With the group selected, the Appearance panel should show:
Group
Contents
Opacity
Click on Opacity. In the box that opens, click the box next to Knockout Group until the check/tick mark appears. If the dash appears, click again.
Explorar tutoriais e artigos relacionados
 12
respostas
12
12
respostas
12
Copiar link para a área de transferência
Copiado
Window>Appearence or shift-F6. Once the appearence panel is open, Twirl down the icon next to the word Stroke, Click Opacity and adjust it to your hearts desire...
Copiar link para a área de transferência
Copiado
1. Select the blue rectangle with the white stroke, then do as Silkrooster suggests to set the stroke's opacity to 0. The white stroke will disappear.
2. Select all three rectangles and group them.
3. With the group selected, the Appearance panel should show:
Group
Contents
Opacity
Click on Opacity. In the box that opens, click the box next to Knockout Group until the check/tick mark appears. If the dash appears, click again.
Copiar link para a área de transferência
Copiado
Thank you SO much you both, that worked perfectly
Copiar link para a área de transferência
Copiado
You're welcome.

Copiar link para a área de transferência
Copiado
I have been trying to figure this out for so long! thank you Although I have one problem, when i import the file as an eps into my indesign document the whote lines appear again. Help! 😕

Copiar link para a área de transferência
Copiado
Don't use EPS. This file format doesn't support transparency. You will have to use AI (with PDF content enabled) or PDF to get the transparency into ID.

Copiar link para a área de transferência
Copiado
I am trying this with text (one word on the bottom layer and then a few words of text in a different font over top)...I am trying to "knockout" a stroke around the top text so that it cuts as a transparent stroke into the bottom layer of text. I tried doing it before creating outlines of the text and then again with creating outlines, but it doesn't seem to be working either way. (I'm not able to lower the opacity of just the stroke, and after creating outlines opacity does not come up as an option in Appearance). I acheived the look I want in Photoshop, but whenever I'm trying to save this as an EPS (for a t-shirt design), it is making it a flat jpg. Any help appreciated!

Copiar link para a área de transferência
Copiado
Do not apply the stroke to the characters. Instead select the text object with the selection tool (just one click). Then add a stroke using the appearance panel. And then you can set the opacity of that stroke to 0%.
Copiar link para a área de transferência
Copiado
Copiar link para a área de transferência
Copiado
The simple fix would be to set the corners of the stroke to rounded. If you do not want that, you will look into outlining the font and adjusting the path.
Copiar link para a área de transferência
Copiado
That helped! Thanks so much!
Copiar link para a área de transferência
Copiado
You're welcome!

Encontre mais inspiração, eventos e recursos na nova comunidade da Adobe
Explore agora
 AdChoices