Copy link to clipboard
Copied
Hi everyone,
I'm quite new to Illustrator so bare with me.
I'm trying to make a magnifying glass and the part that is being magnified is essentially protruding outside of the boarder. How do I cut it so that it's flush against the circled boarder?
 1 Correct answer
Deidra,
You can:
1) Select the rim circle and Ctrl/Cmd+X+F to bring it on top of the enlarged artwork,
2) Select 1) and Ctrl/Cmd+C+B to create a copy behind, then ShiftClick the enlarged artwork and Ctrl/Cmd+7 to create a Clipping Mask that hides the outer parts.
You can use the inner rim circle in 2) if it is a filled Compound Path.
Or you can Draw Inside.
Explore related tutorials & articles
Copy link to clipboard
Copied
Deidra,
You can:
1) Select the rim circle and Ctrl/Cmd+X+F to bring it on top of the enlarged artwork,
2) Select 1) and Ctrl/Cmd+C+B to create a copy behind, then ShiftClick the enlarged artwork and Ctrl/Cmd+7 to create a Clipping Mask that hides the outer parts.
You can use the inner rim circle in 2) if it is a filled Compound Path.
Or you can Draw Inside.
Copy link to clipboard
Copied
Hi Deidra5CC7,
There are actually a few effective ways to acheive this.
Opacity Mask Method:
These masks are a little confusing for beginners but when you understand them they are incredibly powerful. You can mask an object with black and white to hide and reveal parts of the artwork in a non destructive way ( not actually deleting or altering the shape) which means you can always go back and adjust the artwork.
First, group everything you want to mask. For this example it would be the blue circle, white circle, and the two gray lines that are protruding from the magnifying glass.
Next, copy the light blue circle (since that is the area you want the artwork contained in). Make sure not to copy the gray stroke with the blue circle.
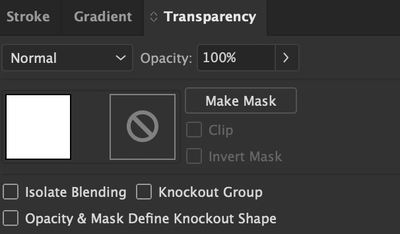
Now you need to select the grouped objects (The blue circle with the lines around it). On the side bar navigate to the transparency tab (if you don't have this you can open it by going to Window > Transparency)
With the object selected you will see a white box and a blank area like this:
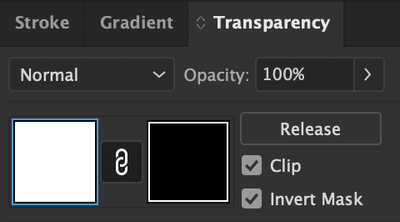
Select the make mask box. Your object will disappear but this is normal. You will also notice there is now a black box next to the other box:
Click the black box. This will now allow you to create on the mask layer. while this black box is selected everything you draw, or in our case paste, will have an effect on your grouped object. Now you can paste the light blue circle from the magnifying glass into this box. However the light blue will make the object kind of transparent and weird. This is because for 100% opacity and 0% opacity the object has to be pure black or pure white. With the light blue circle selected in the mask layer change the color to black or white. If you picked one and you dont see the design try inverting the mask. My mask mode is inverted by default because i prefer using black to show and white to hide but this is just preference.
Now your design should no longer be protruding from the magnifying glass. You can also get familiar with this now by adding some white shapes on the mask and seeing how the masking works.
To go back to the object simply click the white box and you will be back in the normal editing mode and will no longer make changes to the mask.
You can also move and scale your object within the mask by clicking th elink icon between the two boxes to break the link. This will let you move, and resize the object within the mask. when youre done moving it MAKE SURE YOU RECONNECT THE LINK or you will go to move or resize the whole design and run into all kinds of issues so ALWAYS relink the artwork with the mask when youre done.
The Pathfinder method:
This one is really easy but is destructive so i only recomend doing it if you are 100% sure you wont need to adjust later.
For this all you have to do is select the two gray lines (if they are strokes go to object > Outline Stroke to turn it into a shape).
Now copy the light blue circle and paste it in place (command F on mac)
Select the duplicate blue circle and select one of the gray lines and go to the pathfinder options ( if you dont see them go to window > pathfinder) and select this one:
This will alter the path to fit withing the circle that you selected.
Now just copy the blue circle, paste in place and repeat for the other gray line.
Remember this is destructive and alters the path forever. Yes you can undo it but if you get hours into the project and the client wants an adjustment you are out of luck and have to redo it.
The cover up methed (simplest and easiest but might not work for this):
This one is simple. Just copy the gray stroke and paste in a layer on top of the gray lines you want to hide. It will cover the excess of the gray lines however i see they stick out a little further than the stroke so you'll see the little dark spots unless you make the stroke thicker to cover it.
Find more inspiration, events, and resources on the new Adobe Community
Explore Now


