Exit
  • Global community
    • Language:
      • Deutsch
      • English
      • Español
      • Français
      • Português
  • 日本語コミュニティ
  • 한국 커뮤니티
0

How to get this glow effect and these cubes on the right ?

Contributor ,
Feb 08, 2019 Feb 08, 2019

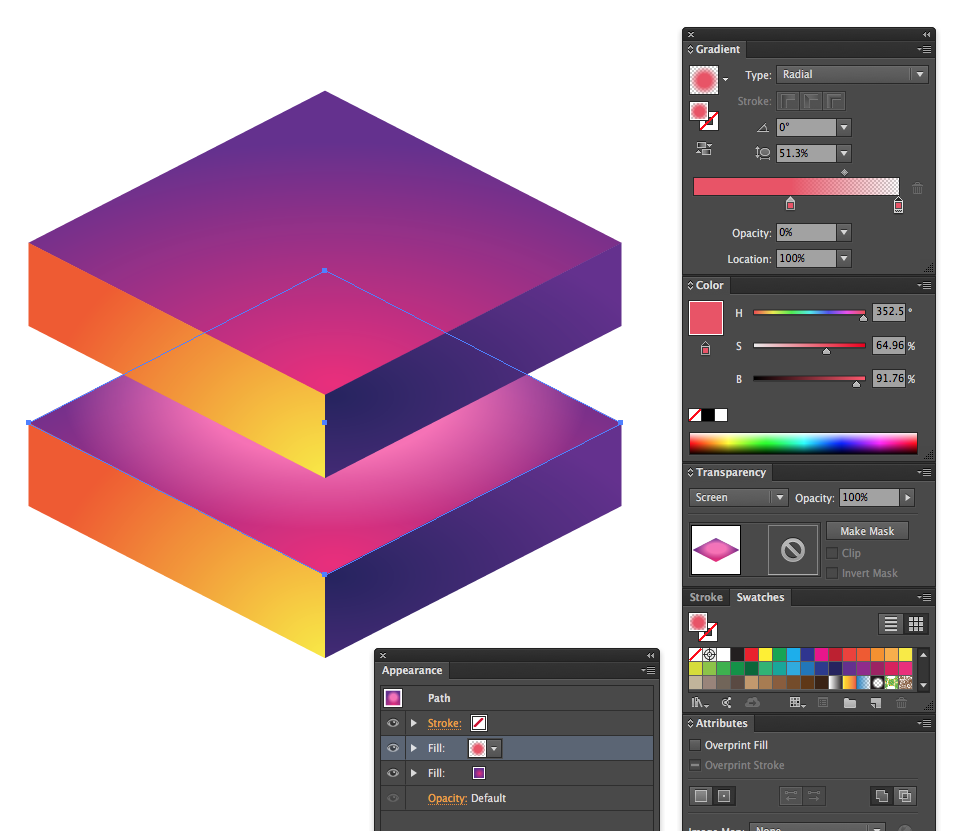
Hi, I know to get these isometric plans, after rotated them in order to be isometric I set up a gradient with same color but one with 0% opacity however it is not so clear to me how to get the glow of that elements inside plans and I wanted to ask your help please. Morevover what's the best way to get those 3D cubes with that graphic applied on as texture that match their isomentric type of plan (I mean left, right and top)?

Working on Win 7 and AI CC 2017

example-01.png

558
Translate
Report
Community guidelines
Be kind and respectful, give credit to the original source of content, and search for duplicates before posting. Learn more
community guidelines

correct answers 1 Correct answer

LEGEND , Feb 11, 2019 Feb 11, 2019
  1. Create your pattern.
  2. Save it as a Symbol
  3. Drag Symbol Instance to Swatch Panel to create a Fill Pattern.
  4. Group each side of your "Cube" artwork.
  5. Select One "side" and, in the Appearance Panel, add a new Fill Attribute.
  6. Assign the "Pattern Fill" to the new Group Fill.
  7. Save this "Group" Appearance as a "Graphic Style"
  8. Assign this Graphic Style to ALL the Sides.
  9. Download this Action Set (or one you already have) to distort each plane into isometric view. Make sure "Transform Pattern Tiles" clicked ON in Gen
...
Translate
Adobe
LEGEND ,
Feb 08, 2019 Feb 08, 2019

You can create the effect with a few gradients applied in the Appearance Panel. You can also apply a Transparency Mode to individual Gradient fills, but it probably is not necessary with the right colors.

This GIF is poor color but shows the ability to freely edit the overlaying gradient.

glow.gif

Translate
Report
Community guidelines
Be kind and respectful, give credit to the original source of content, and search for duplicates before posting. Learn more
community guidelines
Contributor ,
Feb 11, 2019 Feb 11, 2019

While I fully agree with your answer actually I asked how to get that glow/neon effect since I noticed it is not just a glow effect applied to the stroke and what's the best way to apply textures on those cubes surface that follow thier isometric angle. By the way thank you for all the time took to do your rich and useful answer.

Translate
Report
Community guidelines
Be kind and respectful, give credit to the original source of content, and search for duplicates before posting. Learn more
community guidelines
LEGEND ,
Feb 11, 2019 Feb 11, 2019
LATEST
  1. Create your pattern.
  2. Save it as a Symbol
  3. Drag Symbol Instance to Swatch Panel to create a Fill Pattern.
  4. Group each side of your "Cube" artwork.
  5. Select One "side" and, in the Appearance Panel, add a new Fill Attribute.
  6. Assign the "Pattern Fill" to the new Group Fill.
  7. Save this "Group" Appearance as a "Graphic Style"
  8. Assign this Graphic Style to ALL the Sides.
  9. Download this Action Set (or one you already have) to distort each plane into isometric view. Make sure "Transform Pattern Tiles" clicked ON in General Preferences.

As for the "Stroke Glow" effect, I can't really see it in your sample. I'm guessing a simple Stroke Gradient would work fine. If it also has a pattern add a second "Stroke" Attribute in the Appearance Panel and add a Brush pattern to it.

Translate
Report
Community guidelines
Be kind and respectful, give credit to the original source of content, and search for duplicates before posting. Learn more
community guidelines