- Home
- Illustrator
- Discussions
- Re: How to make front thinner (stroke thinner than...
- Re: How to make front thinner (stroke thinner than...
Copy link to clipboard
Copied
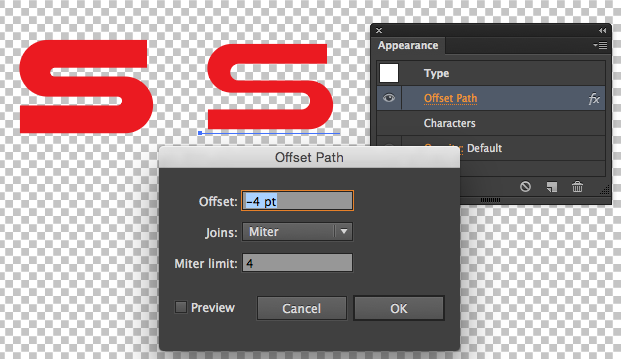
I'm trying to make my "s" as thin as it is in the red section is on the "s" on the right side, the "s" on the left side is still very thick with a stroke of 0. i have tried creating a stroke on the inside like i have on the right "s" but i can't seem to just get it with the red section and not the black stroke on the outside. In other words i want the red "s" as thin as the red "s" is within the black portion.
.png)
 2 Correct answers
Effect >> Path >> Offset Path works on both live text and vector paths.

This is what always works for me:
1. Create the required text.
2. Make the text layer active and click on fx > Stroke.
3. Set the colour swatch to pure black
4. Set Position to Inside
5. Set the Blend Mode to Screen
6. Set the Size value. (usually 1 will do).
7. Click OK
Explore related tutorials & articles
Copy link to clipboard
Copied
Expand the stroke/ convert the type to outlines, subtract it from the rest using pathfinder operations.
Mylenium
Copy link to clipboard
Copied
You could also if the S is already outlined go to Object>Path>Offset Path...
Then select preview and set the offset to minus whatever number works.
You will start with the first S and then after adding a minus offset you will see something like the second S then if you then delete the outer path you will end up with the last S...

Copy link to clipboard
Copied
Esse é o método mais elegante / recomendado
Copy link to clipboard
Copied
Mary,
If you wish to avoid shortening of the lettershapes by the same amount as the thinning, and especiallly if you can use a stroked path for the final shape, you may (save artwork before starting and maybe on the way), it is especially easy for letters like S and C and I:
1) Ctrl/Cmd+Shift+O to create outlines, then Ctrl/Cmd+Shift+G and Ctrl+Alt+Shift+8/Cmd+Option+Shift+8 to get individual paths, switch from Fill to Stroke and set the Stroke as desired;
2) Object>Blend>Blend Options, setting Specified Steps to 1;
For each letter:
3) With the Direct Selection Tool click and delete end segments if relevant (letters like the S); for certain letters you will have to do some more to work with letter parts (letters like A and B);
4) Select the two paths and Ctrl+Alt+B/Cmd+Option+B.
Copy link to clipboard
Copied
Hi. I love everybody else's ideas, but they do render the text uneditable in the end. I'm curious if your wish is just so that you have paths the same width as the inner shape, or if it's just about the look of the text. While it may seem clear and obvious, I sometimes find that sometimes not everything occurs to someone just trying to accomplish a goal, so I'll suggest what, to me, without more information on your purpose, is the easiest solution.
Have you stroked the text with the same color as your background (in this case, white) and just played with the stroke width? If that's not the bottom line need, I apologize, because everyone above has great methods of getting those text shapes to be just as you want them to look - but otherwise, this keeps it editable, and you can play with heights, widths, tracking and kerning to get the precise look you want.
Adobe Community Expert / Adobe Certified Instructor
Copy link to clipboard
Copied
Effect >> Path >> Offset Path works on both live text and vector paths.

Copy link to clipboard
Copied
Hello,
I know that this is an old post but for anyone struglling with the same issue you can use expand on the shape with its stroke, then with the shape builder tool you remove the stroke from the shape (while hitting Alt you click on the strokes), after you remove it all, you will end up with only the shape that was inside of the stroke.
Copy link to clipboard
Copied
Lol I just saw that there are responses already, so nvm me XD
Copy link to clipboard
Copied
This is what always works for me:
1. Create the required text.
2. Make the text layer active and click on fx > Stroke.
3. Set the colour swatch to pure black
4. Set Position to Inside
5. Set the Blend Mode to Screen
6. Set the Size value. (usually 1 will do).
7. Click OK
Find more inspiration, events, and resources on the new Adobe Community
Explore Now


