• Global community
    • Language:
      • Deutsch
      • English
      • Español
      • Français
      • Português
  • 日本語コミュニティ
    Dedicated community for Japanese speakers
  • 한국 커뮤니티
    Dedicated community for Korean speakers
Exit
0

Illustrator trim marks don't add up.

Community Beginner ,
Dec 17, 2017 Dec 17, 2017

Copy link to clipboard

Copied

Hi fellow forum members,

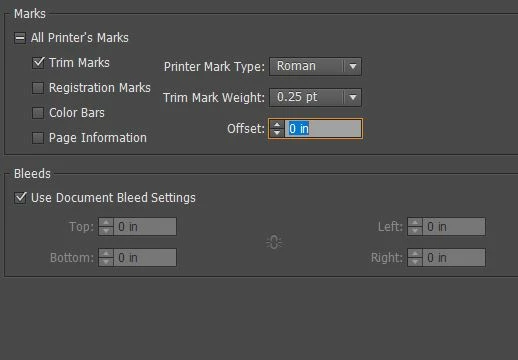
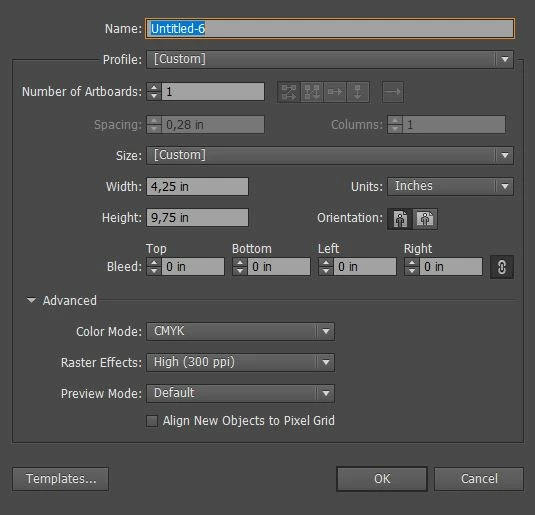
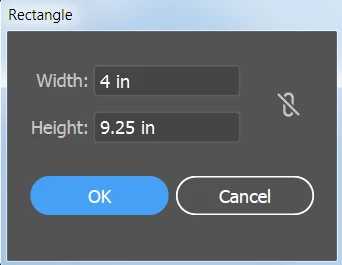
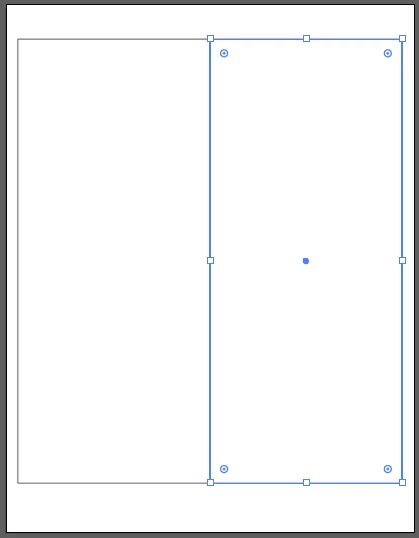
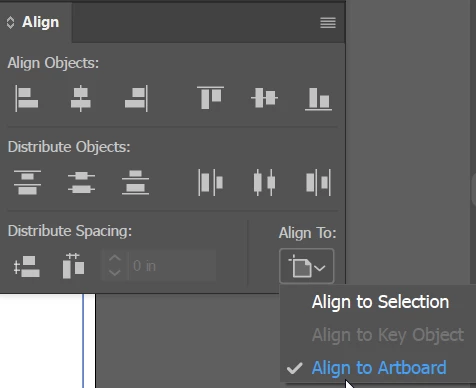
I am creating a document which needs to have trim marks. The final trimmed document size needs to be 4"x 9.25". Now when I create the new document by adding 0.25'' onto both sides ie. 4,25'' x 9,50'' when this document actually prints it actually measures 4''X 9''.

So I then created a new doc 4,25'' x 9,75'' and when this is printed out it prints to the size I want 4'' X 9,25''. So by adding 0.25'' to one side but 0.75'' to the other side I then get the correct print size. This doesn't quite add up so just wondering what I am doing wrong.  I am measuring the actual document with a ruler. Settings attached.

Thanks!

Capture3.JPGCapture2.JPG

Views

3.3K

Translate

Translate

Report

Report
Community guidelines
Be kind and respectful, give credit to the original source of content, and search for duplicates before posting. Learn more
community guidelines

correct answers 1 Correct answer

Community Expert , Dec 17, 2017 Dec 17, 2017

Illustrator can create trim marks, but there isn't as much control as with bleed marks.

I would do everything in Illustrator.

  1. Create a new 8 1/2 x 11 document, the same size as the sheet that the printer will be using.
  2. With the Rectangle tool, click on the artboard, and type in 4 wide, 9.25 high.
  3. Duplicate the rectangle and line it up with the first rectangle.
  4. Select both rectangles and group them.
  5. In the Align panel, select Align to Artboard. (you may need to choose Show Options the panel menu to see
...

Votes

Translate

Translate
Adobe
Community Beginner ,
Dec 17, 2017 Dec 17, 2017

Copy link to clipboard

Copied

Correction**

So by adding 0.25'' to one side but 0.50'' to the other side I then get the correct print size.

Votes

Translate

Translate

Report

Report
Community guidelines
Be kind and respectful, give credit to the original source of content, and search for duplicates before posting. Learn more
community guidelines
Community Expert ,
Dec 17, 2017 Dec 17, 2017

Copy link to clipboard

Copied

When you first create the document the settings should look like this:

When you print, put a check mark on Use Document Settings,

And scaling should be set to Do Not Scale.

Your print dialog may look a little different, but those settings should be somewhere in the dialog box.

Votes

Translate

Translate

Report

Report
Community guidelines
Be kind and respectful, give credit to the original source of content, and search for duplicates before posting. Learn more
community guidelines
Community Beginner ,
Dec 17, 2017 Dec 17, 2017

Copy link to clipboard

Copied

Thanks a million!

Votes

Translate

Translate

Report

Report
Community guidelines
Be kind and respectful, give credit to the original source of content, and search for duplicates before posting. Learn more
community guidelines
Community Expert ,
Dec 17, 2017 Dec 17, 2017

Copy link to clipboard

Copied

You're most welcome!

Votes

Translate

Translate

Report

Report
Community guidelines
Be kind and respectful, give credit to the original source of content, and search for duplicates before posting. Learn more
community guidelines
Community Beginner ,
Dec 17, 2017 Dec 17, 2017

Copy link to clipboard

Copied

I just would like to add one more question. The design I am doing is actually for wedding invites. So what I have been doing is creating the 4''X9'' document and then exporting it as a pdf. The I place two of those pdfs side by side on a letter size document.

I just tested out those settings and then exported it as a pdf and ran a print copy to test. It now seems to size it down to 3,75''X 8,75''. Something I am doing wrong in the export process. Capture4.JPGCapture5.JPGCapture6.JPG

Votes

Translate

Translate

Report

Report
Community guidelines
Be kind and respectful, give credit to the original source of content, and search for duplicates before posting. Learn more
community guidelines
Community Beginner ,
Dec 17, 2017 Dec 17, 2017

Copy link to clipboard

Copied

**Correction

So what I have been doing is creating the 4''X9.25'' document and then exporting it as a pdf.

Votes

Translate

Translate

Report

Report
Community guidelines
Be kind and respectful, give credit to the original source of content, and search for duplicates before posting. Learn more
community guidelines
Community Expert ,
Dec 17, 2017 Dec 17, 2017

Copy link to clipboard

Copied

I may be misunderstanding the workflow. Is this correct -- you are creating two separate documents in Illustrator, exporting each Illustrator document to PDF, and then combining the two PDFs in Illustrator?

Votes

Translate

Translate

Report

Report
Community guidelines
Be kind and respectful, give credit to the original source of content, and search for duplicates before posting. Learn more
community guidelines
Community Beginner ,
Dec 17, 2017 Dec 17, 2017

Copy link to clipboard

Copied

Hi yes Barbara, that is correct.

I am are creating two separate documents in Illustrator, exporting each Illustrator document to PDF, and then combining the two PDFs in Illustrator. I am then exporting the combined document as a pdf and printing that. I then would like the final pdf to have trim marks around each 4''x 9,25'' design.

Votes

Translate

Translate

Report

Report
Community guidelines
Be kind and respectful, give credit to the original source of content, and search for duplicates before posting. Learn more
community guidelines
Community Expert ,
Dec 17, 2017 Dec 17, 2017

Copy link to clipboard

Copied

Are you printing the document yourself or sending the pdf to a commercial printer?

Are both PDFs identical or do they represent the front and the back of an invitation?

Are the two PDFs going to be cut apart or are they going to be folded in the center?

Votes

Translate

Translate

Report

Report
Community guidelines
Be kind and respectful, give credit to the original source of content, and search for duplicates before posting. Learn more
community guidelines
Community Beginner ,
Dec 17, 2017 Dec 17, 2017

Copy link to clipboard

Copied

Hi Barbara,

Many thanks for your super quick response!

I am sending the pdf to a commercial printer.

Both PDFs are identical. (However I also need to create another part of the invitation which will represent the front and back of an invitation, so if you could guide me on both methods that would be highly appreciated!)

The two PDFs are going to be cut apart.

Votes

Translate

Translate

Report

Report
Community guidelines
Be kind and respectful, give credit to the original source of content, and search for duplicates before posting. Learn more
community guidelines
Community Expert ,
Dec 17, 2017 Dec 17, 2017

Copy link to clipboard

Copied

Let's deal with this one first, one where you have identical pdfs.

Do you have a bleed on the invitation, an object that prints to the edge of the sheet?

If there are no objects that print to the edge of the sheet, are you using the trim marks simply as a cutting guide?

Votes

Translate

Translate

Report

Report
Community guidelines
Be kind and respectful, give credit to the original source of content, and search for duplicates before posting. Learn more
community guidelines
Community Beginner ,
Dec 17, 2017 Dec 17, 2017

Copy link to clipboard

Copied

Great! I dont have any bleed on the invitation, most of the objects are far from the edge of the sheet.

Trim marks are required simply as a cutting guide.

Votes

Translate

Translate

Report

Report
Community guidelines
Be kind and respectful, give credit to the original source of content, and search for duplicates before posting. Learn more
community guidelines
Community Expert ,
Dec 17, 2017 Dec 17, 2017

Copy link to clipboard

Copied

Illustrator can create trim marks, but there isn't as much control as with bleed marks.

I would do everything in Illustrator.

  1. Create a new 8 1/2 x 11 document, the same size as the sheet that the printer will be using.
  2. With the Rectangle tool, click on the artboard, and type in 4 wide, 9.25 high.
  3. Duplicate the rectangle and line it up with the first rectangle.
  4. Select both rectangles and group them.
  5. In the Align panel, select Align to Artboard. (you may need to choose Show Options the panel menu to see that.)
  6. Then click the Horizontal Align Center  and Vertical Align Center icons in the Align panel.
  7. With the grouped rectangles selected, in the Effect menu choose Crop Marks. Now you'll need to adjust the marks.
  8. With the grouped rectangles selected, choose Object > Expand Appearance. Then choose Object > Ungroup a couple of times until there are no more groups and the ungroup command is grayed out.
  9. Select the two trim marks on the left and move them far enough to the right that they fit onto the 8.5 x 11 sheet. Leave a little gap between the rectangle and the trim marks to give the printer some tolerance.
  10. Do the same thing on the right, moving the two trim marks in far enough so that they are within the 8.5 x 11 sheet but do not touch the rectangle.
  11. Select a pair of the top and bottom trim marks and duplicate them to the center. (Once you select them you can hold down Alt or Option, start dragging, add the Shift key. Alt/Option will make a duplicate and Shift will constrain the movement so that they line up with the original lines.
  12. Select the two rectangles, and choose View > Guides > Make Guides. View > Guides > Lock Guides so that you won't accidentally move them.
  13. Create your layout on one side. Select everything in your layout (but not the trim marks).
  14. Choose Object > Transform > Move, and type Horizontal 4, Vertical zero. Click Copy.
  15. File > Save as PDF.

Good night for now. Will catch up with you tomorrow.

Votes

Translate

Translate

Report

Report
Community guidelines
Be kind and respectful, give credit to the original source of content, and search for duplicates before posting. Learn more
community guidelines
Community Beginner ,
Dec 18, 2017 Dec 18, 2017

Copy link to clipboard

Copied

Wow! I followed your steps and it created exactly the document I was looking for. I cannot thank you enough! I have been struggling with this for a full day now and finally I have a solution! I am guessing that when it is a folded document I would follow the same steps but then create the front of the design on the right half and the back of the design on the left half? (For the outside of the invite)

Votes

Translate

Translate

Report

Report
Community guidelines
Be kind and respectful, give credit to the original source of content, and search for duplicates before posting. Learn more
community guidelines
Community Expert ,
Dec 18, 2017 Dec 18, 2017

Copy link to clipboard

Copied

You're welcome.

For the folded document, you could have two artboards, each 8 1/2 x 11, with the left and right inside pages on one artboard and the left and right outside pages on the other artboard.

Change the center trim marks to dashes. Solid lines are traditionally used for trim marks and bleed marks; dashed lines for folds.

Votes

Translate

Translate

Report

Report
Community guidelines
Be kind and respectful, give credit to the original source of content, and search for duplicates before posting. Learn more
community guidelines
Community Beginner ,
Dec 21, 2017 Dec 21, 2017

Copy link to clipboard

Copied

Thank you thank you Thank you!!!!

Votes

Translate

Translate

Report

Report
Community guidelines
Be kind and respectful, give credit to the original source of content, and search for duplicates before posting. Learn more
community guidelines
Community Expert ,
Dec 21, 2017 Dec 21, 2017

Copy link to clipboard

Copied

LATEST

You're welcome, and congratulations to the bride and groom!

Votes

Translate

Translate

Report

Report
Community guidelines
Be kind and respectful, give credit to the original source of content, and search for duplicates before posting. Learn more
community guidelines