Jber,
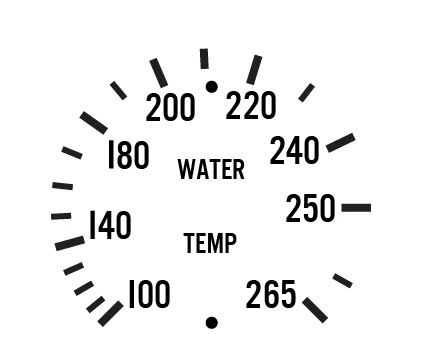
I believe the best way in this case is to custom make it. You may, on top of the original as a locked template (creating everything in red or some other suitable colour clearly discernible from both white and black, and with Smart Guides ticked):
1) Create three stroke/nofill circles corresponding to the outer ends of the tick marks, to the inner ends of the short ones, and to the inner ends of the long ones;
2) Add Anchor Points with the Add Anchor Point Tool (bundled with the Pen Tool) at the centre of each tick mark;
3) For each tick mark, with Butt Cap ticked set the Stroke Weight to the width and ClickDrag with the Line Segment Tool from the added Anchor Point to the centre of the circle, then cut the new tick mark with the Scissors Tool where it crosses the relevant inner end circle and delete the inner surplus part (you may create all the thicker longer ones first and then the shorter narrower ones);
4) Delete or hide the circles and set all the Strokes to white or whichever colour is desired.
You may recreate the black background with a simple filled circle and a straight cutoff at the bottom (unless the straight cutoff is just an image crop thing); you may use the Line Segment Tool, Object>Path>Divide Objects Below, and delete the bottom surplus part.
Created in that way, the tick marks will point more truly towards the centre.


 3
Replies
3
Replies


 AdChoices