

- Home
- Illustrator
- Discussions
- Re: Hmm! Calling them dashes gave me a crazy idea....
- Re: Hmm! Calling them dashes gave me a crazy idea....

Copy link to clipboard
Copied
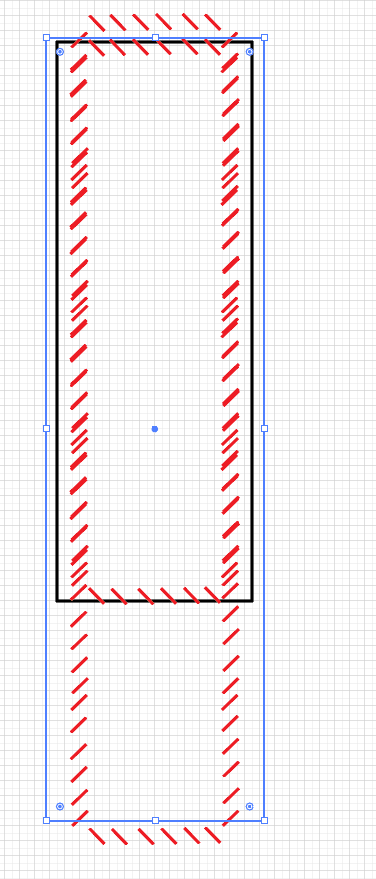
Hope someone can help me. First I am new to AI but not to PS so I have half a clue maybe. So…. I do leather work and am starting to create my patterns in AI. No problem with the shapes and the like but when I go to add a stitching line, I created using the pattern brush and apply it to say a box and then to a different sized box that would be sewn together the stitching spacing doesn’t match up. So I guess what I am trying to say is I need my 2mm high 45 degree diagonal lines that are 3.38mm apart from each other (that’s the distance between the pricks on the pricking iron) to stay that way no matter what the size or shape. Make sense? I know it can be done I see it on other patterns. Any help wouyld be greatly appreciated. Thanks in advance.
on attached picture to differnt sized squares and you can see how they start to offset on each other. thanks the problem.


 1 Correct answer
Jeff wanted to get back to you that yes the Type on Path Tool is working combined with the Path Options Spacing. I can do this on any shape with the proper distance between my 45 degree marks. Thank you for your help. Thanks for hanging in there with me to figure this out!!!
Sincerely,
Don
Explore related tutorials & articles
 20
Replies
20
20
Replies
20

Copy link to clipboard
Copied
Try the scatter brush instead of the pattern brush
Copy link to clipboard
Copied

Copy link to clipboard
Copied
Hi Don,
If Monika's answer is correct, please mark it correct, so we know the issue is solved.
Thanks!
Jeff
Copy link to clipboard
Copied
Here an old tutorial about Pattern Brushes that may help: http://www.jeffwitchel.net/2015/08/a-look-inside-pattern-brush-borders/
In the video, pay close attention to Spacing in the dialog window along with the Fit secton. A combination of these two should answer your question.
Copy link to clipboard
Copied
Jeff thank you for that. Looks like 50% spacing and "add space to fit" is keeping the spacing even. I will play with it more again thank you!
Copy link to clipboard
Copied
It's not neccessarily going to keep the spacing even throughout. If you have two segments that have slightly different lengths, the spacing will be slightly different as well. It's adding space to make the repeat pattern fit perfectly to the length. Different lengths, different spacing.
Copy link to clipboard
Copied
Looking at your artwork, a Pattern Brush is probably not a good choice for you. A big part of the Pattern Brush is that the corners will be consistent. In order for that to happen, the spacing or the art or both need to be adjusted in segments of varying lengths. That's the inconsistancy that your finding.
You may want tro take a look at the Transform Effect instead. It starts with a single stitch. The rest of the stitches are an Effect and are an exact distance appart.

Copy link to clipboard
Copied
It's kind of like a step and repeat effect with a certain number of stitches repeated at an exact distance.
Copy link to clipboard
Copied
where is that located at ?
Copy link to clipboard
Copied
Effects (fx) (at the bottom of the Appearance panel) > Distort and Transform > Transform.
Copy link to clipboard
Copied
ok found it under Effect> Distort & Transform> Transform and yes that works great ... next would be how do I apply that to a path say a rectangle ?
Copy link to clipboard
Copied
That's a problem. Unlike Brushes, you would not be applying this to an existing object, You would be making a rectangle from four slash objects with the Transform Effect apllied. Two with Vertical Offsets (Move), two with Horzizontal Offests (Move). One for each side of the rectangle.
This could get fairly complicated with objects that are not square to the Artboard (without expanding the Efeect).
Copy link to clipboard
Copied
Jeff thank you for your help! this is crazy people are making patterns all the time with stitching lines. It just can't be that complex. or AI isnt the product to use 😞
Sincerely
Don
Copy link to clipboard
Copied
Hi Don,
I'm sure you're right. But the slight differences in the spacing probably go unnoticed.
Best,
Jeff
Copy link to clipboard
Copied
Jeff can you change the shape of the dash to say a slant line?
Copy link to clipboard
Copied
Hmm! I thought that was a slant line in my screenshot above.
Copy link to clipboard
Copied
Hmm! Calling them dashes gave me a crazy idea.
- Draw a rectangle and click on it with the Type on a Path tool (Click and hold on the Type tool to find Type on a Path.)
- Type some Em Dashes (Option+Shift+Hyphen [Alt+Shift+Hyphen on Windows])
- Select this type and use the Character Rotation feature in the Character panel to rotate each individual Em Dash 45°.
These slanty Em Dashes could be your stitches. You can make them bigger or smaller using Point Size. Closer or further appart using Tracking. You could also use them with Type on a Path on any shape path.

Copy link to clipboard
Copied
cool.... I will give this a shot and let you know thatnk you!!!!!
Copy link to clipboard
Copied
Jeff wanted to get back to you that yes the Type on Path Tool is working combined with the Path Options Spacing. I can do this on any shape with the proper distance between my 45 degree marks. Thank you for your help. Thanks for hanging in there with me to figure this out!!!
Sincerely,
Don
Copy link to clipboard
Copied
You're quite welcome Don!

Find more inspiration, events, and resources on the new Adobe Community
Explore Now
 AdChoices