- Home
- Illustrator
- Discussions
- Betreff: One outline on separate separate objects ...
- Betreff: One outline on separate separate objects ...
One outline on separate separate objects / text?
Copy link to clipboard
Copied
I'm trying to create an outline around the perimeter of multiple objects rather than an each object outlined individually. Something like the in the attached image. Is this possible in illustrator 2021?
Explore related tutorials & articles
Copy link to clipboard
Copied
Do you need this outline for cutting?
Copy link to clipboard
Copied
@Monika Gause Yes, I would like to use the outlined path for cutting. So, for that particular situation, I wouldn't need it to be a filled outline / background but I'd also like to know how to fill the background.
Copy link to clipboard
Copied
Basically you need a copy of all objects, all strokes and effects need to be outlined and then you combine all this using pathfinder "Unite". Then Offset path.
This can be done using effects in the appearance panel. But if there are a lot of special things you need to outline first, it can get complicated.
Copy link to clipboard
Copied
I tried your method but unfortunately didnt have any success.
These are the steps that I followed:
I created three lines of text with the type tool
I outlined the text
I copied the outlined text
I pasted in place the outlinde text
I selected the original oulined text, the pasted outlined text and united them using pathfinder
Finally, I created an offset path.
The attached pic was my result
Copy link to clipboard
Copied
Offset path is in Object > Path > Offset path or in Effect > Path > Offset path
If you used the latter, can you please show the Appearance panel?
Copy link to clipboard
Copied
Shane,
You can:
1) Group all the objects (outlined Type or whatever), then Object>Path>Offset Path by the amount that makes them all form the desired outer shape, with or without holes between them; you can try a few times till you get it right (Ctrl/Cmd+Z is your friend);
2) Pathfinder>Unite; if there are holes within the new combined shape you can deselect (Click an empty spot) and then Direct Select the bounding path of each and press Delete a few times.
That ought to be it. The Offset path(s) will be behind the original objects.
Copy link to clipboard
Copied
Shane,
Given the more complicated text with fill and stroke on top, it tales a few more steps than those in my first answer.
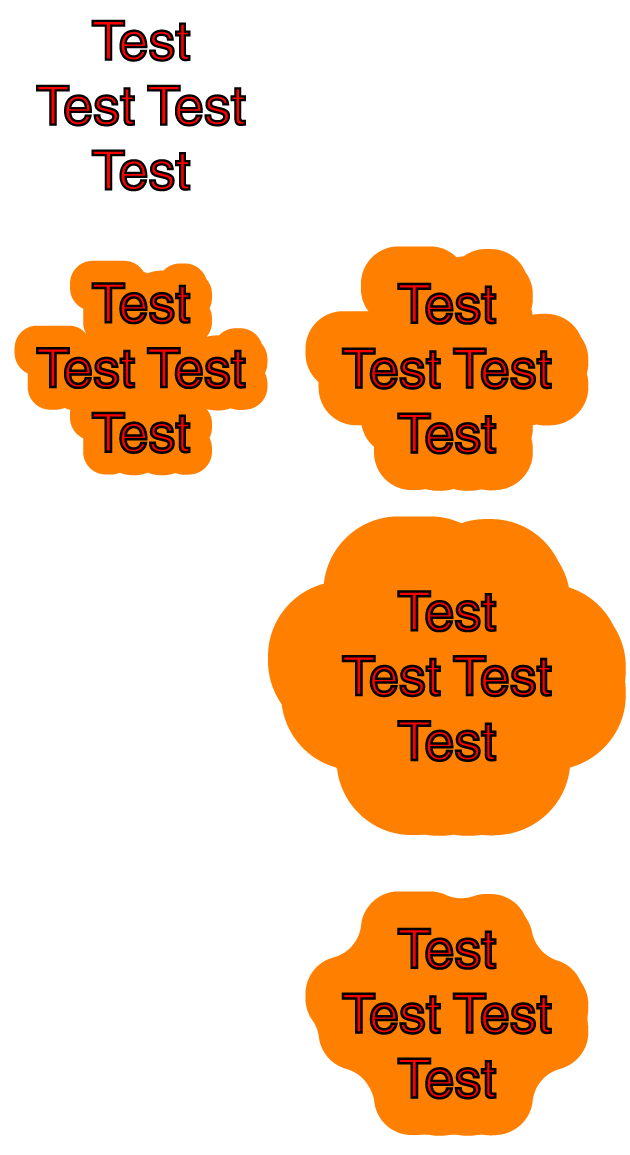
You can, see the images below:
1) Create the three lines of live Type and Add New Stroke in the Appearance panel (below with Helvetica 72pt in red and 3 pt stroke in black, see the first image below;
2) Type>Create Outlines, then Object>Expand Appearance, which will form a Group of Groups, the upper Group being the black strokes, the lower Group being the red fills, it still looks like the first image below;
3) Select the lower red fills Group and Object>Path>Offset Path by the amount that makes them all form the desired outer shape, with or without holes between them; you can try a few times till you get it right (Ctrl/Cmd+Z is your friend), see the second and third images which are based on Offsets of 30 pt and 50 pt (Offset path in the background shown in carrot colour); this corresponds to step 1) in my first answer;
Remember to select Round Joins in the Offset Path options in 3);
4) Ctrl/Cmd+X+B or ClickDrag the offset paths down below the red Group, or below the Group of Groups in the expanded Layers panel;
4) Pathfinder>Unite; if there are holes within the new combined shape (you can hide the letters to see) you can deselect (Click an empty spot) and then Direct Select the bounding path of each and press Delete a few times, in this case there were no holes to be deleted; this corresponds to step 2) in my first answer, it still looks like the second and third images below;
5) If you wish, you can fill out parts of the offset shape to avoid the inward corners; this can be done in different ways, one of them being to Offset the carrot colour path from 4) further out and then Offset back (the same offset, only negative), and delete the unneeded paths; this is shown in the last two images under the 50 pt offset, with another 50 pt out and -50 pt back in, resulting in a softer shape.
Copy link to clipboard
Copied
- @Jacob Bugge Thank you for your detailed and comprehensive response. I was able to replicate your results. Again, thank you very much.
Copy link to clipboard
Copied
You are welcome, Shane, and thank you for an intriguing challenge.


