

- Home
- Illustrator
- Discussions
- Possible to Invert Path Illustrator?
- Possible to Invert Path Illustrator?

Copy link to clipboard
Copied
Does Ai have a capability to Invert a path similiar to PS when Inverting a Selection?


 2 Correct answers

Do you mean creating an offset path? Like this (see blue lines):


You are welcome, westdr.
Until the automatic tracing becomes good enough, or till the end of days, whichever occurs first, the best way is to redraw on top of the locked image using the suitable tools, just as Bobby said, preferarbly using a rather narrow stroke in a contrasting colour and no fill, in this case you can use full black at 0.25 pt, and letting Smart Guides help you, maybe on and off, and remembering that Undo is your friend. Always keep backups of the parts you may need to fall b
...Explore related tutorials & articles
 26
Replies
26
26
Replies
26

Copy link to clipboard
Copied
Illustrator has a Select > Inverse.
But that is probably not what you mean...

Copy link to clipboard
Copied
Maybe you can post a screenshot? Are you referring to masks?
Copy link to clipboard
Copied
I have attached 3 files on the project I am working on. This is an USArmy patch that I would like to change to a vector. I have tried Image Trace without much success. The original question is whether AI can Invert the Path. An example is the lighting bolt. When I trace the yellow segment I would like to invert to paint the red.
I have also included the original image (.jpg).
The file AI Dots I am not sure what it is. This occured when I was attempting to move the Left side of the Path.
In an effort to eliminate the pixelation on the edges I have been adding anchor points, then using the Direct Selection tool to move the Path to cover these areas. This seems to work, not sure if there is a better way though.
Appreciate your help on this one. The patch has a personal meaning. Thanks
Copy link to clipboard
Copied
westdr,
I would suggest your getting the vector version already available,
https://duckduckgo.com/?q=38th+ADA+Patch+vector&t=ftsa&ia=web&atb=v320-1
maybe from here,
https://www.etsy.com/listing/1790414960/38th-adab-patch-vector-image-files-ai
or asking the U.S. Department of Defense or the U.S. Institute of Heraldry.
A viable recreation requires long and careful work, needless when the vector version is already available.
Apart from that, as mentioned in your woodwork thread, if you use the Insert Photo option, helpers can see your screenshots straight away, instead og having to load them in three additional Tabs ánd going back and forth.
Copy link to clipboard
Copied
As I stated the patch has special meaning to me personally. I served with this Unit, a very long time ago. Does not have the same meaning if I buy it. I thought I was asking for help in learning to use Illustrator. Appreciate the assistance though.

Copy link to clipboard
Copied
Unfortunately there isn't a process that is both quick and accurate at converting pixel-based images, particularly something like a US Army unit crest, into clean, vector-based artwork. The best results are achieved by manually re-building new vector paths over the top of the pixel-based image.
The image of the crest can be locked in place, often in a separate locked layer. Illustrator has many tools for creating new paths and editing existing paths. Unit crests would have to be re-built using a combination of those tools. The process isn't all that difficult, but it can be a bit time-consuming depending on how "perfect" you need the artwork to be.
Regarding other web sites that have Army unit crests, they can be pretty iffy. The same goes for military crests in clip art collections, such as the ones in old copies of CorelDRAW. I put it in the same category as people looking for corporate logos at the Brands of the World web site. Use caution when going that route.
It's one thing if someone wants to extract a US Army logo out of a PDF file. Legit artwork of that logo isn't hard to find. It's harder to find good, authentic looking vector art of specific unit crests. I work at a sign company in Oklahoma and have had to re-create my share of crests for projects on several military posts/bases in this region, most often Fort Sill. Some crests, such as ones from newer/smaller units appear to be "home brewed." They're not following many design rules to keep things looking consistent with other existing crests. Some crests feature other logos inside of it, like Russian "Matryoskha" stacking dolls. I'm under the impression the US Army does not have a department that specifically supervises the creation of unit crests or maintains professional quality art files of those assets. All too often a JPEG image saved inside a Powerpoint PPT file is deemed "good enough." Sometimes the only digital file that exists of a crest is an embroidery shop's stitching file for making patches.
Anyway, with all that being said, in order to get good quality artwork of an Army unit crest it often involves doing the manual conversion work yourself.
Copy link to clipboard
Copied
Thanks Bobby;
You are not too far away from where I retired in NWA. The Institute of Heraldry designs the patches and unit crest. However, AFAIK you can only download the image as a jpg. I am sure you are seeing several new Units popping up in your area. I am not in a hurry to finish the project. This just brings back some memories and helps develop skills in learning Ai. Really appreciate the knowledge sharing from the Community Experts who have learned the nuances of Ai. Take care and enjoy the weekend.
Copy link to clipboard
Copied
westdr,
Based on this, "The original question is whether AI can Invert the Path. An example is the lighting bolt. When I trace the yellow segment I would like to invert to paint the red.", I still thought the ability to make colour change(s) was the purpose, and also thought that you might wish to personalize its colouring.
I knew the patch had a special meaning to you, and I had guessed its nature, hence my suggesting your asking the U.S. Department of Defense or the U.S. Institute of Heraldry, or maybe even better your old unit, to have it gifted by those you have served, so you had their original to work with.
And obviously everything Bobby said.
Copy link to clipboard
Copied
Jacob: Appreciate the follow up. I would not change the color. This would degrade the patch. There is however, a subdued color. I still have the original patch I use to wear. This was over 50 years ago. Of all the patches I have worn over the years this one has special meaning. Which is why I want to vectorize it. Not real sure why Image Trace is having a very difficult time tracing it. Thanks
Copy link to clipboard
Copied
You are welcome, westdr.
Until the automatic tracing becomes good enough, or till the end of days, whichever occurs first, the best way is to redraw on top of the locked image using the suitable tools, just as Bobby said, preferarbly using a rather narrow stroke in a contrasting colour and no fill, in this case you can use full black at 0.25 pt, and letting Smart Guides help you, maybe on and off, and remembering that Undo is your friend. Always keep backups of the parts you may need to fall back on.
You will have to decide whether you wish to remain true to the original hand drawn shapes, or change them in favour of simpler/more regular/more symmetrical shapes, and if the latter, to which degree.
Starting with the simpler outermost parts, the first choice will be the outermost rim where the curved part from the bottom extends further on the left side than on the right side where it ends a bit lower at an angle with the straight part at the top. You can start with the Pen Tool at the top left corner as follows (you can start a new path by pressing P for Pen):
1) Click right on top of the corner, then hold Shift and move the cursor down to the spot where the straight part ends and the curve begins (Smart Guides say on), you can move it up and down until you are sure, then Click, then let go of Shift; you can switch to the (Direct) Selection Tool if you need to adjust, preferable keeping the straight part vertical;
2) Press P to start a new path and ClickDrag from the bottom corner, dragging exactly in the direction of the curved part at the corner itself about one third of the way towards the straight part, then hold Shift and ClickDrag vertically up from the bottom end of the straight part (Smart Guides say anchor first and then on); you will undoubtedly need to adjust, preferable keeping the straight part vertical, which you can do by deselecting and switching to the Direct Selection Tool, then Click Dragging the Handles at the two Anchor Points, holding Shift at the top one, until you are satisfied.
After this, for the right side you can:
3A) For symmetry: Reflect a copy of the left rim from 2) with a vertical axis and ShiftClickDrag it by the bottom Anchor Point to snap to the original bottom Anchor Point, deselect and Drag across them with the Direct Seletion Tool, and Join (Ctrl/Cms+J), then Drag across the top corner Anchor Points and Join to get the full rim; or you can:
3B) For asymmetry: Lock the left side and repeat 1) and 2) for the right side of the rim (at the bottom corner Smart Guides say anchor), then unlock the left side and Join at top and bottom.
After this, for the inner rim you can either work in the same way as for the outer rim, which will give you the original shape including its being increasingly closer to the outer rim towards the bottom corner, or you can use the Offset Path as suggested by RvdT, which will give the same distance all the way round, which you can change by moving its bottom corner downwards and maybe adjusting its handles, maybe symmetrically which may require some more effort.
The shading at the inner rim to the right can be done with a combination of Offset Path and then a copy of the corresponding part of the inner rim.
The dividing of (a copy of) the inner part into red and yellow can be done with a simple line and Object>Path>Divide Objects Below, ignoring the bolt and hand parts.
The shading at the inner rim to the right can be done with a combination of Offset Path and then a copy of the corresponding part of the inner rim.
The bolt parts were originally made in one piece and can be redrawn in one piece by Clicking with the Pen Tool at the all corners, ignoring the hand parts; it can be divided later.
The rest can be made with a more elaborate use of the Pen Tool.
I hope these suggestions can get you started; you can show your (lack of) progress (preferably using the Insert Photos button) in connexion with further questions.
Copy link to clipboard
Copied
I worked on the image a little today. Amongst the other daily routines. Have a question in why Illustrator is behaving the way it is. I must have turned something on by accident. When I attempt to fill an area I have drawn a path around it places includes other seperate paths and fills in the area with a color I have selected. This was not happening until recently. I tried isolation mode and this does not work? No hurry, I am really getting to learn. Thanks.


Copy link to clipboard
Copied
@westdr1dw schrieb:
I worked on the image a little today. Amongst the other daily routines. Have a question in why Illustrator is behaving the way it is. I must have turned something on by accident. When I attempt to fill an area I have drawn a path around it places includes other seperate paths and fills in the area with a color I have selected. This was not happening until recently. I tried isolation mode and this does not work? No hurry, I am really getting to learn. Thanks.
This typically happens when a path is not closed.
Copy link to clipboard
Copied
westdr,
What we see is what happens when you have (at lest one) open path with a fill (grey): the fill will form a straight boundary between the open end Anchor Points.
My guess is that, instead of the desired closed path (which will keep the fill inside the outer bounds), you actually have two open paths, the top one with only three Anchor Points, the other one with the rest; and you need to close them.
In this context is is crucial to have the Anchor Points coincide, which you can ensure by snapping, helped by the Smart Guides. At the top left there seems to be two non coincident Anchor Points.
Edit: And what Monika said three minutes ago while I was delayed in answering.
Copy link to clipboard
Copied
Jacob & Monkia; Both of you were spot on with the open paths. Once I fixed those, it fell in place. However, spending a lot of time chasing an open path. At least this is what Doc Info is telling me. I am going to have to stop for the evening. This has been a great exercise though. I really appreciate the assistance. I have to admit it is becoming addictive. Enjoy the weekend. Thanks
Copy link to clipboard
Copied
westdr,
In continuation of this design decision,
"You will have to decide whether you wish to remain true to the original hand drawn shapes, or change them in favour of simpler/more regular/more symmetrical shapes, and if the latter, to which degree."
Presuming you wish to recreate the drawn patch (template) rather than the sewn patch, I would suggest your using ClickDragging with the Pen Tool to get smooth curves, rather than just Clicking to get straight segments corresponding to polylines as used in AutoCAD with inevitable irregularities.
Luckily, the very beginning with the outer frame is relatrively easy; after that comes a more elaborate use of the Pen Tool.
Here is a extended version of the suggested start from this post,
with a set of screenshots showing steps 1) and 2), using blue and green strokes, and the resulting path in blue:
You can start with the Pen Tool at the top left corner as follows (you can start a new path by pressing P for Pen):
1):
First 1A) Click right on top of the corner, then hold Shift and move the cursor down to the spot where the straight part ends and the curve begins (Smart Guides say on), you can move it up and down until you are sure,
Then 1B) Click, then let go of Shift; you can switch to the (Direct) Selection Tool if you need to adjust, preferable keeping the straight part vertical; this is the first part of the path shown in blue at 0.25pt;
2): Press P to start a new path and
Then 2A) ClickDrag from the bottom corner, attempting to drag exactly in the direction of the curved part at the corner itself about one third of the way towards the straight part, shown in green at 0.25pt,
Then 2B) hold Shift and ClickDrag vertically up from the bottom end of the straight part (Smart Guides say anchor first and then on); the Anchor Point is marked with a short horizontal blue path, and the length and direction of ShiftClickDragging is marked with a separate vertical green path, and the actual ShiftClickDragging forms part of the curved to vertical green path so only the topmost part of the original blue pathe shows;
ByShiftClickDragging vertically from the lower end Anchor Point of the original blue path from 1), you have included it the new path from the bottom, so you only have one path;
You will undoubtedly need to adjust the Handles, and maybe also the Anchor Points, preferable keeping the straight part vertical.
In this context, always use the Direct Selection Tool and start by deselecting everything (Click an empty spot or the locked image, otherwise you will find yourself in the mess of moving the selected path in its entirety), then Click the relevant path segment or Anchor Point to reveal both Anchor Point and Handles, then move Anchor Points first if needed, then Click Drag the (end points of the) Handles at the two Anchor Points, holding Shift at the top one, until you are satisfied; you can go back and forth, Undo being your friend.
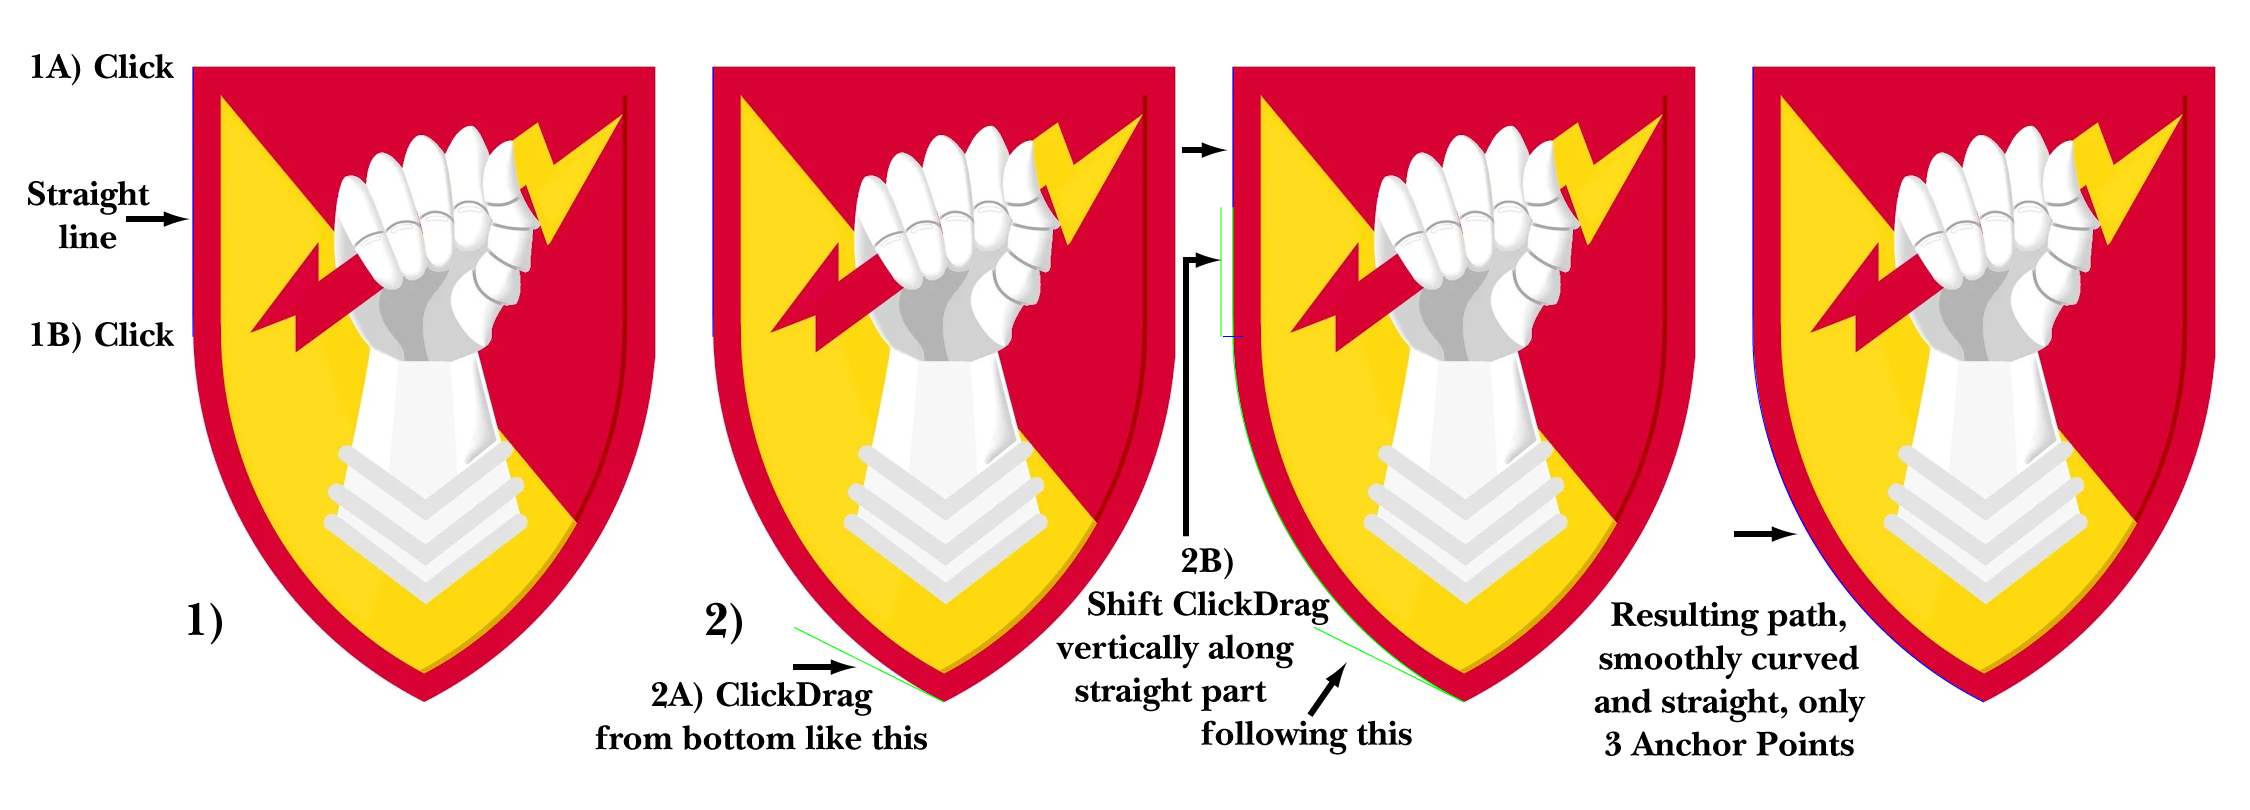
Click to get closer, Click again to get closer still
Copy link to clipboard
Copied
Is there an easy way to locate Open Paths? Doc Info showing 2. I traced the path at 64000% and no breaks.
Copy link to clipboard
Copied
westdr,
There are different ways and approaches, suitable in connexion with different conditions/numbers of paths/degree of mess.
But it sounds as if you have found the open paths?
Otherwise, with only a few paths you can select each path and see in the Document Info palette whether it is open.
For a path that is open but appears closed, as it seems you have, you have a pair of coinciding end Anchor Points somewhere.
What happens if you simply select the path and use the Object dropdown, Object>Path>Join (choosing Smooth to retain a smooth curve, otherwise Corner)?
Copy link to clipboard
Copied
When I attempt to join them I get the error. I just seen your response from 2018 on Joing Paths. I will have to work it some more. Good practice though, Thanks
Copy link to clipboard
Copied
Which error, westdr?
One sneaky error can be a stray Anchor Point or two coinciding Anchor Points at one end of a open path, a kind of double end Anchor Point, which will give too many Anchor Points for Joining, so you need to get rid of at least one.
I am unsure which response from 2018?
Edit: After midnight over here again.
Copy link to clipboard
Copied
Hello Jacob;
I appreciate the response. My apologies for the delayed response. However, I normally take a day of rest on Sunday's. However, this morning I was exploring the basics of a Path. I am a little surprised with a discovery. The Path gave every impression it should be Closed. However, Doc Info was showing Open. Using the Pencil tool I scribbled at the last know connection. Still showed Open, until after using the Eraser tool and cleaned up the connection. Was really surprised how it cleaned up the area. Only then did it Close the Path. One common denominator is Ai has bizarre behavior until you learn the nuances it will keep you guessing for sure. Until then I just need to continue to stay with the basics.
Appreciate your assistance though.
Copy link to clipboard
Copied
westdr,
No rush, and no need for apologies. From time to time over the years, OPs (original posters) have responded after one or several years of silence, and then their threads could continue.
If you use the Pen Tool in one go for each whole path with Smart Guides on, it is very easy to see/ensure that you close the paths while creating them.
For remaining open paths, it may be easier to start over.
Or you can show screenshots with each ailing path selected with the Direct Selection Tool along with the Doc Info and get suggestions based on those.
Copy link to clipboard
Copied
Thanks, will continue to gain proficiency with the tools. I have used several software apps in the past. Spending a great deal of time with various database programs. Getting accustomed to Illustrator is a totally different environment.
Copy link to clipboard
Copied
I think inverting will not help you much.
There are 2 very light colors side by side in this: the white and the yellow. If you just invert stuff here, you will get a different patch.
Apart from that there is the Edit > Edit colors > Invert. It will still need adjusting or could be completely useless for the job.
Copy link to clipboard
Copied
Thanks Monika.
-
- 1
- 2

Get ready! An upgraded Adobe Community experience is coming in January.
Learn more
 AdChoices