• Global community
    • Language:
      • Deutsch
      • English
      • Español
      • Français
      • Português
  • 日本語コミュニティ
    Dedicated community for Japanese speakers
  • 한국 커뮤니티
    Dedicated community for Korean speakers
Exit
0

Removing Section of Image

New Here ,
Dec 01, 2017 Dec 01, 2017

Copy link to clipboard

Copied

Ok, I'm fairly new to Illustrator and I have spent hours searching for how to correct the issue I'm having but I haven't been able to find a solution (even though I know it must be simple enough). I have an image and I want to take out a portion of the background in the center. I've tried the minus front/back thing. I've also tried the clipping mask and Knockout. Any suggestion would be greatly appreciated! The green box is the area I am trying to open to the artboard. Screenshot (2).png

Views

389

Translate

Translate

Report

Report
Community guidelines
Be kind and respectful, give credit to the original source of content, and search for duplicates before posting. Learn more
community guidelines

correct answers 1 Correct answer

Community Expert , Dec 01, 2017 Dec 01, 2017

Hi Tiffany,

You have the right ideas how to do this, but atleast one important step must be missing in the implementation.

  1. Fill your green shape with black. Command 3 to hide.
  2. Group your background. Command 3 to hide.
  3. Confirm all the items are hidden. Option Command 3 to unhide.
  4. After unhiding you will have 2 items selected. Your grouped art, and your black shape.
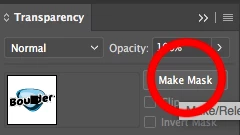
  5. Click make mask from transparency palette.
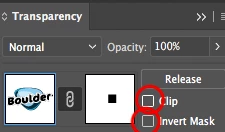
  6. Adjust  checkmarks until you get  desired result.

Screen Shot 2017-12-01 at 1.52.00 PM.png

Screen Shot 2017-12-01 at 1.51.46 PM.png

Hard to remember which checkmarks to use, becaus

...

Votes

Translate

Translate
Adobe
Community Expert ,
Dec 01, 2017 Dec 01, 2017

Copy link to clipboard

Copied

Hi Tiffany,

You have the right ideas how to do this, but atleast one important step must be missing in the implementation.

  1. Fill your green shape with black. Command 3 to hide.
  2. Group your background. Command 3 to hide.
  3. Confirm all the items are hidden. Option Command 3 to unhide.
  4. After unhiding you will have 2 items selected. Your grouped art, and your black shape.
  5. Click make mask from transparency palette.
  6. Adjust  checkmarks until you get  desired result.

Screen Shot 2017-12-01 at 1.52.00 PM.png

Screen Shot 2017-12-01 at 1.51.46 PM.png

Hard to remember which checkmarks to use, because this depends if your rectangle is filled with black or white. Since I work in photoshop I often think the opposite that black is a knockout color.

Disregard the logo that is just what I had on screen to test my instructions were accurate.

Votes

Translate

Translate

Report

Report
Community guidelines
Be kind and respectful, give credit to the original source of content, and search for duplicates before posting. Learn more
community guidelines
New Here ,
Dec 01, 2017 Dec 01, 2017

Copy link to clipboard

Copied

Thank you so much. This have been driving me crazy!

Votes

Translate

Translate

Report

Report
Community guidelines
Be kind and respectful, give credit to the original source of content, and search for duplicates before posting. Learn more
community guidelines
Community Expert ,
Dec 01, 2017 Dec 01, 2017

Copy link to clipboard

Copied

LATEST

You are welcome

Votes

Translate

Translate

Report

Report
Community guidelines
Be kind and respectful, give credit to the original source of content, and search for duplicates before posting. Learn more
community guidelines