Copy link to clipboard
Copied
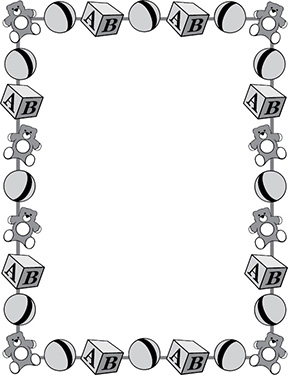
I have this image that was originally created as an EPS file with whatever version of Illustrator was current in the mid-90s. I'm now using the latest version of Illustrator CC. The transparency grid shows that everything outside of the toys is transparent. I can select the two paths that make up the rectangle border and fill in with a color. I want the white area inside the rectangle to be transparent like the outside, but when I go into the transparency options and set the opacity to 0, it fills with the color of the rectangle that I just set! How do I get this area to go to true transparency? The icon just above the transparency group is greyed out so maybe there's a compatibility issue? Do opacity masks and/or knockout groups come into play? This is probably really easy but I'm a total Illustrator noob! Thanks.

 1 Correct answer
Use the Direct Select tool. The white arrow near the top of your toolbar.
Select the white box in the middle by clicking on it. Press delete to get rid of it.
This may leave you now with a gray box, I assume because the stroke we see as a frame line is converted to an outlined path at some point.
Now select the gray box, delete it.
If you want to put a frame line back in there, choose the rectangle tool and draw it from top left corner to bottom right corner. Now set the fill value to empty (don't u
...Explore related tutorials & articles
Copy link to clipboard
Copied
Select the white area with the direct selection tool and set the fill to "None"
Copy link to clipboard
Copied
That was one of the first things I tried, but it fills with the same color as the rectangle—in this case, the grey as shown in the image. This wouldn't bother me if the export to PNG would see that as transparent, but it opens in Photoshop with the grey interior as well.I'm setting the colors to CMYK so I can colorize the image, but is that the wrong approach that's causing me this grief?
Copy link to clipboard
Copied
In that case you will need to open the layers panel and inspect what is there. There seem to be some objects you don't need. We can't see them in the screenshot.
Copy link to clipboard
Copied
Hi David,
Sorry about the delay. I am hopeful that the issue was fixed by suggestions shared above. Feel free to let us know if you still need assistance.
Regards,
Srishti
Copy link to clipboard
Copied
Hi Srishti,
My knowledge of vector graphics is novice at best, so, for the time being, I deleted the lines creating the rectangle and just went with the other objects as the border without the rectangle, knowing I could have redrawn it if I really wanted it. The image comes from a collection produced by a company I used to work for in the mid-90s when guidelines for vector graphics possibly weren't as stringent as they might be now, but I suspect it's more likely my lack of knowledge that's the culprit.
I had hoped to include the vector image itself as part of the post, but EPS files aren't allowed. As such, this isn't an issue that I want to waste anyone's time on, so this thread can be closed. I'll just have to pick up an "Illustrator for Dummies" book! ![]()
Dave
Copy link to clipboard
Copied
Use the Direct Select tool. The white arrow near the top of your toolbar.
Select the white box in the middle by clicking on it. Press delete to get rid of it.
This may leave you now with a gray box, I assume because the stroke we see as a frame line is converted to an outlined path at some point.
Now select the gray box, delete it.
If you want to put a frame line back in there, choose the rectangle tool and draw it from top left corner to bottom right corner. Now set the fill value to empty (don't use transparency), and set the stroke to whatever color you would like. If the line is too thin, increase the stroke weight.
Good luck!
Copy link to clipboard
Copied
I was hoping I could select the rectangle and just change the colour without having to redraw it. But since it was just a simple rectangle, everything you suggested and even what I might see while doing it was exactly as described so it was a 30-second operation. Thank you!
Find more inspiration, events, and resources on the new Adobe Community
Explore Now