


Copy link to clipboard
Copied
Hi everyone, so...I want to get a series of circles to follow a path, the space between each circle needs to be the same as well as them getting smaller.
I almost got there with the Art Brush but it distorts the circle, if you look at the image the circles are distorted. I want the same effect but the circle stays perfectly round. I don't think the blend tool will work for this as you can't control the amount of space between each differently sized circle.

So in a nutshell, is there a way to make a pattern or a series of shapes follow a path that doesn't distort the shape / pattern and doesn't include the blend tool
Thanks for any advice or tips!!
Leo


 1 Correct answer

Superwire,
If you really wish to have the same distance/gap between the growing circles, you need a way that includes the Blend tool, even twice, sorry, with a true Blend and a fake Blend.
You may, given the path you have chosen:
1) Create a straight true Blend with the desired number and sizes of circles (the length is non critical but should be sufficient to see what you are doing), then Expand it, then Ungroup;
2) With all (different) circles selected, click the first or last circle again, then u
...Explore related tutorials & articles
 8
Replies
8
8
Replies
8

Copy link to clipboard
Copied
Hi,
I'd do it with Object > Blend:

Copy link to clipboard
Copied
You can use transform live effect on one circle to repeat
Object >> Distort & Transform >> Transform

You can visually tweak into place using the cursor keys to go up and down in the numeric fields. The spacing in between gets progressively smaller though at an even rate, so you either may or may not like this better.
Copy link to clipboard
Copied
Superwire,
If you really wish to have the same distance/gap between the growing circles, you need a way that includes the Blend tool, even twice, sorry, with a true Blend and a fake Blend.
You may, given the path you have chosen:
1) Create a straight true Blend with the desired number and sizes of circles (the length is non critical but should be sufficient to see what you are doing), then Expand it, then Ungroup;
2) With all (different) circles selected, click the first or last circle again, then under Align use Distribute Spacing with a suitable (still non critical) amount; this will give you the kind of spacing you need;
3) Object>Blend>Options>Specified steps, set the value to 1 and set Orientation to Align to Path;
4) Select all the circles from 2) and Object>Blend>Make, this will give you a fake Blend including temporary intermediate circles;
5) Select the path you have chosen and Object>Path>Add Anchor Points a sufficient number of times (you can see in 6) whether you have enough);
6) Select the Blend from 4) and the path from 4) and Object>Blend>Replace Spine;
7) Object>Blend>Expand and Ungroup, and delete the intermediate círcles;
8) Enjoy.
If you just wanted the same distance from centre to centre, the original Blend would be sufficient.
Step 5) is crucial to obtain the controllability you have missed.
Copy link to clipboard
Copied
Hey this looks very good just tried it out and it got very close thank you
Copy link to clipboard
Copied
You are welcome, Superwire.
There may be a crossposting because of my editing post #3, so you may be unaware of the crucial new step 5) which ensures the exact spacing (whether centre to centre of between objects); I tend to forget to mention the adding of Anchor Points (because I am too used to it) it so I really have to pull my socks up.
Copy link to clipboard
Copied
That's excellent I have some more time to play around with this today, thank you 

Copy link to clipboard
Copied
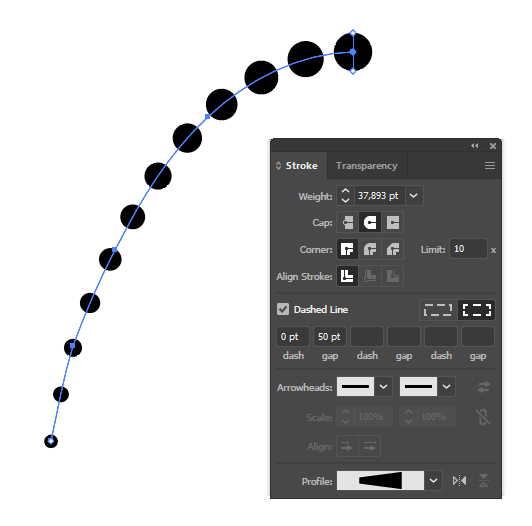
You can alse make simple line with dashes and Use Width Tool to adjust Width.
This is very handy, you work with one line - you can edit it easily
Copy link to clipboard
Copied
Thats a great tip thank you, but I don't think I can control the space between each dot differently with that method..

Find more inspiration, events, and resources on the new Adobe Community
Explore Now
 AdChoices