• Global community
    • Language:
      • Deutsch
      • English
      • Español
      • Français
      • Português
  • 日本語コミュニティ
    Dedicated community for Japanese speakers
  • 한국 커뮤니티
    Dedicated community for Korean speakers
Exit
0

Tiling with an Overlap

Community Beginner ,
Dec 12, 2016 Dec 12, 2016

Copy link to clipboard

Copied

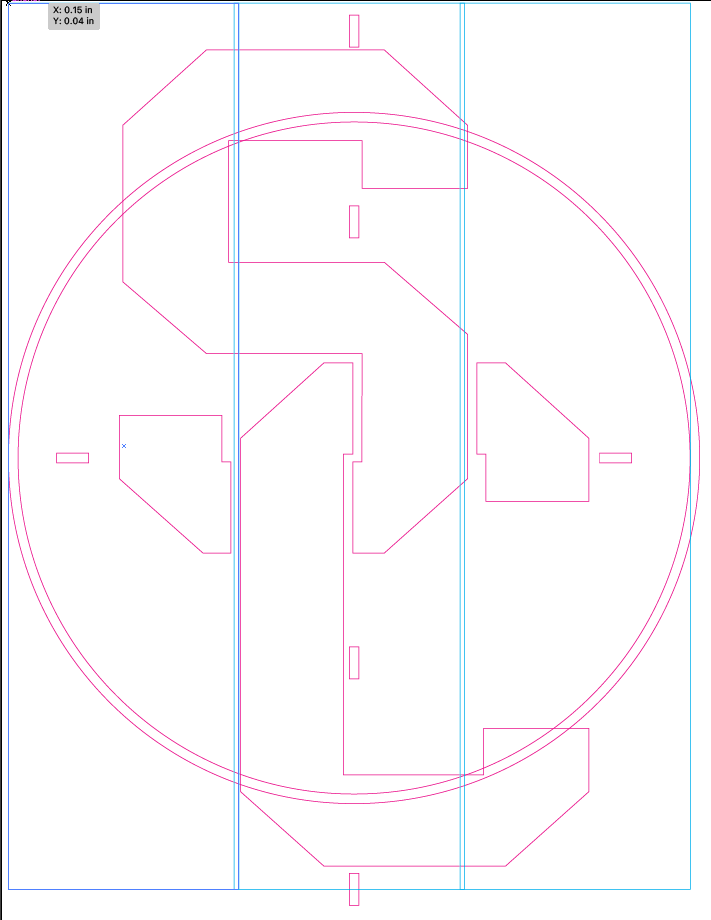
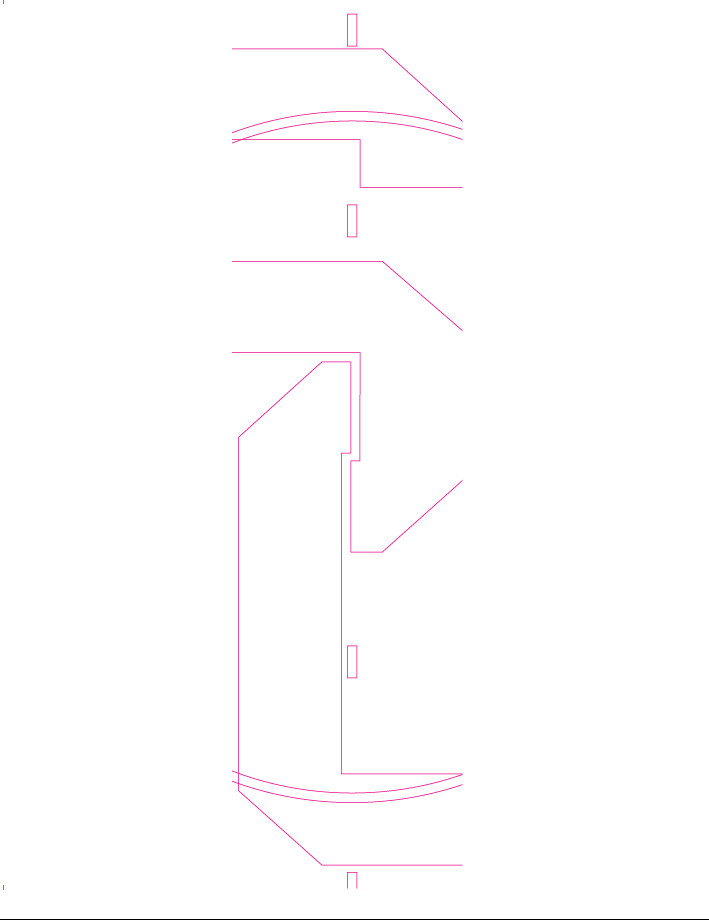
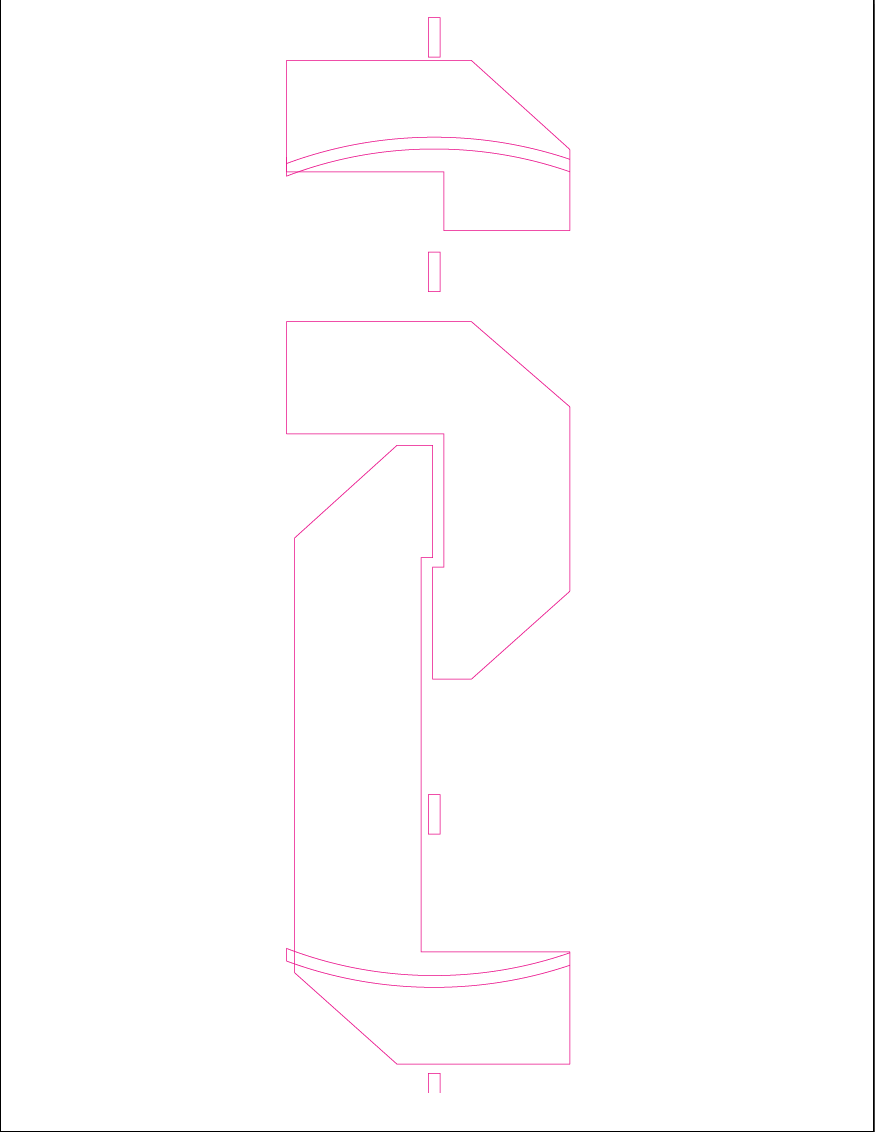
I have been cutting large stencils for gyms for a client for a long time and there's a little issue I haven't been able to figure out but have just made do. These are large stencils, so I design in Illustrator at 1:10 scale. For reference, the circle in the attached image is 12 feet. When approved, I take to our Roland VS640i using Versaworks, scale 1000%, and then tile as the material only has about 47" of usable width. So as an example in reference to the attached image, I'll tile into 3 panels with a 1/2" overlap. It's great, but the software doesn't finish the cuts where it cuts through artwork, so I cut it manually afterwards. See the other two images. The middle panel with the sides open is what I'm getting, and the other is what I ideally want. I think I've exhausted my options of having Versaworks do the work for me, so the next step is to manually tile each panel before sending to the printer.

I just want to see if there's a quicker way to get the end result. If it was as simple as cutting artwork into 3 panels, that would be no problem, but the overlap seems to add several steps. I need the overlap. So my question is how can I tile artwork maintaining an overlap.

AGD 2016-12-12 at 10.39.07 AM.pngAGD 2016-12-12 at 10.46.31 AM.pngAGD 2016-12-12 at 10.47.48 AM.png

Views

1.6K

Translate

Translate

Report

Report
Community guidelines
Be kind and respectful, give credit to the original source of content, and search for duplicates before posting. Learn more
community guidelines
Adobe
Community Expert ,
Dec 12, 2016 Dec 12, 2016

Copy link to clipboard

Copied

I would overlap three artboards to the size of your panels and remove the cyan/blue paths.

Votes

Translate

Translate

Report

Report
Community guidelines
Be kind and respectful, give credit to the original source of content, and search for duplicates before posting. Learn more
community guidelines
Community Beginner ,
Dec 12, 2016 Dec 12, 2016

Copy link to clipboard

Copied

I think that makes sense. So use the art boards as a mask, sort of. I layout the 3 boards, overlapped, placed the art within those 3, and I can simply save as an EPS and check 'Use Art boards' when saving. That should save each section. I guess the only thing that doesn't address is the open cuts. I would still fill those in manually right?

Votes

Translate

Translate

Report

Report
Community guidelines
Be kind and respectful, give credit to the original source of content, and search for duplicates before posting. Learn more
community guidelines
Community Expert ,
Dec 12, 2016 Dec 12, 2016

Copy link to clipboard

Copied

  • Put the art onto a 47" artboard
  • Draw a rectangle the size of the artboard and create a mask.
  • Duplicate 2 more artboards,  select the contents of mask and move over 46.5" &  (2x 46.5"} on the last artboard.

Divide all numbers by 10 since you will need to work 1/10th scale.

Votes

Translate

Translate

Report

Report
Community guidelines
Be kind and respectful, give credit to the original source of content, and search for duplicates before posting. Learn more
community guidelines
Community Beginner ,
Dec 12, 2016 Dec 12, 2016

Copy link to clipboard

Copied

This may be a silly question, but how do I move the art exactly 46.5"? As to the open cuts, I would still have to do those manually right?

Votes

Translate

Translate

Report

Report
Community guidelines
Be kind and respectful, give credit to the original source of content, and search for duplicates before posting. Learn more
community guidelines
Community Expert ,
Dec 13, 2016 Dec 13, 2016

Copy link to clipboard

Copied

LATEST

Double-click in the tool palette on of the section tools, and you will get the move palette.

To select the contents of a mask, with the mask itslef click on this.

Screen Shot 2016-12-13 at 9.23.13 AM.png

Votes

Translate

Translate

Report

Report
Community guidelines
Be kind and respectful, give credit to the original source of content, and search for duplicates before posting. Learn more
community guidelines