• Global community
    • Language:
      • Deutsch
      • English
      • Español
      • Français
      • Português
  • 日本語コミュニティ
    Dedicated community for Japanese speakers
  • 한국 커뮤니티
    Dedicated community for Korean speakers
Exit
0

transform dashed lines into separate (small)lines

New Here ,
Jul 22, 2010 Jul 22, 2010

Copy link to clipboard

Copied

I need to transform a lot of dashed (single) lines into separate lines... Who can tell me how to do this in a few clicks. I don't need an outline of the dashed line. So the black dashes I need, the white in between the dashes I want to loose.

A little complicated to explain... See the example. I need the second lines.

Afbeelding 2.jpg

Kind regards, Ellen

Views

50.6K

Translate

Translate

Report

Report
Community guidelines
Be kind and respectful, give credit to the original source of content, and search for duplicates before posting. Learn more
community guidelines

correct answers 2 Correct answers

New Here , Jan 09, 2018 Jan 09, 2018

I know this is an old post. Just to share my method. I found the best solution for this problem :

1- create a single line i.e. 12pt long 1pt thick

2- make a pattern brush from the line

3- In pattern brush options dialog box, put 50% in spacing box.

4- apply the pattern brush to your desired shape.

5- you can still adjust the gaps in spacing box and hit apply to stroke

6- You can also change stroke weight !

7- go to object -> expand appearance.

Done !

Hope this will help.

- Tolyn

Votes

Translate

Translate
New Here , Aug 23, 2018 Aug 23, 2018

I had the same problem and I found a (what I think easier) method to convert a dashed line into single dashes:

  1. Set thickness of line to 0.0001 pt
  2. Menu Object > Expand (if greyed out, choose Object Expand Appearance first, as the object has appearance attributes applied to it)
  3. Set thickness back to original value

Voilà!

- Andy

Note: With my Illustrator CS6/Win it only works with setting thickness to 0.0001pt (see above). It does NOT work with a thicker line (like 0.001). Why: If it's too thick, the Exp

...

Votes

Translate

Translate
Adobe
LEGEND ,
Jul 22, 2010 Jul 22, 2010

Copy link to clipboard

Copied

Object --> Expand.

Mylenium

Votes

Translate

Translate

Report

Report
Community guidelines
Be kind and respectful, give credit to the original source of content, and search for duplicates before posting. Learn more
community guidelines
LEGEND ,
Jul 23, 2010 Jul 23, 2010

Copy link to clipboard

Copied

Object Expand (Stroke) gives you this:

dash.jpg

Not quite what the OP was asking for.

Is there another way?

Votes

Translate

Translate

Report

Report
Community guidelines
Be kind and respectful, give credit to the original source of content, and search for duplicates before posting. Learn more
community guidelines
New Here ,
Jul 23, 2010 Jul 23, 2010

Copy link to clipboard

Copied

I used a trick and waiting now to see if production will accept...

I gave the lines a weight of 0.0001 pt... and then used expand transparency.

Hopefully it works!!!

Thanks for the replies.

Ellen

Votes

Translate

Translate

Report

Report
Community guidelines
Be kind and respectful, give credit to the original source of content, and search for duplicates before posting. Learn more
community guidelines
New Here ,
Dec 21, 2021 Dec 21, 2021

Copy link to clipboard

Copied

It won't work for laser cutting.

Votes

Translate

Translate

Report

Report
Community guidelines
Be kind and respectful, give credit to the original source of content, and search for duplicates before posting. Learn more
community guidelines
New Here ,
Nov 14, 2024 Nov 14, 2024

Copy link to clipboard

Copied

LATEST

Thanks This worked for me. I'll just add that after clicking expand appearance --> expand --> change fill to 0.5  stroke thickness.

Votes

Translate

Translate

Report

Report
Community guidelines
Be kind and respectful, give credit to the original source of content, and search for duplicates before posting. Learn more
community guidelines
LEGEND ,
Jul 23, 2010 Jul 23, 2010

Copy link to clipboard

Copied

Don't use a Dash stroke. Use a Pattern Brush consisting of a short open path. Widen the Brush's invisible tile path to create the desired gap relative to the dash lenght. Apply to paths, then Expand Appearance.

JET

Votes

Translate

Translate

Report

Report
Community guidelines
Be kind and respectful, give credit to the original source of content, and search for duplicates before posting. Learn more
community guidelines
New Here ,
Apr 20, 2013 Apr 20, 2013

Copy link to clipboard

Copied

I have the same problem.

In the CS6 there is one method for separate one dashed line into many single lines?

http://forums.adobe.com/servlet/JiveServlet/showImage/2-2995179-35054/Afbeelding+2.jpg

Votes

Translate

Translate

Report

Report
Community guidelines
Be kind and respectful, give credit to the original source of content, and search for duplicates before posting. Learn more
community guidelines
Community Expert ,
Apr 20, 2013 Apr 20, 2013

Copy link to clipboard

Copied

Same as above. Use Object>Expand or Expand Appearance. If Expand Appearance is the choice offered, then use it and then Object Expand.

Votes

Translate

Translate

Report

Report
Community guidelines
Be kind and respectful, give credit to the original source of content, and search for duplicates before posting. Learn more
community guidelines
New Here ,
Apr 20, 2013 Apr 20, 2013

Copy link to clipboard

Copied

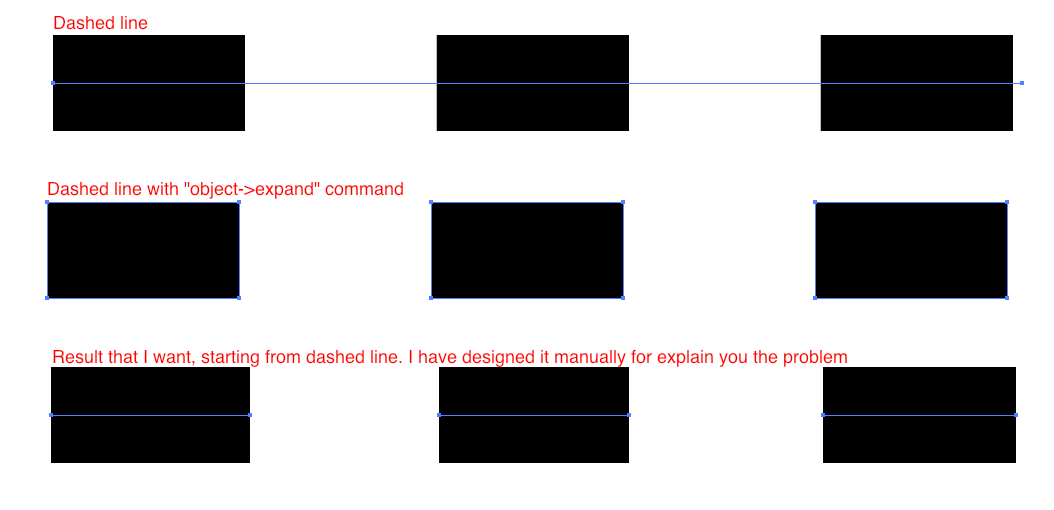
I think that you have not understand the problem.
Schermata 04-2456403 alle 21.29.49.png

If I expand line by (object->expand) the result are not many lines, but many filled forms.

Votes

Translate

Translate

Report

Report
Community guidelines
Be kind and respectful, give credit to the original source of content, and search for duplicates before posting. Learn more
community guidelines
Mentor ,
Apr 20, 2013 Apr 20, 2013

Copy link to clipboard

Copied

MaurizioRR wrote:

I think that you have not understand the problem.

Schermata 04-2456403 alle 21.29.49.png

If I expand line by (object->expand) the result are not many lines, but many filled forms.

Maybe "you" dont understand the suggestion that JET / Larry gave? It accomplishes what you show in your example (IMHO)? Have you tried it?

ExpandPatternBrush.png

Votes

Translate

Translate

Report

Report
Community guidelines
Be kind and respectful, give credit to the original source of content, and search for duplicates before posting. Learn more
community guidelines
Participant ,
Jun 24, 2014 Jun 24, 2014

Copy link to clipboard

Copied

I know this is an old topic, but I'm still looking for a good solution to this. Using the pattern brush works if you're not concerned with accuracy. I'm converting engineering drawings for a very particular (government) client, and the dashed pattern of long and short dashes as well as the line weight has to be exact. There just doesn't seem to be enough control of the pattern using the pattern brush. And like the OP, I don't want expanded objects.

Votes

Translate

Translate

Report

Report
Community guidelines
Be kind and respectful, give credit to the original source of content, and search for duplicates before posting. Learn more
community guidelines
Community Beginner ,
Oct 30, 2015 Oct 30, 2015

Copy link to clipboard

Copied

So I found an easy way to do it.

1. I just made the dashed line to have a stroke of 0.0001 pt thick

2. then hit Object>Path>Outline Stroke and it worked perfect.

Took 2 seconds.

Votes

Translate

Translate

Report

Report
Community guidelines
Be kind and respectful, give credit to the original source of content, and search for duplicates before posting. Learn more
community guidelines
LEGEND ,
Oct 30, 2015 Oct 30, 2015

Copy link to clipboard

Copied

That would give you a set of double paths. If you direct select one of the dashes (click on a path) and drag you will see that you have got a thin filled rectangle.

Votes

Translate

Translate

Report

Report
Community guidelines
Be kind and respectful, give credit to the original source of content, and search for duplicates before posting. Learn more
community guidelines
Community Beginner ,
Dec 23, 2015 Dec 23, 2015

Copy link to clipboard

Copied

Actually - under CS 2015 a .0001 pt line seems to work.

The resulting paths are closed but only 2 points each so not rectangles.

You can check visually by applying a round endcap (as opposed to corner).

Votes

Translate

Translate

Report

Report
Community guidelines
Be kind and respectful, give credit to the original source of content, and search for duplicates before posting. Learn more
community guidelines
New Here ,
Jan 04, 2016 Jan 04, 2016

Copy link to clipboard

Copied

I tried the method (set stroke thickness of 0.0001, and then use boject -> Path ->Outline Stroke) and it works fine.I am using Illustrator CC 2015.2.0 Release

Votes

Translate

Translate

Report

Report
Community guidelines
Be kind and respectful, give credit to the original source of content, and search for duplicates before posting. Learn more
community guidelines
Participant ,
Jan 04, 2016 Jan 04, 2016

Copy link to clipboard

Copied

Still not addressing the issue. It's still a set of stroked paths, not a line of single strokes.

Votes

Translate

Translate

Report

Report
Community guidelines
Be kind and respectful, give credit to the original source of content, and search for duplicates before posting. Learn more
community guidelines
New Here ,
Feb 09, 2016 Feb 09, 2016

Copy link to clipboard

Copied

If you want to make a straight line I have a work around and I'll brake it down step by step as follows:


1. Start with single stroke. i.e. 12pt long 1 pt thick.

2. Option drag the same stroke where you want it to end. (now you have two strokes)

3. Go to Object:Blend:Blend Options and change it to specified steps and fill in how many little strokes you want in between the two you already made. (not the total but the number of little strokes you want in addition to the two you already have)

4. Go to Object:Blend:Expand

5. Done.


Votes

Translate

Translate

Report

Report
Community guidelines
Be kind and respectful, give credit to the original source of content, and search for duplicates before posting. Learn more
community guidelines
New Here ,
Feb 09, 2016 Feb 09, 2016

Copy link to clipboard

Copied

I forgot a step after 3. You have to goto Object:Blend:Make.

Sorry Guys

Votes

Translate

Translate

Report

Report
Community guidelines
Be kind and respectful, give credit to the original source of content, and search for duplicates before posting. Learn more
community guidelines
New Here ,
Mar 30, 2016 Mar 30, 2016

Copy link to clipboard

Copied

Thanks Ace!  That worked perfectly!

Votes

Translate

Translate

Report

Report
Community guidelines
Be kind and respectful, give credit to the original source of content, and search for duplicates before posting. Learn more
community guidelines
LEGEND ,
Mar 30, 2016 Mar 30, 2016

Copy link to clipboard

Copied

If you want your blend to follow a curve you can use the Replace Spine feature.

Votes

Translate

Translate

Report

Report
Community guidelines
Be kind and respectful, give credit to the original source of content, and search for duplicates before posting. Learn more
community guidelines
Explorer ,
Feb 10, 2017 Feb 10, 2017

Copy link to clipboard

Copied

Thank you!

Votes

Translate

Translate

Report

Report
Community guidelines
Be kind and respectful, give credit to the original source of content, and search for duplicates before posting. Learn more
community guidelines
New Here ,
Apr 21, 2015 Apr 21, 2015

Copy link to clipboard

Copied

It's somewhat of a PITA if you have a complex shape with lots of dashes, but I figured out how to do this:

Start with your dashed line:

1.jpg

Copy and past the line in front so it's in the exact same spot
Turn it back into a solid line (I like to change the color to make it easier to see) and send it to the back:2.jpg

Outline the stroke of the dashed line only, select both objects, and then in the Pathfinder menu, choose "Outline" (the second to last option):
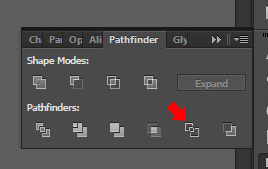
Untitled-2.jpg

Go into isolation mode (or ungroup) and select all the lines you want, cut them, delete the ones you don't need then paste the lines you want back in:
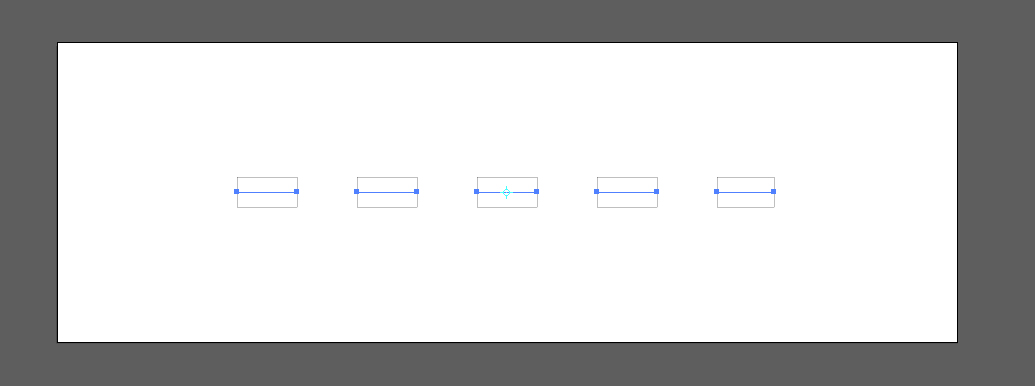
Untitled-1.jpg

You now have lots of separate vector lines that form one large dashed line:

3.jpg

Votes

Translate

Translate

Report

Report
Community guidelines
Be kind and respectful, give credit to the original source of content, and search for duplicates before posting. Learn more
community guidelines
New Here ,
Jan 15, 2016 Jan 15, 2016

Copy link to clipboard

Copied

Make a line for example 5mm --> make a pattern brush from line. Select the the other line and apply the brush on it. After this at Stroke menu apply a dashed line and last expand appearance.

Votes

Translate

Translate

Report

Report
Community guidelines
Be kind and respectful, give credit to the original source of content, and search for duplicates before posting. Learn more
community guidelines
New Here ,
Jan 09, 2018 Jan 09, 2018

Copy link to clipboard

Copied

I know this is an old post. Just to share my method. I found the best solution for this problem :

1- create a single line i.e. 12pt long 1pt thick

2- make a pattern brush from the line

3- In pattern brush options dialog box, put 50% in spacing box.

4- apply the pattern brush to your desired shape.

5- you can still adjust the gaps in spacing box and hit apply to stroke

6- You can also change stroke weight !

7- go to object -> expand appearance.

Done !

Hope this will help.

- Tolyn

Votes

Translate

Translate

Report

Report
Community guidelines
Be kind and respectful, give credit to the original source of content, and search for duplicates before posting. Learn more
community guidelines