Exit
  • Global community
    • Language:
      • Deutsch
      • English
      • Español
      • Français
      • Português
  • 日本語コミュニティ
  • 한국 커뮤니티
0

Uniformly scale a shape within a shape in illustrator

New Here ,
Jan 18, 2018 Jan 18, 2018

Hi all,

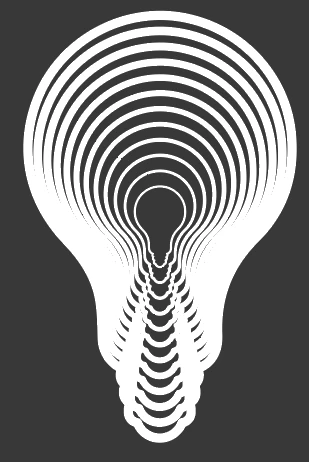
Quick question about illustrator, I'm trying to uniformly scale a shape within a shape multiple times. The only semi easy way I seem to be able to do this is with the blend tool but even that doesn't work with even slightly complicated shapes and takes a very long time to create. Is there an easy way to do this or is it just not possible?

Please see below images for the context of the best I seem to be able to achieve but still, the lightbulb gets instantly distorted. I'd like to have the shape of the (in this case) lightbulb remain throughout the layers but if you scale up the shape you get what happens in picture two. So picture one is created by adding a stroke around the object until it gets very big, outlining it and then blending between that and the original ... but as you can see this doesn't give great results either. (This is the same as offsetting the path I guess)

Screen Shot 2018-01-18 at 10.43.57.png

Screen Shot 2018-01-18 at 10.45.47.png

18.5K
Translate
Report
Community guidelines
Be kind and respectful, give credit to the original source of content, and search for duplicates before posting. Learn more
community guidelines

correct answers 1 Correct answer

LEGEND , Jan 18, 2018 Jan 18, 2018
I'm trying to uniformly scale a shape within a shape multiple times.

Actually, that's not what you're trying to do. Geometry dictates that uniformly scaling a non-symmetrical shape will not yield parallel paths. It will with a square or a circle, but not with an ellipse or a non-square rectangle.

What you're trying to do is create parallel contours. Other drawing programs (Corel Draw, for example) provide a dedicated Contour Tool or command that creates as many multiple offsets as you want (with e

...
Translate
Adobe
Community Expert ,
Jan 18, 2018 Jan 18, 2018

Try Object > Path > Offset path

Translate
Report
Community guidelines
Be kind and respectful, give credit to the original source of content, and search for duplicates before posting. Learn more
community guidelines
New Here ,
Jan 18, 2018 Jan 18, 2018

I have tried this, unfortunately it gives the same results as image one

Translate
Report
Community guidelines
Be kind and respectful, give credit to the original source of content, and search for duplicates before posting. Learn more
community guidelines
Community Expert ,
Jan 18, 2018 Jan 18, 2018

if not one of those, what do you want?

Translate
Report
Community guidelines
Be kind and respectful, give credit to the original source of content, and search for duplicates before posting. Learn more
community guidelines
Community Expert ,
Jan 18, 2018 Jan 18, 2018

Offset path works fine for me:

Offset.png

Translate
Report
Community guidelines
Be kind and respectful, give credit to the original source of content, and search for duplicates before posting. Learn more
community guidelines
Community Expert ,
Jan 18, 2018 Jan 18, 2018

But I used Effect > Path > Offset Path.

Don't know if that makes a difference.

Translate
Report
Community guidelines
Be kind and respectful, give credit to the original source of content, and search for duplicates before posting. Learn more
community guidelines
LEGEND ,
Jan 18, 2018 Jan 18, 2018
I'm trying to uniformly scale a shape within a shape multiple times.

Actually, that's not what you're trying to do. Geometry dictates that uniformly scaling a non-symmetrical shape will not yield parallel paths. It will with a square or a circle, but not with an ellipse or a non-square rectangle.

What you're trying to do is create parallel contours. Other drawing programs (Corel Draw, for example) provide a dedicated Contour Tool or command that creates as many multiple offsets as you want (with either uniform or progressive spacing between them) in one step and automatically resolves any self-crossing. Very handy. In Illustrator, you have to do it with repeated applications of the Offset Path command.

...picture one is created by adding a stroke around the object until it gets very big, outlining it and then blending between that and the original ... but as you can see this doesn't give great results either. (This is the same as offsetting the path I guess)

Offsetting one path and then blending it with the original does not do the same thing as several sequential applications of offset path. Blends work by interpolating the positions of each pair of correlating nodes in a straight line. That's not the same thing as offsetting a path and maintaining parallelism:

OffsetVsBlend.PNG

JET

Translate
Report
Community guidelines
Be kind and respectful, give credit to the original source of content, and search for duplicates before posting. Learn more
community guidelines
Mentor ,
Jan 18, 2018 Jan 18, 2018

Do the same thing you did in the second example, but don't scale the stroke. That's as close as you're going to get.

Look at this simple case example: you can either have equal spacing around each iteration, or have each iteration be congruent to each other, but not both — unless your shape is a regular polygon.

boxes.jpg

Translate
Report
Community guidelines
Be kind and respectful, give credit to the original source of content, and search for duplicates before posting. Learn more
community guidelines
Community Expert ,
Jan 18, 2018 Jan 18, 2018
LATEST

I think this method will get you about as close as possible to what you want.

First make sure that the light bulb outline is perfectly symmetrical and drawn with as few anchor points as possible. You can do that by creating half, duplicating and flipping the half and then combining the two halves into a single shape.

Object > Path > Offset Path.

Then Object > Blend.

Translate
Report
Community guidelines
Be kind and respectful, give credit to the original source of content, and search for duplicates before posting. Learn more
community guidelines