Exit
  • Global community
    • Language:
      • Deutsch
      • English
      • Español
      • Français
      • Português
  • 日本語コミュニティ
  • 한국 커뮤니티
0

Making a color picker style color wheel

Engaged ,
Mar 23, 2021 Mar 23, 2021

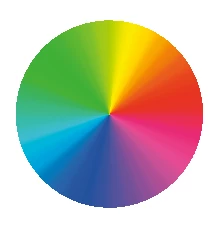
I want to make a color picker style color wheel, somewhat like this, but with my own color selection:


Screen Shot 2021-03-23 at 5.48.55 AM.png


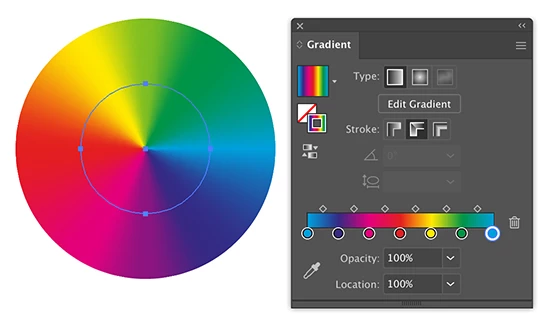
Is there a way to do this by creating a segmented circle and then blending the colors of the segments together somehow? I want grayer colors in the center, so in fact I would have multiple segment circles of different diameters stacked on top of each other. After their interiors are blended, I would then need to blend them together radially.


Or am I going about this all wrong: should I be using lines that are gray near the center and progressively more colorful on the ends and then have Illustrator blend the space between them?

3.0K
Translate
Report
Community guidelines
Be kind and respectful, give credit to the original source of content, and search for duplicates before posting. Learn more
community guidelines

correct answers 2 Correct answers

Community Expert , Mar 23, 2021 Mar 23, 2021

Marie,


As I (mis)understand it, you can (also):


1) Create a circle of the desired size with a white Fill;

2) Create a stroked circle at half the size with the same Stroke Weight and apply the desired basic Gradient along the stroke, obviously starting and ending with the same colour;

3) Create a circle like the one in 1), only with a radial Gradient from black to white;

4) Select 2) and 3) and make an (Opacity) Mask, then adjust the Gradient Slider to obtain the desired radial colour transit

...
Translate
Community Expert , Mar 23, 2021 Mar 23, 2021

You can use a gradient across a stroke.

This is a 130 pt circle with a 130 pt stroke.

Screenshot 2021-03-23 at 22.03.39.png

Translate
Adobe
Community Expert ,
Mar 23, 2021 Mar 23, 2021

You could use:

- the blend function as you already wrote

- freeform gradients

- gradient meshes


Which one applies, depends upon the exact nature of your design. It's not clear to me, how you imagine it to be, so maybe try all of them out?

Translate
Report
Community guidelines
Be kind and respectful, give credit to the original source of content, and search for duplicates before posting. Learn more
community guidelines
Engaged ,
Mar 23, 2021 Mar 23, 2021

See how this one blends in the circular direction but also from the center outward?Screen Shot 2021-03-23 at 6.09.31 AM.png

Translate
Report
Community guidelines
Be kind and respectful, give credit to the original source of content, and search for duplicates before posting. Learn more
community guidelines
Community Expert ,
Mar 23, 2021 Mar 23, 2021

Your idea with blending lines should work for that.

Translate
Report
Community guidelines
Be kind and respectful, give credit to the original source of content, and search for duplicates before posting. Learn more
community guidelines
Engaged ,
Mar 23, 2021 Mar 23, 2021

It is a pretty vague idea, and I don't know how to execute on it. Could you explain?

Translate
Report
Community guidelines
Be kind and respectful, give credit to the original source of content, and search for duplicates before posting. Learn more
community guidelines
Community Expert ,
Mar 23, 2021 Mar 23, 2021

Marie,


As I (mis)understand it, you can (also):


1) Create a circle of the desired size with a white Fill;

2) Create a stroked circle at half the size with the same Stroke Weight and apply the desired basic Gradient along the stroke, obviously starting and ending with the same colour;

3) Create a circle like the one in 1), only with a radial Gradient from black to white;

4) Select 2) and 3) and make an (Opacity) Mask, then adjust the Gradient Slider to obtain the desired radial colour transition.


Translate
Report
Community guidelines
Be kind and respectful, give credit to the original source of content, and search for duplicates before posting. Learn more
community guidelines
New Here ,
Oct 04, 2025 Oct 04, 2025

This worked well for me, thank you!

Translate
Report
Community guidelines
Be kind and respectful, give credit to the original source of content, and search for duplicates before posting. Learn more
community guidelines
Community Expert ,
Oct 05, 2025 Oct 05, 2025
LATEST

You are welcome, Galaxy, and thank you for sharing.


Good to know if you need help, and unknown to most, it is quite easy to directly show images in posts, hence the following general suggestion:


Please show images by using the Insert Photos button (looks like moon over mountains) for each at the top of the reply box which makes everything appear right there in your post together with your text, rather than he more conspicuous Drag&drop attachment which requires helpers to open a new tab for each image and wait for its showing, then go back and forth; and if they just click it and wait for its showing and press the X to get back to the text, the image is gone, so if they need another look they have to open it again and wait to see it again.


Translate
Report
Community guidelines
Be kind and respectful, give credit to the original source of content, and search for duplicates before posting. Learn more
community guidelines
Community Expert ,
Mar 23, 2021 Mar 23, 2021

You can use a gradient across a stroke.

This is a 130 pt circle with a 130 pt stroke.

Screenshot 2021-03-23 at 22.03.39.png

Translate
Report
Community guidelines
Be kind and respectful, give credit to the original source of content, and search for duplicates before posting. Learn more
community guidelines
New Here ,
Mar 24, 2021 Mar 24, 2021

Yes! And then overlay a circle with a radial gradient in desired grey percentage (0-100% opacity) ... if that's the look you're afterr?

Screen Shot 2021-03-24 at 11.41.36 PM.png


Translate
Report
Community guidelines
Be kind and respectful, give credit to the original source of content, and search for duplicates before posting. Learn more
community guidelines