

- Home
- Illustrator
- Discussions
- Removing Stroke from Font but retaining fill shape
- Removing Stroke from Font but retaining fill shape

Copy link to clipboard
Copied
Hi,
I'm new to illustrator and need help editing a logo. The font that I have chosen for the logo looks perfect after I placed a stroke on it which is the same colour as the background colour - so effectively you cannot see the stroke but it is making the part of the font you can see slimmer and much more appealing. The problem I am having is turning it into a vector because once I 'create outlines' it includes the stroke which is no good on certain backgrounds. If I delete the stroke, the font then loses the slim effect and goes back to its original thickness.
So I am quite frustrated trying to remove the stroke whilst keeping the effect it has on the remaining shape of the fill, i.e. the result I want.
Can anyone please assist with this?
Many thanks
Steve


 1 Correct answer

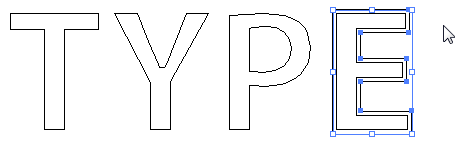
Another way would be to type the live text as you normally would. Then Type > Create Outlines. Select the outlined text and Object > Offset Path. Put in a negative Offset amount.

UnGroup, and delete the outer larger shapes.
Explore related tutorials & articles
 8
Replies
8
8
Replies
8

Copy link to clipboard
Copied
Steve,
You may:
1) Create the live Type without the stroke;
2) Effect>Path>Offset Path and use the offset value - (minus) half the Stroke Weight you have used;
3) Object>Expand Appearance.
You may wish to save (a copy of) the artwork after 2) so you can go back and edit, then repeat 3).
Or, depending on the end use, you may consider stopping at 2), which will keep the editability.
Copy link to clipboard
Copied
Another way would be to type the live text as you normally would. Then Type > Create Outlines. Select the outlined text and Object > Offset Path. Put in a negative Offset amount.

UnGroup, and delete the outer larger shapes.

Copy link to clipboard
Copied
Thank you so much Barbara, this method seemed to work a treat and the visual aid was very useful too. Brilliant!
Steve

Copy link to clipboard
Copied
Jacob's advice does exactly the same.
It only involves fewer steps, is editable until the very last moment (when you expand it) and you don't need to select and delete anything afterwards.
Copy link to clipboard
Copied
Yes, thanks to Jacob also. His points were a helpful and succinct start but there were questions I had between the steps where I became stuck on. The latter guidance seemed to work best for me. Much appreciated for your swift responses all round.
Steve
Copy link to clipboard
Copied
Steve,
Trying to specify more, you may, otherwise please tell us where you need to become unstuck:
1) Create the live Type without the stroke, then switch to the Selection Tool (black arrow) to exit typing and be able to access the Effect options;
2) Effect>Path>Offset Path (click Path in the Effect dropdown, then Offset Path in the flyout) and use the offset value - (minus) half the Stroke Weight you have used, as one case if you used a 1pt stroke this would cover 0.5pt of the fill and 0.5pt outside it (invisible over a background of the same colour), so to have the same end effect you should set the Offset to -0.5pt; similarly for other Stroke Weights; the live Type object is still selected normally, ready for expansion;
3) Object>Expand Appearance (click Expand Appearance in the Object dropdown).
You may wish to save (a copy of) the artwork after 2) so you can go back and edit, then repeat 3).
Or, depending on the end use, you may consider stopping at 2), which will keep the editability.
Edit: Hi Monika.
Copy link to clipboard
Copied
Hi Jacob,
I seemed to get stuck with not knowing how the offset tool worked on number 2, when I had entered the minus number it didn't seem to work for some reason and got lost in the process. I have previously used photoshop so perhaps once i attempted it again this morning the removing of one layer over the other by 'sending to back' once I had offset font shape, made sense and worked. On realising the offset font could be separated from the rest of the shape this helped. On reflection all the instructions made sense but whilst I was attempting it for the first time, it was a little puzzling. All sorted now though.
Btw, what is the purpose in number 3)? Is object>expand appearance the same as grouping and grabbing the corner to expand?
Thanks
Steve
Copy link to clipboard
Copied
Steve,
You may stop at 2) with the live Type with the effect, but in some cases you will need to have the letters as (uneditable) paths.
The expanding is the shortest way to get from the Type with effect to the (Group of) corresponding (Compound/simple) paths.

Find more inspiration, events, and resources on the new Adobe Community
Explore Now
 AdChoices