Copy link to clipboard
Copied
I'm making an A0 poster with a 3mm bleed. It's in the document setup, it's all linked, all settings are established but the problem is in exporting the bleed.
My bleed is showing as a white 3mm border and isn't showing as the extended graphic images. Ive tried everything on every discussion board, I am a frequent user of indesign and im at a loss this has never happened before with exporting bleeds.
The document itself (screenshot) shows the correct format in bleed preview but when exporting pdf it always turns up with white edges
how do i fix this???

 1 Correct answer
I also made a copy of your placed PDF and reset the cropbox to 0 in AcrobatPro, and placed that with Media as the option and it worked, so I'm not sure what's going on with the package you provided.
Here's the fixed package
Copy link to clipboard
Copied
Are you adding bleed and crop marks? If not, make sure you display art trim and bleed boxes in Acrobat. Show us a screenshot there.
Copy link to clipboard
Copied
What does your document look like in Normal Mode, and how much bleed do you have set on it?
Copy link to clipboard
Copied
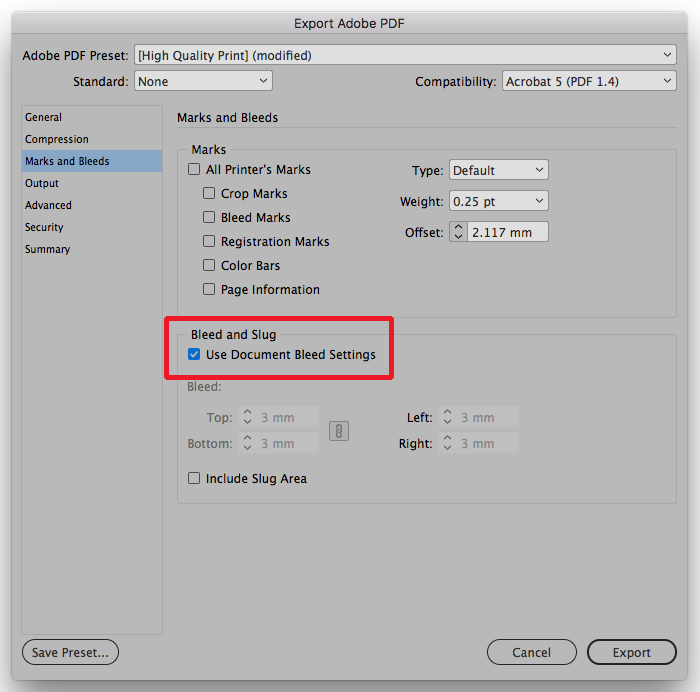
In the Marks and Bleeds section of your Export Adobe PDF dialog does your bleed setting look like the screen shot below?
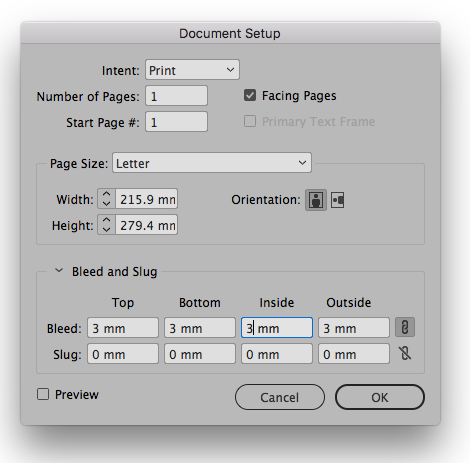
Also is your bleed set up in the Document Setup dialog as in the below screen shot?
Copy link to clipboard
Copied
As you're unfortunately discovering, InDesign lets you set up a bleed area when you create a document but it doesn't automatically let you output it. To get out what you design into your InDesign document, you need to specify the output result.
Going on the assumption that you're setting up the PDF output through PDF presets (a valid workflow, but not the only one) I'd suggest you set up your PDF output similar to the example below:
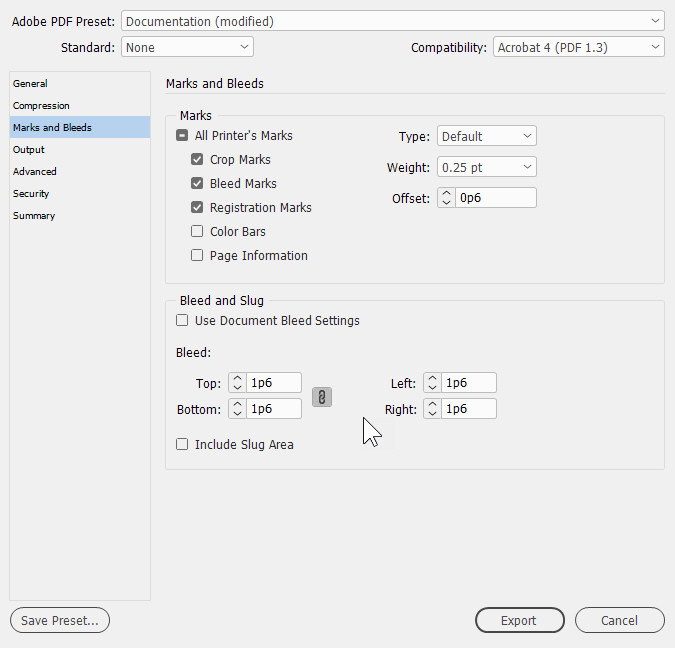
By default, settings in the Marks and Bleeds section will be turned off. While you can make things easy on yourself by simply selecting the All Printers Marks check box, The essential information you'd need to specify your bleed and see it's done right are the first three check boxes beneath that. Crop Marks, which show the trim area for the pages inside the bleeds; Bleed Marks, which show the edge of the bleed area outside the trim; and, because you're using process color outside the trim Registration Marks, which will allow your printers to ensure you get proper alignment for conventional process color printing. Ask your printer about registration marks though, since they may not be compatible with some digital output workflows.
Below that is the Bleed and Slug section. Here is where you can specify how much space you allow for bleed information. I personally prefer to specify the bleed area rather than rely on the document bleed settings. That way I know what I'm going to get at the end of the process.
If you prefer to "print" your PDFs, you get similar settings with your print options after you name the PDF you want to "print" from InDesign.
Either way, I think if you follow this roadmap, you'll get the end results you're looking for.
Hope this helps,
Randy
Copy link to clipboard
Copied
I just love these "urgent" posts that the OP never returns to.
Copy link to clipboard
Copied
I encountered exactly this issue today with an inDesign Document that has an imported PDF covering the background. When I fill the background with a solid it exported that into the bleed, but the PDF background was still cropped to document size.
It should be noted in my case the imported PDF also has the same bleed area as the document. In import options, it's set to crop to "Media" and it previews correctly in the document.
Things that did not fix it:
1. Marks & Bleeds settings
2. Document Bleed & Slug settings
3. Saving as an IDML
4. Re-importing the PDF background, changing it's scale / position
5. Duplicating the PDF background, copping it to cover only the bleed area
6. Resaving the linked PDF background file (Acrobat DC)
7. Changing the import options on the PDF to "Crop to Media"
8. Removing the bleed altogether and increasing the document size to just fill the bleed area.
At this point I knew the problem was in the linked PDF file, so I opened it in Acrobat again and found there was a crop applied to each page that matched the bleed I was missing. So setting the crop to 0 on all sides and resaving the PDF fixed the issue for me.
So summary, error may be caused by a crop setting in a linked file that is inextricably overriding what your inDesign import settings are, despite how any document preview may appear to be.
Copy link to clipboard
Copied
Your problem is not, from the description the same. It's also impossible to tell without screenshots and full details about version and operating system.
Copy link to clipboard
Copied
It's the same problem. The OP describes using correct bleed settings and outputting a doc that ends up with the correct dimensions except the bleed is showing up as white instead of the expected image. A 3mm white border; in my case it was a 1/8th inch white border. Obviously the OP has a placed background graphic of some kind; all that poster design is not made in InDesign, it's a linked PDF or something similar. My problem was the same: placed background graphic would not bleed. It was exporting a document with the bleed area, but it was showing up white instead of the background graphic. When I added a solid in inDesign that solid did bleed correctly, but this was just for diagnosis not a description of the problem. I still need the graphic to bleed.
So what do I say, please please believe what I'm describing? Please believe what the OP describes? Should I waste my time providing full details to people who won't read the OP and think it's just the settings when OP clearly describes 3 times that the settings are correct, they've done this before, there is bleed area but it's white. No, I will not waste my time. I'm posting only to help people with the problem solve the problem. Goodbye.
Eugene Tyson: If you have no input on the actual issue don't post. If you're doing the wide format printing of the OP's poster you can PM your file requirements, otherwise don't tell people how to do their jobs when they're clearly not asking you.
Copy link to clipboard
Copied
Woah - don't attack me just because I have a different point of view. It's a forum and which is a word for an open discussion.
I do believe you - but I can't replicate the issue. Others have offered to help - if you can please supply the file then I'd be happy to take a look.
Other than that - for large format you rarely need to add bleed - you should check with your print provider - so there's no need to hold up the project.
We can still fix the issue - but need more info.
Copy link to clipboard
Copied
I can't replicate your problem, so maybe you could share the problem ID package via Dropbox or your Cloud account?
Here's a placed PDF with the Import Option set to Crop Media

AcrobatPro shows the correct bleed with the exported PDF

Copy link to clipboard
Copied
I've done as you suggested in your post and cannot replicate the issue.
Copy link to clipboard
Copied
Sorry Eugene, that probably read even grumpier than I actually was this morning. I can't replicate the issue either with inDesign exported new PDFs using current CC version. The problem I had was with an imported PDF that was definitely edited and resaved by someone else some time in the last 2 years, and I don't know if they used Illustrator, Enfocus Neo, or Acrobat to change that PDF. But I do know it would have been a PDF that was already cropped in Acrobat that they edited, so they resaved it with another program that likely messed up how inDesign interprets the crop box.
Anyway that's the only file I've been able to use to replicate the issue. Though I saved over that file in Acrobat after removing the bleed to fix it, I was surprised to find the issue comes back after cropping it again in Acrobat and resaving. So I've put those files on Dropbox, heres the link:
Dropbox - WC 717TF Folder - bleed issues.zip
Thanks!
Gorky
Copy link to clipboard
Copied
Thanks Gaurki, much appreciated. I can take a look and see if there's anything I can add. If not, we can submit it as a bug.
For what it's worth, I've worked in printing for over since I was 17, I'm 38 now... a good 21 years! I don't flount around with bad advise, hence the large format idea I had, it's not going to be an issue having no bleed on an A0.
Most large format operators apply a border outside the image to trim off. Once the image is printed, it's trimmed on a hand trimmer, and a long bench, or it can be trimmed on a guillotine.
But trimming into the image won't detract from it being so big, A0 is quite large.
I'd say a lot of 1 off A0 prints are actually undersize, but nobody cares. ![]()
Copy link to clipboard
Copied
Heck, my grammar is all over the place... jeez!
Copy link to clipboard
Copied
Your WC 717TF.indd file has no document bleed—see Document Setup:
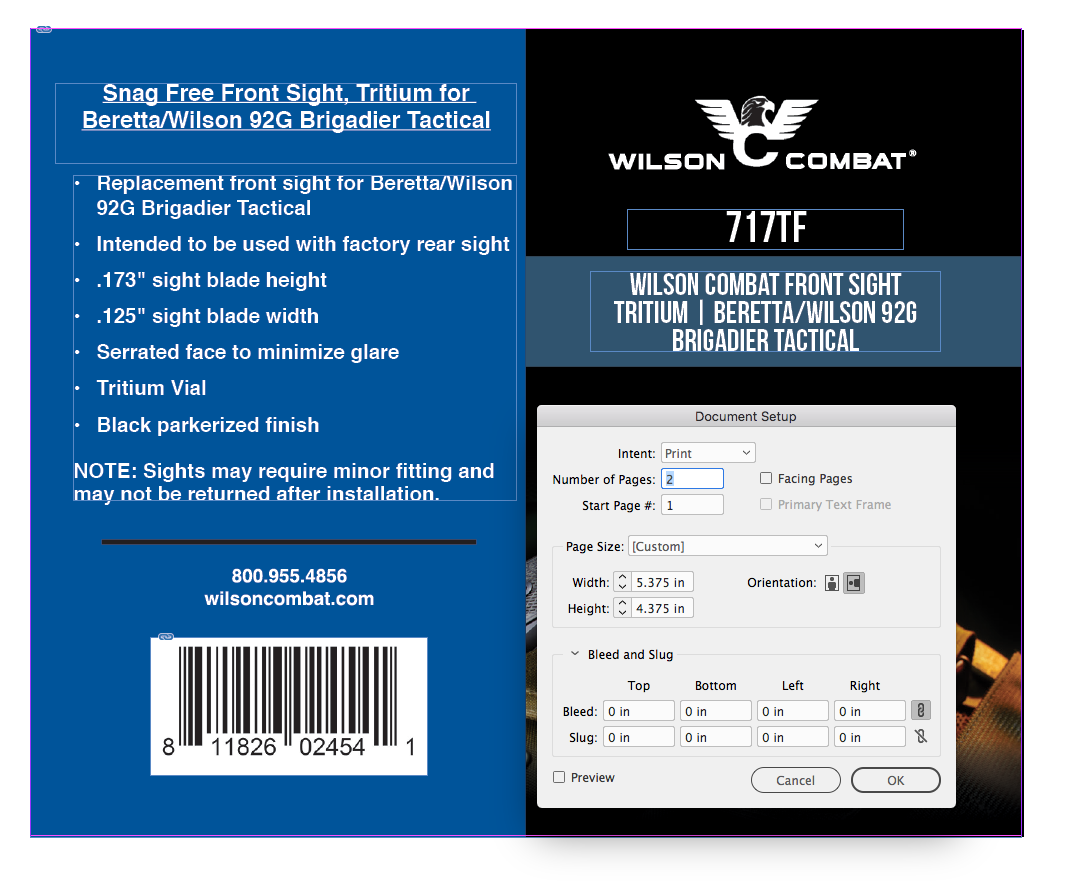
That also shows in the Export Marks and Bleeds
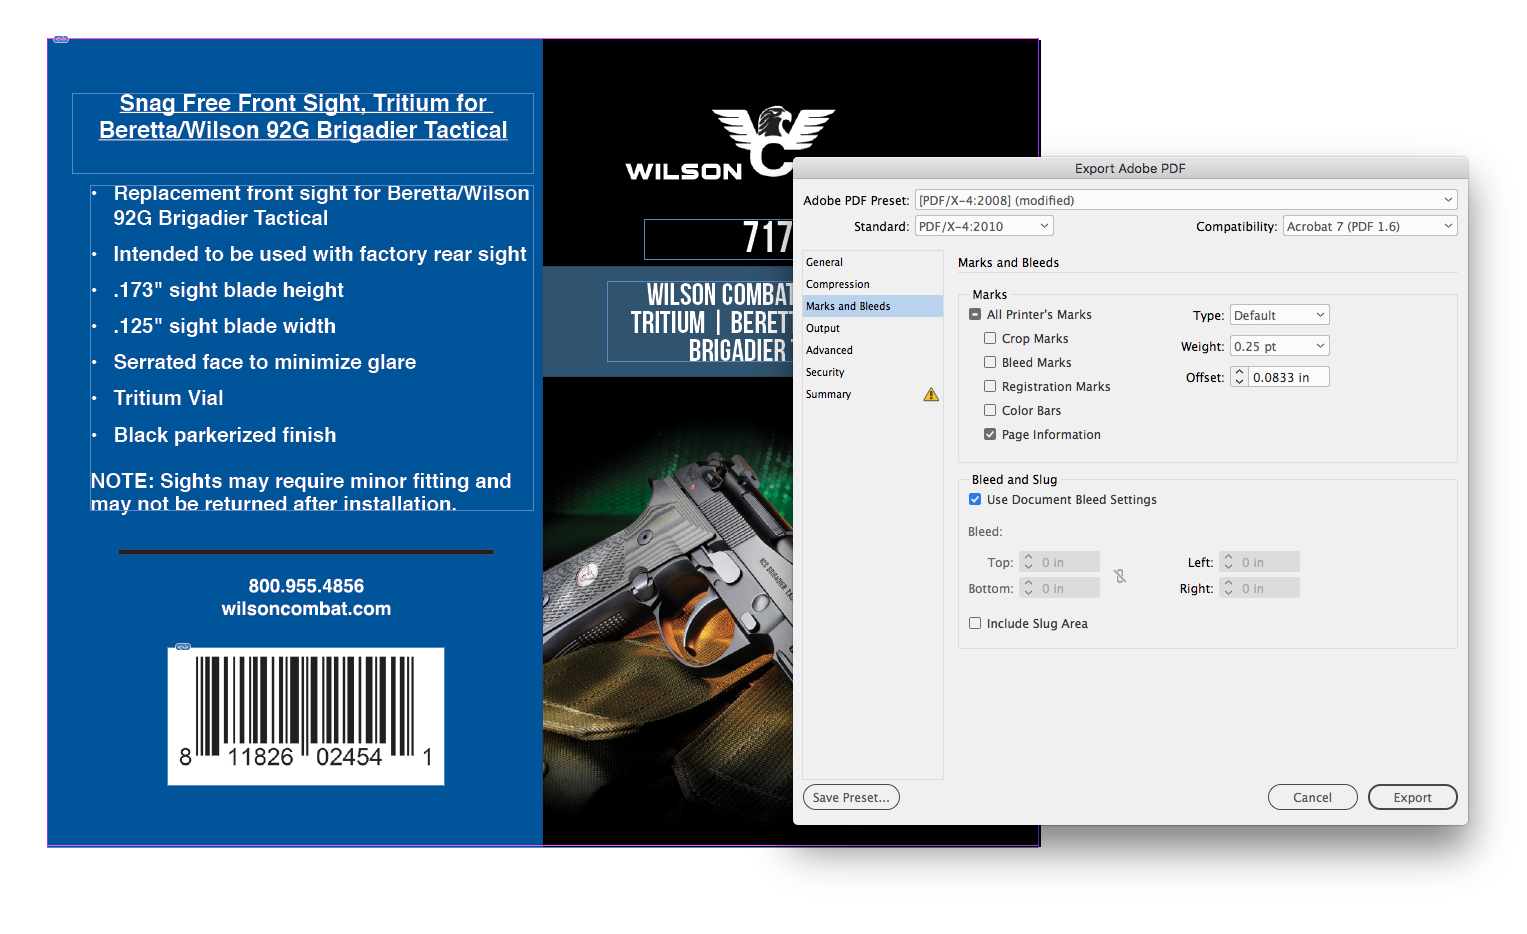
If you uncheck Use Document Bleed Settings and add a bleed it would have no content because the document has no bleed assigned:

Copy link to clipboard
Copied
Sorry, it has no bleed because of step #8 I tried to solve the issue. Basically, finished size should be 5.125x4.125 with 0.125" bleed. I removed the bleed and increased document size to 5.375x4.375. Doesn't matter, if you export the file as-is regardless of bleed settings there would be a white border.
Copy link to clipboard
Copied
Seems like the problem is with using Media as the Crop To option.
I added your bleed back in and placed the PDF with the options set to Bleed rather than Media and with Fit Content to Frame:


Copy link to clipboard
Copied
I also made a copy of your placed PDF and reset the cropbox to 0 in AcrobatPro, and placed that with Media as the option and it worked, so I'm not sure what's going on with the package you provided.
Here's the fixed package
Copy link to clipboard
Copied
Thanks Rob Day, that's the solution I reached also for this file. I have no idea what caused it but I would guess a non-Adobe editing program messed up something to do with how the Media box is calculated in the linked PDF. I encountered this at least once before, like 7 years ago, but it's rare and thankfully easy to fix with Acrobat once you realize inDesign is not causing it.
Note: Setting the crop to "Bleed" and fitting content to frame in Indesign will just enlarge the background PDF until the errant bleed area is out of the frame and not visible; 104% in my case instead of desired 97%. Not a solve IMO unless the bleed is completely unrecoverable and we have to just rebuild the file anyway.
Another clue: Export to Acrobat 4 (PDF 1.3) and the bleed comes out correct! Any higher compatibility setting = fail.
Copy link to clipboard
Copied
Note: Setting the crop to "Bleed" and fitting content to frame in Indesign will just enlarge the background PDF until the errant bleed area is out of the frame and not visible; 104%
That's because the PDF's original dimension including its bleed is 5.5" x 4.5" and not your trimmed 5.25" x 4.25"—I think messing around with the Page Boxes in AcrobatPro is what's causing your problem.

To match the placed PDF's trim and bleed (with no Page Box edits) over in InDesign, the document size (the trim) would have to be 5.25" x 4.25" with a .125" bleed.

In that case placing at 100% would cover the ID page bleed and it will export that way.
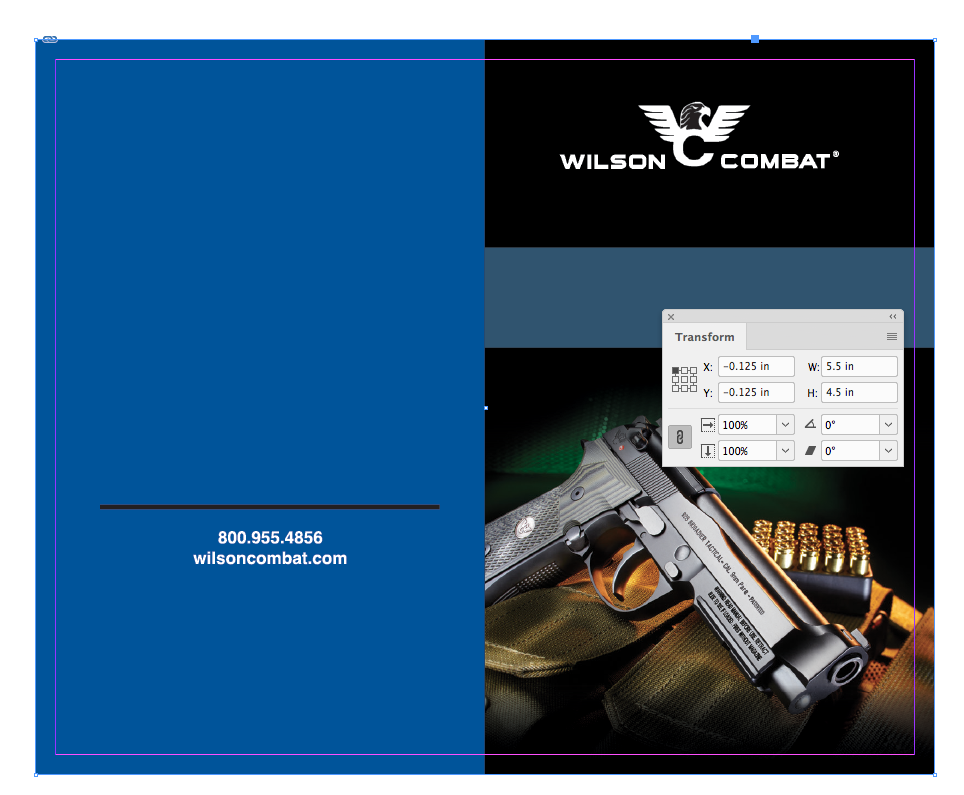
If you want the trim to be 5.125 x 4.125 with a .125" bleed, you can set up the document that way and reduce the PDF. That's what I did in the Dropbox fix I posted. Note that I removed your Page Box edits in AcrobatPro before placing:
Copy link to clipboard
Copied
Another clue: Export to Acrobat 4 (PDF 1.3) and the bleed comes out correct! Any higher compatibility setting = fail.
The PDF in my Dropbox fix was exported as PDF/X-4 (Acrobat 7)
Copy link to clipboard
Copied
There's a lot to be said for using the lowest common denominator ...
Call me a knuckle-dragging neanderthal if you want, but if the job doesn't contain transparency and is targeted for a straight CMYK workflow I still use /X1a for the task. I appreciate what /X4 can do to render transparency and service RGB/In-RIP color management, but if it's not relevant for the workflow the added complexity is not needed.
Copy link to clipboard
Copied
That's for a different thread. I just pointed out that I used Acrobat 7 for my export in the DB fix I posted and there was no problem with the bleed.
But you can export a PDF/X-4 to a CMYK destination and if there's no transparency on the page, the results will be the same as a PDF/X-1a export
Copy link to clipboard
Copied
"That's because the PDF's original dimension including its bleed is 5.5" x 4.5" and not your trimmed 5.25" x 4.25"—I think messing around with the Page Boxes in AcrobatPro is what's causing your problem."
It's a little confusing because the document happens to be slightly reduced from a previous printed size (they couldn't fit the printed piece easily into product packaging) but scaling down the PDF in inDesign isn't causing the issue and changing the crop to setting of the placed PDF to bleed would not fix it either in this case, that would result in a 1/4th inch tighter crop on the background graphic than intended, or the wrong scale if fit to content. So even if the background imported PDF was at 100% scale placed on a 5.25x4.25 inDesign doc with 1/8th bleeds, if you set Crop To: Bleed the background is too small, and fit content to frame then makes the logo off-center on the right panel, the blue rectangle wouldn't align with product text description, etc. So it would change the appearance and relative position of objects rather than reducing the overall scale as designed. See screenshot.
Only non-destructive solutions were to export as PDF 1.3 (granted no transparency issues) or to fix the crop of the imported document using Acrobat.
Not sure what program caused the problem since I can't duplicate them with another PDF using Acrobat or Illustrator. Suspect that program is Enfocus Neo or a workflow product like Fuji XMF based on knowledge of what software the original designer had available.

-
- 1
- 2
Find more inspiration, events, and resources on the new Adobe Community
Explore Now

