

- Home
- InDesign
- Discussions
- Re: Effect on small caption washes out entire spre...
- Re: Effect on small caption washes out entire spre...
Copy link to clipboard
Copied
Is this a bug? I've done this before with no problem (even in the same document), but now it's acting strange.
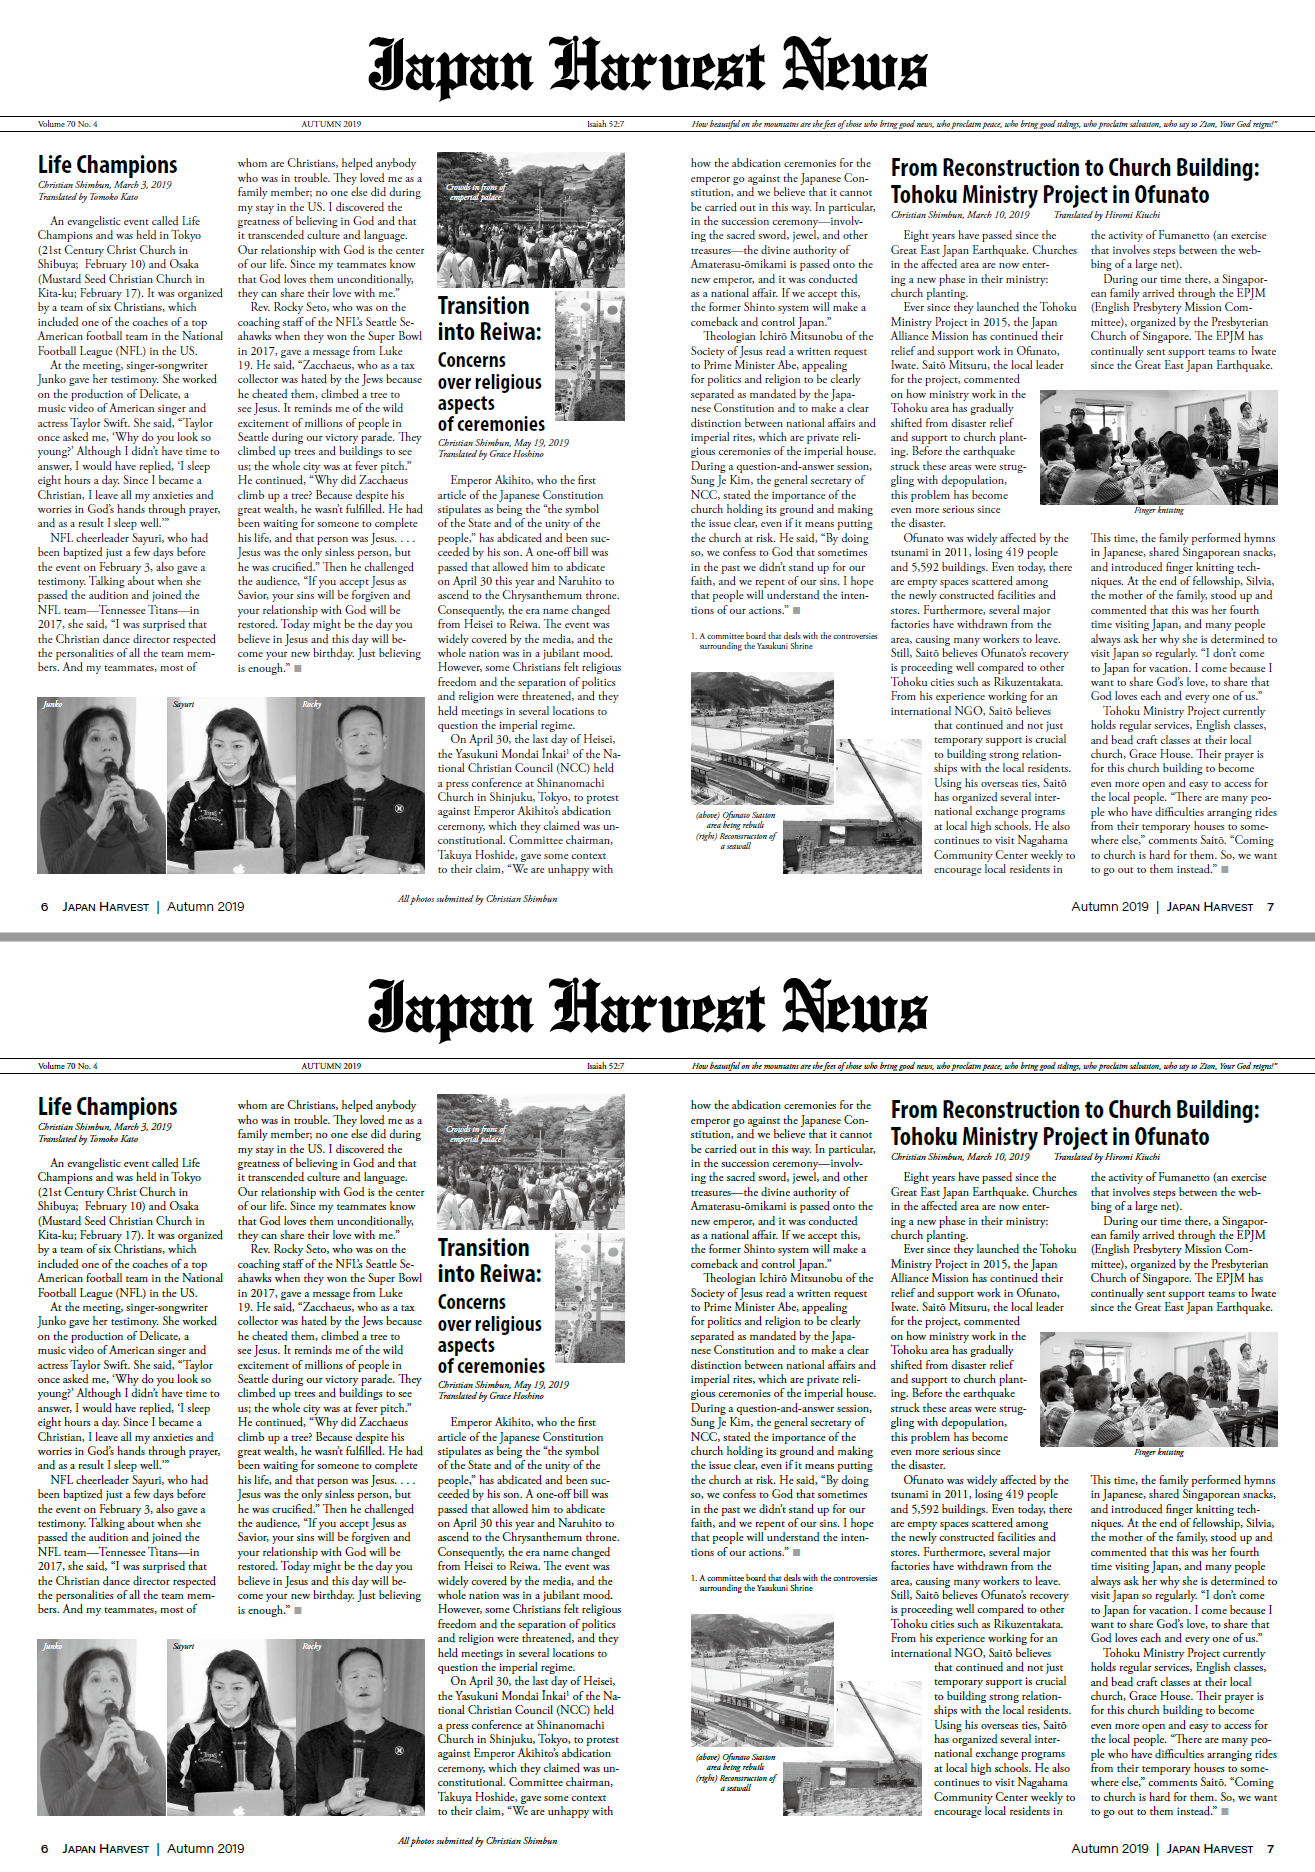
I have a spread with several images and captions. One caption is white text on top of trees, so I wanted to give the caption a bit of darkening shadow to make it more readable. Normal thing to do, I thought. But if I add any effect to the caption, all the images on the whole spread mysteriously fade. I assumed it was just a display problem of some sort, but the problem is visible even in exported PDFs!
This is a screenshot composite of the before and after PDFs - the only difference is that I applied a drop shadow to the caption on the top center photo:
The actual PDFs are here on Dropbox, although I might delete the files later: [without effect] [with effect]


 1 Correct answer

Photoshop does not (it just makes the R/G/B values the same for all pixels, I guess)
That’s not right, Photoshop has a Grayscale Mode. Its appearance is color managed either by its assigned Gray profile or, if the is no profile assigned, the current Color Settings’ Gray Working space.
InDesign doesn't have a Grayscale space for color management, and a Grayscale object’s print preview is color manged by the document’s assigned CMYK profile’s Black Ink. To get a matching preview between Photoshop an
... 18
Replies
18
18
Replies
18

Copy link to clipboard
Copied
Quote:
"So, What Does the Transparency Blend Space Do?
You’re aware that you can combine RGB and CMYK images and artwork in the same document in InDesign. Great.
But as soon as you introduce ANY transparency into the document (for example, using an effect like a drop shadow,
or placing an image with a transparent background), InDesign needs to convert everything in the document to
EITHER RGB or CMYK. (This is why you may often see a number of colors or grayscale images suddenly change
their appearance on the page when you switch the transparency blend space setting)."
Best regards --Gernot Hoffmann
Copy link to clipboard
Copied
Thanks. I read the article, but I don't completely understand what is happening.
This is a magazine with a document blend space of CMYK. All the color swatches are CMYK, but I leave photos as JPG and let the process convert them to CMYK automatically - I don't know if that happens at the point of PDF export or by the software at the printing company, but I've always been satisfied with the way the colors look.
For the "News" spread, I use Irfanview (or occasionally Photoshop if I need more powerful editing) to make a grayscale version of the photos.
In the article you linked, it says this:
InDesign, on the other hand, will let you combine page objects and artwork with grayscale, CMYK, RGB, or LAB on the same page; it allows both CMYK and RGB profile assignments to handle the management and display of CMYK and RGB colors on the same page. Grayscale artwork and images default to using the CMYK profile (the black plate).
Okay, that last sentence is obviously related to my problem, since the photos that are fading are grayscale. And upon closer inspection, I learned that although Irfanview creates a truly grayscale-type JPG, Photoshop does not (it just makes the R/G/B values the same for all pixels, I guess). And yup, the two photos on the spread that were converted in Photoshop (2nd and 3rd of the three people in the lower left) don't fade.
Later in the article, it says:
But as soon as you introduce ANY transparency into the document (for example, using an effect like a drop shadow, or placing an image with a transparent background), InDesign needs to convert everything in the document to EITHER RGB or CMYK.
Hmm... This is where I'm confused. A few questions:
- The document already had transparency on other pages long before I tried doing this - gradient feathers, shadows on other text, etc. So if this is at the document level (that's what the sentence says), whatever was going to happen to the document should have already happened. Is the article wrong about it being at the document level and it's really at the spread level?
- How can I tell whether a spread has transparency somewhere on it? Is there some info/status that will tell me? I have other pages in the document that have a grayscale JPG, but adding an effect does not cause a change to them, so I assume there is already some transparency on the spread, so when I placed the grayscale image, I don't realize it is lighter than it otherwise would be.
- When I add transparency to a spread and InDesign has to then consolidate everything to a single blend space, why is it converting the CMYK elements to RGB, instead of the RGB elements to CMYK? As I said, my document's blend space is set to CMYK and all my swatches are CMYK.
- Are things colored with swatches (text, strokes, fills) also being converted to RGB on any spread that has transparency? I don't see anything like that visually changing, but it might be subtle. When I export the print-ready PDF, I'm pretty sure the swatches end up however they were in the document, because the printshop will reject it if there are non-CMYK swatches. (Occasionally an advertiser gives me something with an RGB spot color, and if I don't notice, the printshop kicks it back.)
Copy link to clipboard
Copied
Photoshop does not (it just makes the R/G/B values the same for all pixels, I guess)
That’s not right, Photoshop has a Grayscale Mode. Its appearance is color managed either by its assigned Gray profile or, if the is no profile assigned, the current Color Settings’ Gray Working space.
InDesign doesn't have a Grayscale space for color management, and a Grayscale object’s print preview is color manged by the document’s assigned CMYK profile’s Black Ink. To get a matching preview between Photoshop and InDesign, you would need to set the Photoshop image’s Gray assignment to a Black Ink profile, and turn on Overprint Preview in InDesign. See #3 here for instructions:
Re: Grayscale images showing up too dark
More here:
Copy link to clipboard
Copied
And upon closer inspection, I learned that although Irfanview creates a truly grayscale-type JPG, Photoshop does not (it just makes the R/G/B values the same for all pixels, I guess)
One other note on this, if you want to save a JPEG grayscale out of Photoshop, it would have to be via Save As and not Export Save For Web—Save For Web converts Grayscale to RGB. Or, don’t use the lossy JPEG format at all—use .PSD.
Copy link to clipboard
Copied
One other note on this, if you want to save a JPEG grayscale out of Photoshop, it would have to be via Save As and not Export Save For Web—Save For Web converts Grayscale to RGB. Or, don’t use the lossy JPEG format at all—use .PSD.
I never use Save for Web. But I see now why my Photoshop edits this time were staying RGB - I was using a Black & White adjustment layer so that I could tweak it if necessary, and that doesn't change the color mode of the file.
If I work with an image in Photoshop, I do save the .PSD so I can edit it more later if necessary. But then I normally do Save As JPG and place the JPG in InDesign, because long term I don't want to have to archive the huge PSD file. Yes, I know it's lossy, but it's only one generation, and at high quality settings I can't see the difference. And most of the simple stuff I just do in Irfanview - it's fast, easy to use, and surprisingly powerful for a free tool. (Sorry, Mac users - it only supports Windows.)
Copy link to clipboard
Copied
One problem with inkjets is that the ink isn't stabilized well enough to use for your product hang tags. Ink will come off on customers' fingers or smear onto the product itself. Gets worse when moisture is in the mix.
That is a good way to convert color to black & white. You can then use Convert to Profile to convert your Black & White layered RGB doc to grayscale using your InDesign document’s CMYK Black Ink profile, and get matching previews.
So in your Photoshop Color Settings choose Load Gray... from the Working Gray Space menu and choose the CMYK profile you have assigned to your ID document. Here I'm loading the US Sheetfed Coated CMYK profile and it gets listed as Black Ink - US Sheetfed Coated:

It will then be available when I choose Convert to Profile...

Over in InDesign the PS grayscale and ID preview match with Overprint Preview turned on:

Copy link to clipboard
Copied
Thanks for that. But it looks like you have a random quote at the beginning - no one on this thread has said anything about inkjet, or even laser. For the sake of people who find this thread later, if you edit to remove the quote, I'll delete this reply.
(After Rob's next reply, I'm now testing editing of a replied-to post, just to see if it's possible...)
Copy link to clipboard
Copied
OsakaWebbie wrote
But I see now why my Photoshop edits this time were staying RGB - I was using a Black & White adjustment layer so that I could tweak it if necessary, and that doesn't change the color mode of the file.
Sorry, not sure how I managed to do that. Above is the intended quote, I can’t edit my post now that you’ve responded.
Copy link to clipboard
Copied
You can't edit after my reply? I wonder what's different about how we're replying to each other. I just tested, and I had no trouble editing (see above).
[Sorry to all the other readers if we end up not cleaning this up - just ignore this side-tracked conversation.]
Copy link to clipboard
Copied
InDesign has two different preview modes for grayscale objects, one for print destinations and another for screen destinations.
When Overprint or Separation Preview is turned on, or when the Transparency Blend Space is set to CMYK with any transparent object on the spread; you get a print preview. The print preview soft proofs the grayscale’s appearance as is expected to print on the CMYK black plate—your document‘s assigned CMYK profile is used for the preview. Assigning different CMYK profiles would affect the print soft proof preview—but only the preview changes, the print output numbers do not change.
If you turn off Overprint Preview, grayscales are previewed as sGray (or 2.2 Gamma). If the destination is for screens, turning off Overprint Preview soft proofs an export with a conversion to RGB. If you are designing for screens and there are transparent objects on the page, you can set the Transparency Blend Space to RGB and get an RGB soft proof of the transparency, but you would not want to do that when the destination is for print, because grayscale objects would export as 4-color separations.
It looks like your Test - effect on caption.pdf sample had the Transparency blend Space set to RGB. The images are all listed as AdobeRGB and would output as 4-color

Copy link to clipboard
Copied
I'd suggest a different course of action. It won't be a live effect like applying a drop shadow, but it'll get you the result you're looking for with simpler output processing and a lot less grief in the long run:
1. Select the reversed cutline with your Arrow/Select tool. Then use the Object>Arrange>Bring to Front menu command to place it at the very top of the stacking order on the page. That will make things easier for subsequent steps.
2. With the Arrow/Select tool still in use, use the Edit>Copy menu command, then Edit>Paste in Place menu command. It won't look any different, but you've just placed a duplicate of the reversed cutline immediately above the existing one. Now use your cursor/arrow keyboard keys to bump the top cutline across two bumps to the right and one bump down from the version below.
3. Double-click inside the top cutline to select your Text tool, and press Cmd/Ctrl+A to select the entire cutline. Change the text color to [Black] in the Swatches panel. This should let you clearly see your black cutline above your reversed one.
4. Go to the Toolbox and get your Arrow/Select tool again and, if needed, select the top/black cutline. If you did Step 1 correctly, all you'll need to do is select the Object>Arrange>Send Backward menu command to place it directly behind the reversed cutline and above everything else on the page. Use the cursor/arrow keys to bump the black cutline behind the reversed one to position it where you like it, then admire your handiwork.
By using layered type elements rather than live effects, you not only will avoid affecting pixels around and beneath your cutline, but also define a sharp edge for the type so your printers don't go nuts printing your pub and threaten you with great bodily harm.
Give this a try and please let us know how it works for you.
Hope this helps,
Randy.
Copy link to clipboard
Copied
Before the extra work keep in mind the change in the preview isn’t affecting the document’s output numbers, the preview is color managed differently when there is transparency. Even if you avoid transparency, Overprint Preview should be turned on for print projects, and that will have the same affect on the preview.
Copy link to clipboard
Copied
Randy Hagan : That is NOT the appearance I want. I just want a subtle increase in contrast near the text, not a black hard edged repeat of it. Avoiding features is not a solution.
rob day : Overprint Preview was a clue - I had never heard of it before. Turning that on makes all the grayscale images the lighter version.
"The preview isn't affecting the document’s output numbers..." Actually, that's not completely true - the type of PDF I was exporting for my tests (the version I send to the proofreaders, which is RGB) is definitely affected by Overprint Preview as well as transparency. If a spread has neither, grayscale images will have higher contrast in an RGB PDF. But of course that's not the ultimate goal, so I did another test using the PDF preset I use for sending the magazine to the printshop, and indeed, even with Overprint Preview off and no transparency, a CMYK PDF will have the lighter version. So yeah, Overprint Preview will indeed be a more honest representation of the final result.
However, I have another question about Overprint Preview. For some reason, when I turn it on, the Normal view no longer has red underlining of misspelled words. What in the world does the spellchecker have to do with blending space and overprint? In theory it's not my job to check for typos, but I do fix them when I find them, so I want to see those red squiggles in Normal view. Also, Overprint Preview appears to force Display Performance to High Quality - that's fine when I'm actually working closely with images, but it's another reason why I'm not comfortable leaving Overprint Preview enabled all the time. (There might be other side effects - those are the two I've noticed so far.) Is there another setting somewhere to at least show spellchecker results with Overprint Preview? Or a setting to have Overprint Preview applied when in Preview view but not when in Normal view?
Copy link to clipboard
Copied
I respect your call on that. You're entitled to get the results you're looking for.
Another thing you might like to try, depending on the linescreen you use for printing, would be to creating your cutline directly on the image in Adobe Photoshop as a live type layer, then apply the effects you desire. If you're printing your images at 133 lines per inch or better — sorry, I don't know the metric equivalent — you can apply live type layers and effects to your cutline and save it as a .psd file. Then export a grayscale .jpeg or .tif image for placement within InDesign.
It'll print just as well as it would if you set the cutline within InDesign, and is an excellent tool for the results you're seeking. It has the best tools and most precise controls for getting the results you want.
I wouldn't call it so much avoiding features as avoiding limitations of InDesign. Like ones you're encountering now, for example. You may find Adobe Photoshop is a much better tool to get the results you want. Maybe this will work better for you. There's often a number of ways around problems with the various tools you have with Adobe Creative Cloud. You can use the solution that works best for you.
Hope this helps,
Randy
Copy link to clipboard
Copied
"The preview isn't affecting the document’s output numbers..." Actually, that's not completely true - the type of PDF I was exporting for my tests (the version I send to the proofreaders, which is RGB) is definitely affected by Overprint Preview as well as transparency.
You are converting the document’s color to RGB on Export, so of course the final output numbers from Acrobat would change. When the RGB PDF is printed as separations from Acrobat, the RGB values would be converted to 4-color CMYK mixes. Export using either PDF/X-1a or PDF/X-4 and compare the numbers in ID’s Separation Preview vs. Acrobat’s Output Preview.
For some reason, when I turn it on, the Normal view no longer has red underlining of misspelled words. What in the world does the spellchecker have to do with blending space and overprint?
Overprint/Separation Preview shows the expected CMYK print—the spell check underlining, hidden characters, text frames, etc. will not print so they are not shown. You can toggle Overprint on and off via Command-Y.
Copy link to clipboard
Copied
Overprint/Separation Preview shows the expected CMYK print—the spell check underlining, hidden characters, text frames, etc. will not print so they are not shown.
Yeah, I guess the text frames do go away - I didn't notice that before. But grids, guides, bleeds, objects on the pasteboard, and probably several other things still show. If I click Preview in the toolbar, everything like that disappears.
You can toggle Overprint on and off via Command-Y.
Haha, I guess they want to discourage Windows users - I have to press Ctrl-Alt-Shift-Y! If they add much more, I'll run out of fingers.
Thanks for the help. I'm not completely happy with the way InDesign does things in this regard, but I now know what's going on and can work with that.
Copy link to clipboard
Copied
You can change the key command

Copy link to clipboard
Copied
You can change the key command
I know - I just thought it was funny that it was so different between Mac and Windows.

Find more inspiration, events, and resources on the new Adobe Community
Explore Now
 AdChoices