 Adobe Community
- Home
- InDesign
- Discussions
- Intersecting Crop Marks: Are they a thing? If so, ...
- Intersecting Crop Marks: Are they a thing? If so, ...

Copy link to clipboard
Copied
Every time I export a layout and select the option to include crop marks...
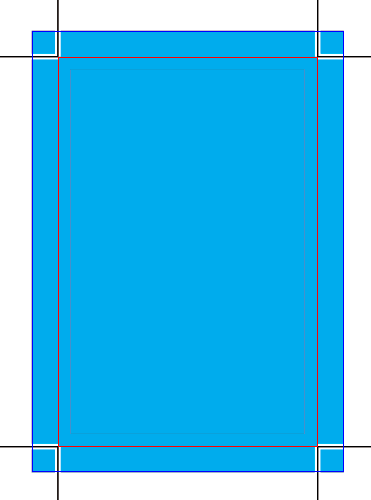
I get the same style of crop mark: 2 small lines at a 90 degree angle to one another in each corner of the page that DO NOT come to a point or intersect one another, and that (if continued) would come to a point that faces in towards the center of the document, as pictured below.
Top

Bottom

The issue I keep running into is this: no matter what order I trim the sides in, trimming any 2 sides cuts-off the marks indicating the edge of the other 2 sides. This problem would be fixed if...
A. The lines intersected and continued into an X shape.
B. The point where they would intersect faced out towards the edge of the page.
Basically, if you imagine both lines continue until they form an X, it is giving me the top of the X and I need the bottom. Is there a different option or setting I should be selecting to accomplish crop marks that will allow me to trim all 4 sides without cutting off the mark for an adjacent side?


 1 Correct answer
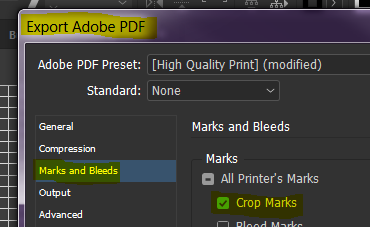
FWIW: crop marks can come to a point, just set Offset to zero in PDF Export dialog Marks section.
If you want to intersect them, try CropMarks script, which is bundled with InDesign. It allows you to set negative Offset value, what effectively makes crop marks intersected:
 31
Replies
31
31
Replies
31
Copy link to clipboard
Copied
FWIW: crop marks can come to a point, just set Offset to zero in PDF Export dialog Marks section.

If you want to intersect them, try CropMarks script, which is bundled with InDesign. It allows you to set negative Offset value, what effectively makes crop marks intersected:

Copy link to clipboard
Copied
OMG, you're wonderful! This has been an ongoing minor irritation that I have not been able to answer for over a year now. So your first suggestion worked perfectly to make them come to a point, but I am not sure where to access CropMarks Script. That is a feature I have never used or stumbled upon before. Can you tell me where to find it?
Copy link to clipboard
Copied
Open a panel in Windows:
Window > Utilities > Scripts
then follow a screen shot:

Copy link to clipboard
Copied
I'm not following. The reason crop marks are offset is so they are all removed in the trimming.
Is there a different option or setting I should be selecting to accomplish crop marks that will allow me to trim all 4 sides without cutting off the mark for an adjacent side?
Unless you are trimming a dummy by hand? If that's the case don't completely cut off the sheet, start and end your cuts just outside of trim marks. If you are using something like a RotaTrimmer try rotating the sheet clockwise as you make the cuts.
Copy link to clipboard
Copied
I'm not sure how lack of an offset would mean that your crop marks don't all get cut off. Before asking this question I would make my own with the line tool all the time and they work perfectly as long as you are needing to trim all 4 sides. I am using a mechanical cutter for large quantities of paper so it makes a complete cut all the way across the page. When you have an offset, no matter which side you trim and in what order you trim them, cutting off the excess right at the mark on one side removes the mark for the adjacent side along with it. I am self-taught and not an expert by any means so maybe there is something common-sense I am missing here, but until reading the answer above and adjusting my offset to 0 or a negative amount I have always encountered this problem and the only solution I knew of was to create my own custom intersecting crop marks using the line tool.
Copy link to clipboard
Copied
Just a note:
actually, rob day is quite right, it’s all OK with InDesign’s crop marks, and you shouldn’t feel the need to invent something different on your own, or even draw them manually.
However, it was your query, that’s doable, and I did my best trying to answer a question asked.
It doesn’t mean professionals work that way though 
Copy link to clipboard
Copied
Thank you for the screen shot. I was able to find it but I will have to do some more digging into how to use that script though. I tried running it but it wants me to select an object. Not sure how to use it to apply crop mark settings to the entire page.
If professionals use the traditional crop marks that I am having an issue with, can someone please explain to me how you are supposed to trim to avoid cutting both marks off when you trim one side? I am not trimming by hand, I am using a machine that makes a cut all the way across the page so any side I cut off takes all 4 crop marks on that side with it (the mark for that side plus the marks for the 2 adjacent sides).
This user had the same problem and the only solutions offered were to create your own or trim by hand. That is what prompted me to create my own, but it's a hassle to insert them every time. So how do the professionals cut bulk paper guillotine style without scrapping half of their crop marks?
Copy link to clipboard
Copied
Yup, that script works with object(s), not pages. You can fool it by drawing a whole page sized invisible frame. If you'll make it a bit smaller, and run script on it, you’ll get crop marks with bleed regarding your page. It’s likely will require a bit experimenting to define values that work best for you.
Printer trimming machines work differently, and ID’s crop marks are perfectly OK for it.
If it doesn’t fit your needs, you should try to get used with the script, I think.
Copy link to clipboard
Copied
can someone please explain to me how you are supposed to trim to avoid cutting both marks off when you trim one side?
So how do the professionals cut bulk paper guillotine style without scrapping half of their crop marks?
In a bindery large stacks of sheets are jogged and trimmed, and it would be impossible to jog hundreds of sheets so the marks line up perfectly throughout the stack. If the marks were touching, that would guarantee some remnant of the marks would show up randomly on the trimmed sheets through the stack. The bindery might rule up the top sheet, but the stack is usually rotated for each cut.
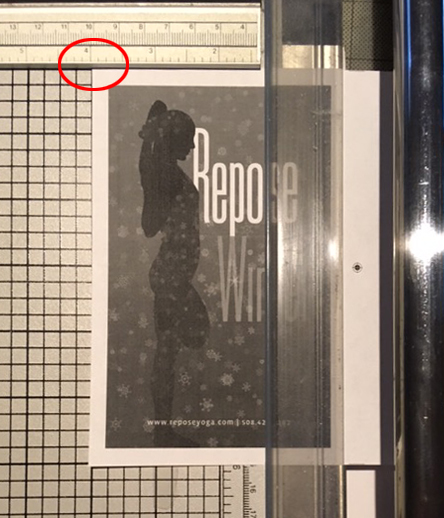
I use a RotaTrimmer for in house trimming, and rotate the sheet(s) clockwise to solve the lost marks problem:
The left edge on the guide with the top edge lined up with the blade

Rotate clockwise with the bottom edge on the guide and the remaining left edge mark lined up with the cutter
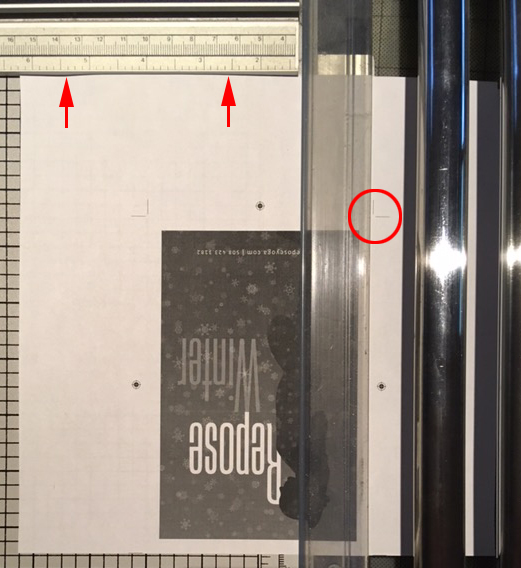
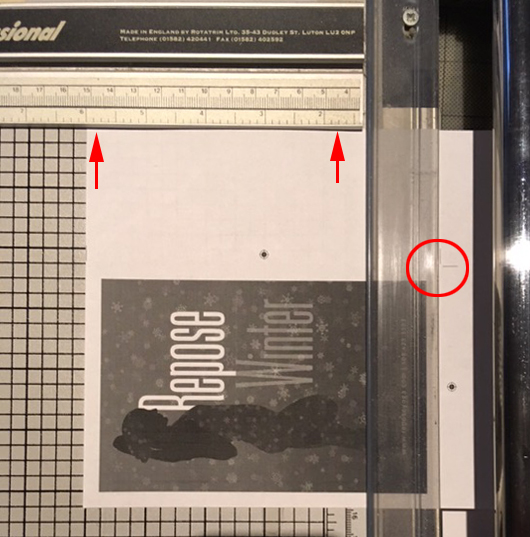
The final cut is to the trim width
Copy link to clipboard
Copied
I am using a machine cutter so I can't stop short of cutting off the adjacent crop mark. How do I avoid that then? The crop line for the right side of the page is to the left of the top and bottom marks and visa versa with the left side, so when I cut off either side it takes the top and bottom with it. Even if you work your way around you are always left with one side un-trimmed and no crop marks left telling you where to cut it.
Copy link to clipboard
Copied
Ok, so what I am gathering is that professional printers use a trimming machine that avoids this issue. I would like to encourage Adobe to develop a more amateur friendly option for folks who don't have access to this professional equipment so that we can easily create crop marks that work for a guillotine cutter because this very frustrating lol. I will try Winterm's suggestion of applying the crop mark script to a full-page frame, that seems to be my best option for now. This would be an easy fix if I could just create a negative offset when exporting.

Copy link to clipboard
Copied
FWIW, the printers I’ve dealt with the last few years don’t want any crop marks at all. They add their own using the data in the PDF.

Copy link to clipboard
Copied
Agree with Bob.
Been about 15+ years since one of our printers wanted any printer marks at all.
Today's prepress station works with the data embedded into the press-quality PDF that we supply (IIRC, it's the "trimbox" data that they use). If they want crop marks, bleed marks, registration marks, color bars, etc., they'll add what they need through their prepress software.
Our recommendation:
- Don't change the crop marks unless you've talked it through with your printer.
- Ask your printer if they want any of the print marks at all, and if so, which ones.
- Always ensure in InDesign's page setup that you define the final trimmed size of the document because that dimension is eventually built into the PDF for automated prepress to use.
| PubCom | Classes & Books for Accessible InDesign, PDFs & MS Office |
Copy link to clipboard
Copied
Bevi,
OP trims it herself… She has no one to ask except us.
Copy link to clipboard
Copied
Right. I just wanted the OP to understand how it’s done in a modern workflow.
Copy link to clipboard
Copied
This isn't applicable since I am not using a printer. I am printing and trimming myself.
Copy link to clipboard
Copied
InaLandCalledHonahlee wrote
Ok, so what I am gathering is that professional printers use a trimming machine that avoids this issue.
because they cut all sides at once. Your way is actually 'semi-manual', that's why you encounter this problem.
Copy link to clipboard
Copied
InaLandCalledHonahlee wrote
This would be an easy fix if I could just create a negative offset when exporting.
With standard exporting you can have bleed. With script you can have negative offset. Not both at a time, sorry.
However, you can 'cheat' script for bleed…
Copy link to clipboard
Copied
Thank you all for your help! I genuinely appreciate you all ^_^ I think I will just have to stick with winterm's suggestion for now and use crop mark script to create crop marks for a frame around my page. At least now I understand why they are the way they are. I always wondered why this wasn't an issue for most people.
Copy link to clipboard
Copied
You're welcome, and don't wait another year with your next question

Copy link to clipboard
Copied
Here is a different perspective. I may have missed the point entirely, if so I apologise... I have made prints to be trimmed at home, and it's awkward but possible if you have a guillotine that is (a) marked out with rulers along the non-cutting edge, and (b) big enough for your whole sheet. So one like this is good Rexel Guillotine CL120 A3 460 mm 10 sheets | Viking Direct UK and one like this is not Dahle 508 A3 Personal Trimmer | Viking Direct UK because it won't hold the full size sheet.
First, why do the crop marks sit entirely outside the page, not meeting? Because the printer doesn't want to see them on the page. Slight inaccuracies in cutting would otherwise leave guides, rules, bits of marks visible at the edge or in the corner, and that's not considered a professional result. I'd aim for the same so I'd use the same cut off marks.
How? Get the page with cut marks. Cut off the left using the marks. Now cut the top edge using the marks at the right, and the bottom edge, also using the marks at the right. We now have a page with no marks and extra paper at the right. But you should know the required size. Use the ruler on the guillotine to set the line for the right edge, and cut it off. Done!
Copy link to clipboard
Copied
How? Get the page with cut marks. Cut off the left using the marks. Now cut the top edge using the marks at the right, and the bottom edge, also using the marks at the right. We now have a page with no marks and extra paper at the right. But you should know the required size. Use the ruler on the guillotine to set the line for the right edge, and cut it off. Done!
Illustrated in my #15 
Copy link to clipboard
Copied
So it is. I don't know what a Rotatrimmer is, and it looks rather fancy, but on close inspection it is indeed a guillotine just as required. Thanks!
Copy link to clipboard
Copied
"How? Get the page with cut marks. Cut off the left using the marks. Now cut the top edge using the marks at the right, and the bottom edge, also using the marks at the right. We now have a page with no marks and extra paper at the right. But you should know the required size. Use the ruler on the guillotine to set the line for the right edge, and cut it off. Done!"
That would work fine but eventually, this thing that I am designing will be printed and trimmed by a small and only moderately trained production staff and for lack of a better word it needs to be idiot proof. They didn't design the thing and it will be one of many things they will need to print and trim and if I just expect them to know the correct size for each thing and cut it to size without a mark it will get messed up. That's actually what prompted me to finally figure out how to do this. It's been a burning question for a long time but it wasn't necessary until a batch of 100 prints got cut incorrectly.
-
- 1
- 2

 AdChoices