• Global community
    • Language:
      • Deutsch
      • English
      • Español
      • Français
      • Português
  • 日本語コミュニティ
    Dedicated community for Japanese speakers
  • 한국 커뮤니티
    Dedicated community for Korean speakers
Exit
0

Moving images about on inDesign

Community Beginner ,
Jan 07, 2020 Jan 07, 2020

Copy link to clipboard

Copied

Hi,


I am creating a brochure and need to add lots of images accompanied by text and logos etc. I am adding the images into the document via file and place. Whenever the image goes onto my page, it has the blue area box around it which I expand to cover the entire A4 document as things will get moved around once it is checked by my manager. I have tried to place the image without the blue box by not being clicked in the document when I'm placing the image but I can't seem to get this to work.


However, I am not able to move the previous image(s) once I have added a new one into the document. I have tried this in multiple layers and in the same layer and it will not let me even select a previous image once new ones have been added in.


Excuse my lack of correct terminology, I am an ID newbie.


Any help would be appreciated, thanks!

TOPICS
EPUB , Feature request , How to , Import and export , Performance , Publish online , Scripting , Type

Views

7.8K

Translate

Translate

Report

Report
Community guidelines
Be kind and respectful, give credit to the original source of content, and search for duplicates before posting. Learn more
community guidelines

correct answers 1 Correct answer

Community Expert , Jan 07, 2020 Jan 07, 2020

When you first place an image by clicking the loaded cursor onto the page, it comes in a full size, automatically surrounded by the blue box (the non-printing image frame). Don't resize that frame to cover the whole A4 page (which is what I assume you're doing, just dragging any handle on the image to resize the frame). Instead, if you want the image to take up more or less area on the page, hold down Command-Option (on Windows: Control-Alt) before and while you click and drag on a corner handle

...

Votes

Translate

Translate
Enthusiast ,
Jan 07, 2020 Jan 07, 2020

Copy link to clipboard

Copied

By "blue area box," it sounds as though you are referring to the image container frame. All images have their own separate container when placed, which by default, shows up outlined in blue. If you wish to move the image on the page, you can use the Selection Tool, which is hollow pointer icon at the top of the Tools panel, so there is no need to expand the frame to the full size of the page after placing. That will allow you to place multiple images on the page without their frames overlapping each other, making it easier to select each one.

Votes

Translate

Translate

Report

Report
Community guidelines
Be kind and respectful, give credit to the original source of content, and search for duplicates before posting. Learn more
community guidelines
Community Beginner ,
Jan 07, 2020 Jan 07, 2020

Copy link to clipboard

Copied

I have tried this and on some images it works, but when resizing certain images it just seems to crop them rather than making them smaller

Votes

Translate

Translate

Report

Report
Community guidelines
Be kind and respectful, give credit to the original source of content, and search for duplicates before posting. Learn more
community guidelines
Community Expert ,
Jan 07, 2020 Jan 07, 2020

Copy link to clipboard

Copied

It is important to understand that when an image is imported into InDesign it actually is two separate components—the container frame (offically known as a Graphics Frame) and the image itself. Think of the frame like a soup can and the image like the soup. To manipulate the image inside the frame click on the inside of the frame with the Direct Selection Tool (the white arrow). You will notice a hollow translucent circle appear in the center of the image. Dragging that circle with the direct selection tool will allow you to move the image within the frame. Additionally, when you click on the image you will see a (usually brown) frame appear with corner handles. These handles will probably appear ourside of the container frame and will define the actual outer edges of the imported image. Dragging the corner handles of this (brown) box will allow you to enlarge and reduce the image. Drag with the shift key held down and your sizing will be proportional. If you wish to alter the the outer container (the graphic frame) click on the outer edge of the frame with the regular selection tool (black arrow). If the frame is on the default first layer then the outline of it will be blue. Each layer you add to the document will show the frame in a different color which makes it easier to see which layer a frame is on. If you drag the corners of the selected container frame you will enlarge or reduce the perimeter of the frame. If you hold down the Command (Mac)/Control (PC) key when you drag on a corner then you will enlarge or reduce the frame and its entire contents. Hold down the shift and all enlargement and reduction will stay proportional.

Votes

Translate

Translate

Report

Report
Community guidelines
Be kind and respectful, give credit to the original source of content, and search for duplicates before posting. Learn more
community guidelines
Community Expert ,
Jan 07, 2020 Jan 07, 2020

Copy link to clipboard

Copied

Bill's description of working with graphic frames and images is very accurate, and will probably help explain what's happening.


One slight correction. He says the image frame is usually brown that's often true. But to be a little more precise: The selection colors you see for objects depend on color selected for the Layer you're working on (shown in the Layers panel—found in Window > Layers). The default layer is a light blue color and that's what most objects show on their bounding box, including graphic frames. The color of the image frame inside it is the inverse of blue, which is brown.


However, when you work with documents with multiple layers, the layer selection color may be different. The graphic frame could be red. In that case, the frame of the image inside it will be light blue (like the example shown below).


Screen Shot 2020-01-07 at 10.02.16 AM.png

Votes

Translate

Translate

Report

Report
Community guidelines
Be kind and respectful, give credit to the original source of content, and search for duplicates before posting. Learn more
community guidelines
Enthusiast ,
Jan 07, 2020 Jan 07, 2020

Copy link to clipboard

Copied

I would suggest visiting this link on Adobe's InDesign Help page and watching the second video, "Move, resize, and fit graphics".

Votes

Translate

Translate

Report

Report
Community guidelines
Be kind and respectful, give credit to the original source of content, and search for duplicates before posting. Learn more
community guidelines
Community Expert ,
Jan 07, 2020 Jan 07, 2020

Copy link to clipboard

Copied

When you first place an image by clicking the loaded cursor onto the page, it comes in a full size, automatically surrounded by the blue box (the non-printing image frame). Don't resize that frame to cover the whole A4 page (which is what I assume you're doing, just dragging any handle on the image to resize the frame). Instead, if you want the image to take up more or less area on the page, hold down Command-Option (on Windows: Control-Alt) before and while you click and drag on a corner handle to scale both the image and its non-printing frame, releasing the modifiers after you release the mouse button.


OR select the image with the Selection tool and enter a scaling percentage in the Scale field in the Properties panel or Control bar.


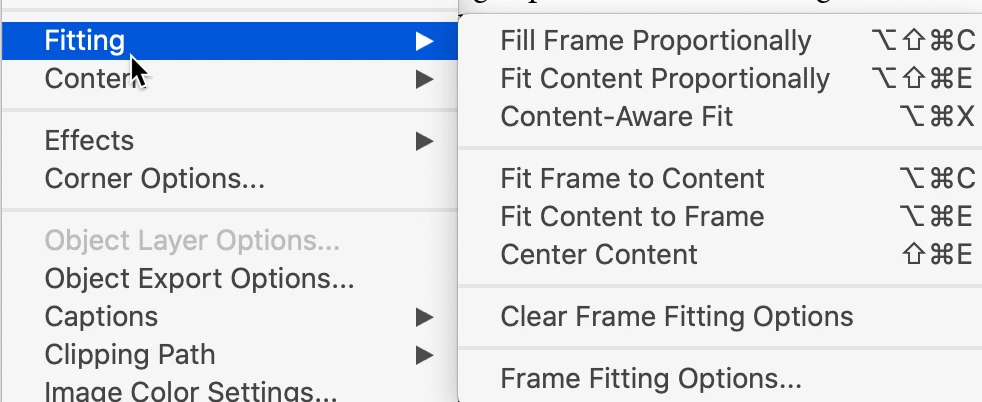
OR resize the frame itself as you were doing, then with it still selected, choose a Frame Fitting option from the Object > Fitting menu to automatically scale the image itself to fit the frame.


2020-01-07_13-51-37.png


You place multiple images on the page in this same way, arranging them overlapping or side-by-side.

NOTE: When you choose File > Place, be sure the "Replace Selected Object" checkbox is turned off/empty.


AM 


Votes

Translate

Translate

Report

Report
Community guidelines
Be kind and respectful, give credit to the original source of content, and search for duplicates before posting. Learn more
community guidelines
Community Beginner ,
Jan 08, 2020 Jan 08, 2020

Copy link to clipboard

Copied

LATEST

Thanks so much, your step by step answer really helped.

Votes

Translate

Translate

Report

Report
Community guidelines
Be kind and respectful, give credit to the original source of content, and search for duplicates before posting. Learn more
community guidelines
Community Expert ,
Jan 07, 2020 Jan 07, 2020

Copy link to clipboard

Copied

Once you resized the frame/container to fill up the entire page, it covers up the items below it (like a sheet of clear plastic), so you can't select through it by straight clicking. Resize the image frames by using the Object > Fitting > Fit Frame to Content menu or the button on the Control panel.


It's also possible that you imported images while your text cursor was active; that could have created an inline object (image). You will need to select those and cut them. Switch to the Selection tool (black arrow) and paste. Position, size, and crop as needed.

David Creamer: Community Expert (ACI and ACE 1995-2023)

Votes

Translate

Translate

Report

Report
Community guidelines
Be kind and respectful, give credit to the original source of content, and search for duplicates before posting. Learn more
community guidelines
Community Expert ,
Jan 07, 2020 Jan 07, 2020

Copy link to clipboard

Copied

I just realized that I had one inaccuracy in my first post. The transluscent circle—called the Content Grabber— appears when you click on the image with the regular selection tool (the black arrow). You can then drag on the content grabber to move the image around. If you click on the image with the direct selection tool (white arrow) the grabber does not appear but you can still move the image within the frame as long as the direct selection tool stays chosen.

Votes

Translate

Translate

Report

Report
Community guidelines
Be kind and respectful, give credit to the original source of content, and search for duplicates before posting. Learn more
community guidelines
Community Beginner ,
Jan 08, 2020 Jan 08, 2020

Copy link to clipboard

Copied

Thanks everybody for the help. I seem to have figured it out now! Much appreciated!

Votes

Translate

Translate

Report

Report
Community guidelines
Be kind and respectful, give credit to the original source of content, and search for duplicates before posting. Learn more
community guidelines