Known Participant
September 8, 2020
Answered

Problem alligning crop marks in .pdf document (cover made in indesign, rest made in acrobat)

  • September 8, 2020
  • 3 replies
  • 3490 views

Hello and sorry for confusing title.

So i am working on this nightmare of a file (40 pages product manual), originaly made in corel draw, i re-made all of the content using technique - pdf opened in acrobat - edited in illustrator, saved back to pdf page by page. The whole project is done now, but i customized the cover of the manual in indesign.

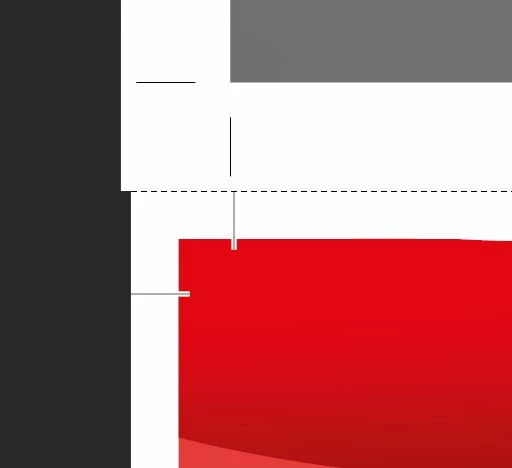
The thing is, 38 of those 40 pages (the contents of the book) had crop marks added by acrobat pro. The other two pages made in indesign, i added myself while exporting it into pdf, and those two just does not match each other, size of the cover pages after crop seem to be a slightly smaller than the rest of the pages. (see the attachment below)

Is there any way that i can maybe move the crop marks (to enlarge the area that is going to get cut by printers)? Any advice is welcome.

Thanks a lot in advance.

This topic has been closed for replies.
Correct answer Bill Silbert

To determine the trim size of the Acrobat document pages go through View>Tools>Print Production>Set Page Boxes and in the dialog window that appears set the "Apply to:" pull-down menu to TrimBox as shown below. The trim size displays below the image of a document page. To check the bleed amout change the pull-down to Bleedbox.

3 replies

Participant
November 23, 2021

Good afternoon, 


I am trying to remove crop marks as well and the instruction below View/Tools/Print Production i am not seeing under my Adobe Acrobat. Please advise

Bill Silbert
Community Expert
Bill SilbertCommunity ExpertCorrect answer
Community Expert
September 8, 2020

To determine the trim size of the Acrobat document pages go through View>Tools>Print Production>Set Page Boxes and in the dialog window that appears set the "Apply to:" pull-down menu to TrimBox as shown below. The trim size displays below the image of a document page. To check the bleed amout change the pull-down to Bleedbox.

ZowerAuthor
Known Participant
September 8, 2020

Thank you Bill, your reply actually solved my issue.

I had to go to the print production as you suggested, went to the trim box dropdown and the size on the bottom right under the preview picture is the size of the file that i had to change my indesign file to. Now they both seem to be the same size even after crop.

Thanks both of you guys, you are the best.

Have a nice day.

ZowerAuthor
Known Participant
September 8, 2020

Actually i would have one additional question to this.

The size of the pages after trimming seems to be the same, but the trim marks in the pdf document doesent allign, they seem to be slightly off to the right by couple millimeters, would that be a problem for the printers or since the trim marks are correct it does not matter for the printing process and the page size will be correct once printed?

Please see attachment bellow.

Randy Hagan
Community Expert
Community Expert
September 8, 2020

I'm making a couple of assumptions here:


  1. You've designed a bleed into your cover, and we're looking at the crop marks for page trimming inside the bleed area.
  2. When you say you want to "enlarge" the crop marks, you're talking about moving them further away from the page trim area, as opposed to moving them to create a larger trim area (e.g. - more page size).


When you print your InDesign document, you can vary the distance of crop marks from the edge trim using the Offset: edit box, as shown below:


Using the default of .0833 in (6 points in printer's measures) offsets the crop/bleed marks as shown in the screen capture below:

Opening up that Offset: value to 3/16ths of an inch (.1875 in) moves the crop marks further out like shown below:

If you want to create a larger trim areae.g. a bigger page — you need to go to the File>Document Setup menu command and create a bigger page.


Hope this helps,


Randy


ZowerAuthor
Known Participant
September 8, 2020

Thank you for reply Randy!

1. I am not aware of creating bleed marks there, but as you wrote, the marks that were on the screenshot are trim marks, top part of the image is one page from total 38 pages, and you can see that the trim marks are slightly "wider" or "further" from each other than on the bottom part of the screenshot which is the part designed with indesign and exported to pdf (cover - 2 pages), so I am assuming from what you wrote, that my problem is not moving the trim marks rather than making the page bigger as you suggested.

I will try to adjust the page size and inform back if that helped.

Thank you so far.

ZowerAuthor
Known Participant
September 8, 2020

I am totally doing something wrong here.

I went into acrobat - file - properties and checked what size of my document was, so i could copy that size and make the indesign file fit the same size as my acrobat file. I coppied those numbers over to indesign but aperently, the numbers that i see in properties pannel of acrobat are including the trim marks in it, is there a way to get "clean" dimensions of the document, like it would already cropped? 

You can see what i mean on the screencap below. Top part of the image is the indesign file that i changed document size to the size that i found in the properties pannel of acrobat - the size would be perfect (trim marks of the indesign file fits perfectly on the page size of the acrobat file), if it did not include the trim marks.

Now i wonder where can i find the right size of the acrobat document. Or how to calculate what is the trim mark size.

Sorry for those questions and my way of putting it, may sound pretty confusing. But i just do not know how to do it and thought you experienced folks could help me out.

Thanks a lot in advance again.