Participant
September 26, 2017
Answered

Two coloured, circled bullet point

  • September 26, 2017
  • 2 replies
  • 638 views

Hi all,

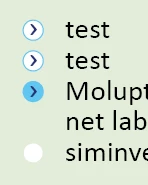
I am trying to make this bulletpoint:

I managed to make it using Paragraph Rule Above (Colour: Bright Blue) and Paragraph Rule Below (Colour: Paper), I also added Navy colour for the bullet via Character Style.

The whole list works perfectly for one line, and things are getting out of control when you have more then one line of text (Rule Below moves to the end):

Are there any other ways for creating the Bullets like this? I want to AVOID using Anchored object with tabs or such.

(I guess I have to patiently wait for OpenType SVG support in InDesign!)

This topic has been closed for replies.
Correct answer vinny38

Here's a workaround you might find helpful (or not):

It has a constraint though: you must manually type a character at the beginning of the paragraph.

I.e. >Lorem ipsum dolor sit amet, consectetur adipiscing elit.

So you can set your paragraph style with a circle bullet. No text after bullet!

Apply a character style to your bullet. Let' call it... "bullet" ^^

Then add some settings to this character style: fill color (white), stroke weight and color (blue) and... most importantly, negative tracking. You'll need some adjustments, but go high for a start: i.e. -500. This will bring back the arrow to the left, over the bullet.

Now create a new character style. Let's call it "arrow". Apply positive tracking: i.e. +500. This will create a "fake" space between arrow and text.

Go back to your paragraph style and add a Grep style: apply "arrow" character style to ^>.

Finally, adjust tracking for both "bullet" and "arrow", possibly shifting and font size and your done.

2 replies

vinny38
vinny38Correct answer
Legend
September 26, 2017

Here's a workaround you might find helpful (or not):

It has a constraint though: you must manually type a character at the beginning of the paragraph.

I.e. >Lorem ipsum dolor sit amet, consectetur adipiscing elit.

So you can set your paragraph style with a circle bullet. No text after bullet!

Apply a character style to your bullet. Let' call it... "bullet" ^^

Then add some settings to this character style: fill color (white), stroke weight and color (blue) and... most importantly, negative tracking. You'll need some adjustments, but go high for a start: i.e. -500. This will bring back the arrow to the left, over the bullet.

Now create a new character style. Let's call it "arrow". Apply positive tracking: i.e. +500. This will create a "fake" space between arrow and text.

Go back to your paragraph style and add a Grep style: apply "arrow" character style to ^>.

Finally, adjust tracking for both "bullet" and "arrow", possibly shifting and font size and your done.

winterm
Legend
September 26, 2017

Uhm... isn't it a bit overcomplicated? What about good ol' inline graphics? Are they in your blacklist, too?

Participant
September 26, 2017

I believe I would have to stick to Inline/Anchored graphics for the time being :/... Customer insist on using such bullet points (MS Word!)

winterm
Legend
September 26, 2017

Well, not the worst bullets ever seen

And using inline graphics in such cases is a pretty common workflow. Remember you can use Find/Change to manage it globally.