 Adobe Community
- Home
- InDesign
- Discussions
- Re: Weird text wrap behavior - hope someone knows ...
- Re: Weird text wrap behavior - hope someone knows ...

Copy link to clipboard
Copied
For some reason, I suddenly cannot apply a 1-pica wrap around my imported photos. I've done this the same way for years, but suddenly, my 1-pica wrap is measuring only 0p7.44 pica, even though the text wrap palette says it is 1 pica. I've deleted and reimported the photo, then reapplied the text wrap with the same incorrect result. I've tried setting up a style, and the style gives the same result.
I searched online for info on this, and I came across an article about applying the text wrap to either an image frame or the image itself. I don't know if this has anything to do with what I'm doing.
- First of all, I'm not drawing a frame and then importing an image into it; rather, I'm simply placing an image, adding a keyline, then setting the text wrap. So, how is there even a frame to select vs. selecting the "image itself"?
- Second, why would one create a frame (unless they don't have the image yet and need a placeholder) vs. importing the image and doing what I've described.
- Third, if there IS a frame, how does one select it vs. selecting the image itself? (I imagine it is a matter of holding down a control or alt key but how do you know what you have selected -- the frame or the photo -- and how do you tell, to start with, that there is even a frame to select? In my case, there may not be since I know I'm not drawing any frames before I place my photos.
These last questions may or may not be pertinent to an answer about my text wrap problem, which is my real concern. But I mention just in case I am on to something but don't know how to use the info.
Otherwise -- I really need to know why, when I assign a 1-pica text wrap to my photo, the wrap only measures 0p7.44. Does it have to do with the other text palette options? I almost never change any of those except perhaps which icon at the top I choose. I occasionally will chose to "detect edges," but that is not a factor in these straightforward rectangular images I'm using in this book.
I'd appreciate some help, and soonest, if possible. Thanks much for any thoughts, advice, instruction or information!
C.


 1 Correct answer

Hi casinclaire ,
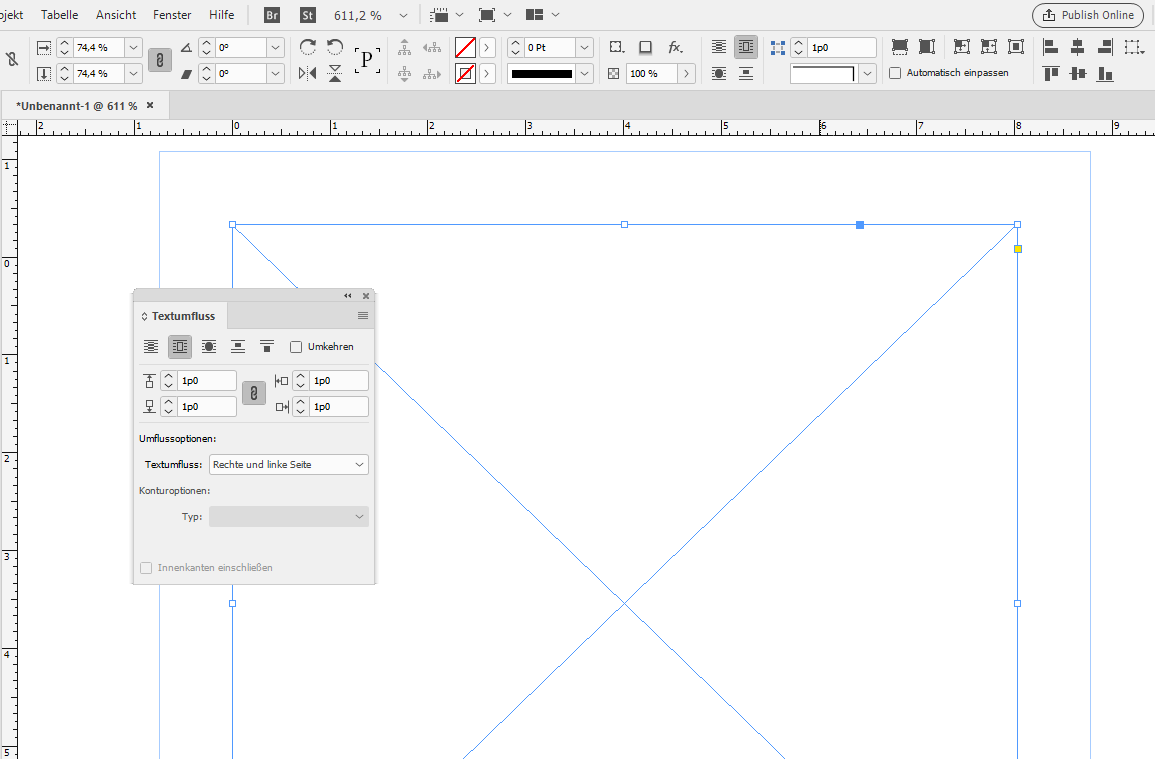
that a 1-pica value is doing a 0p7.44 pica wrap around means that your frame is scaled.
Select the frame and open your Transformation Panel. You can reset the scaling as 100%. Then a 1-pica value would return a 1-pica wrap.
From my German InDesign CC 2018.1.
1.pica text wrap value on a rectangle that is scaled to 74.4 %.
The effective value is not one pica. The rulers are set to Pica.
Transformation Panel. Redefining scaling to 100 %:
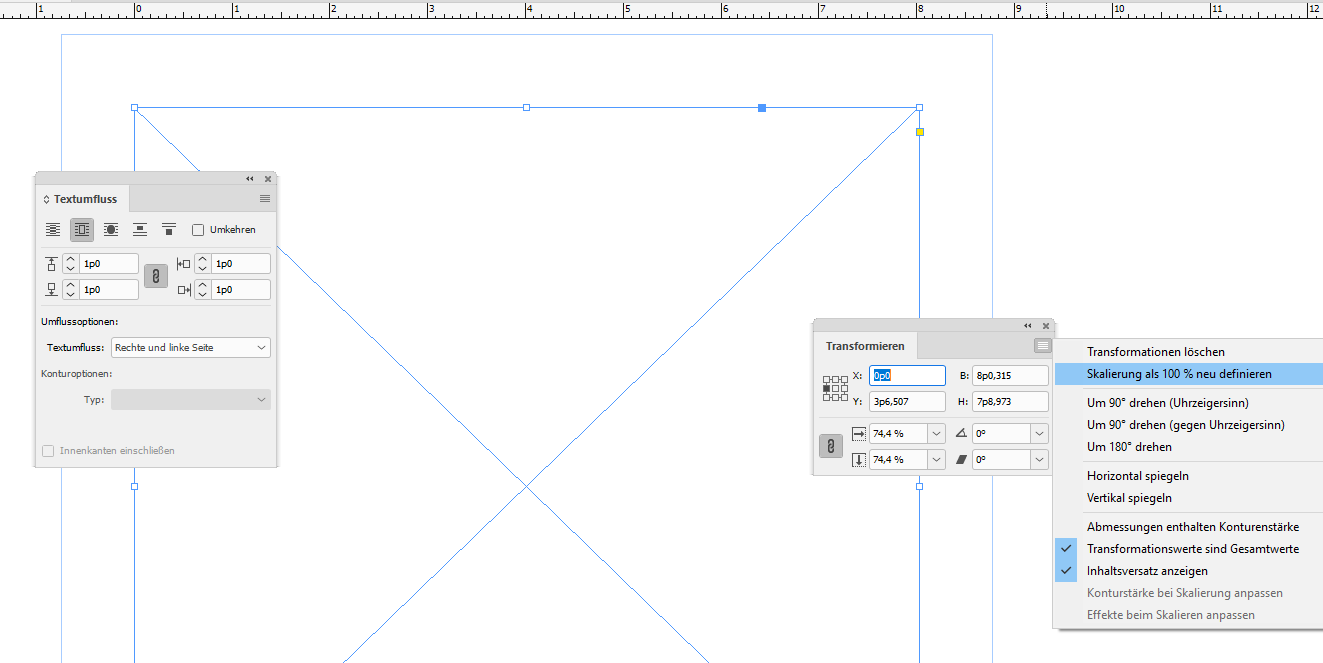
Now the result of that action:

Regards,
Uwe
 11
Replies
11
11
Replies
11

Copy link to clipboard
Copied
First of all, I'm not drawing a frame and then importing an image into it; rather, I'm simply placing an image, adding a keyline, then setting the text wrap. So, how is there even a frame to select vs. selecting the "image itself"?
When you place an image, InDesign automatically creates a frame for you that is the same size as the image. It is not possible to have an image with no frame in InDesign.
Second, why would one create a frame (unless they don't have the image yet and need a placeholder) vs. importing the image and doing what I've described.
Just as you said, a frame might be created before placing an image because they need a placeholder. Another reason would be that they want to set the fitting options before placing an image. For example, lets say that the original size of the image is larger than the frame you want to put it into. You could create a frame, go to Object > Fitting > Frame Fitting Options, and choose an option.
Third, if there IS a frame, how does one select it vs. selecting the image itself? (I imagine it is a matter of holding down a control or alt key but how do you know what you have selected -- the frame or the photo -- and how do you tell, to start with, that there is even a frame to select? In my case, there may not be since I know I'm not drawing any frames before I place my photos.
To select the frame use the black Selection tool. As you hover your cursor over the frame a disk icon should appear in the center of the image. If you click the disk icon, the image instead of the frame will be selected. Alternatively, you can click the image with the white Direct Selection tool to select the image instead of the frame. Another technique is to double-click the image with the black selection tool to toggle selecting the frame and image.
Copy link to clipboard
Copied
Barbara,
Thanks so much for this response and info. I feel rather stupid as you point out the disk that shows up in the center of the image. I don't know what I was thinking. Of course, I definitely know about this, and the use for it and also that I can select the whole frame vs. selecting the image via this disc. For some reason, the terminology just didn't click in my brain when I was reading the article that was about all this stuff, or else I was just overtired with all the many late-night deadlines I've had this week (yeah, I'm blaming it on that); I just didn't realize this was what was being referred to. So this part of my post was a real "duh" question on my part. 
I'm still hoping someone will have a clue about the text wrap problem, though, which is my main concern. This one, even with my years of experience, is not ringing a bell as far as coming up with a cause. It's almost as if it were a glitch or low RAM, as I said, but after multiple reboots (even though 16 GB of RAM ought not to require it), I still am having the problem. I'm hoping it is just some setting I've mis-selected or some combo of settings I've accidentally used that I didn't mean to. It is a real mystery! (I suspect anything could be a mystery for me in my current bloodshot-eyes condition!)
Thanks again -- C.
Copy link to clipboard
Copied
Hi casinclaire ,
that a 1-pica value is doing a 0p7.44 pica wrap around means that your frame is scaled.
Select the frame and open your Transformation Panel. You can reset the scaling as 100%. Then a 1-pica value would return a 1-pica wrap.
From my German InDesign CC 2018.1.
1.pica text wrap value on a rectangle that is scaled to 74.4 %.
The effective value is not one pica. The rulers are set to Pica.

Transformation Panel. Redefining scaling to 100 %:

Now the result of that action:

Regards,
Uwe
Copy link to clipboard
Copied
This makes sense as I am scaling all of the images I'm using in this project, so I will definitely check it out.
But it does raise another question for me. How is one to achieve the desired wrap size for an image that one wishes to scale?
That is, if I'm not embedding the images, then I don't mind if they are outsized and need to be scaled. If I have a lot of images, I would sometimes rather scale in InD than hop back and forth between Ind and PShop resizing just so I can import every image at 100% and thus maintain my text wrap. It seems weird that InD would scale the text wrap if it is added after the image is scaled and thus require a person to always have to go resize the photo in PShop before placing if they do want to maintain their text wrap size.
I've never run into this before and can't help wondering if I have something turned on or off somewhere that is making InD suddenly pay attention to the scale of my images.
Copy link to clipboard
Copied
Laubender,
I just looked over your response again, and I think maybe the answer to my last question might be in there. It is just late here, and I'm not focused. I'll look at it again tomorrow. Thanks so much.
Copy link to clipboard
Copied
Hi casinclaire ,
there is an easy solution if you do not apply the wrap to the image but to the frame holding the image.
Look into InDesign's preferences and see what's set using scaling.
If you choose When Scaling: Apply To Contents and you do the wrap on the frame holding the image you are good to go.
Regards,
Uwe
Copy link to clipboard
Copied
Thanks again. I'll ck my settings. All this has certainly shown me that I should be more mindful of what I'm selecting! I really appreciate the help and the info.
Copy link to clipboard
Copied
Sleep deprivation will do it every time. We've all been there.
I agree that the text wrap issue has to do with the image being selected when the frame should be selected.
Copy link to clipboard
Copied
Thanks for your understanding. I hate when I post a stupid question (I know, they say there aren't any, but I'm sure I've proved that wrong...). Thanks again for the info and support.

Copy link to clipboard
Copied
Hi,
If the image you want to Wrap the text around doesn't psd file you have to choose deduct edges.
If you want to wrap to be around the bounding box
With Black arrow choose the frame (not the image inside), just choose Wrap around bounding box. the second choice from left, so you will have the the options to change the top, bottom, left and right offset.

If the Image you have imported has a transparent background or it is psd file.
choose wrap around object shape, contour options: detect edges.

Copy link to clipboard
Copied
Hi. Don't know if I saw your reply at the time you made it, but your mini-tutorial was very helpful. Thanks!

 AdChoices