Participant
November 23, 2018
Answered

Indesign Animate Slideshow - Image Strip

  • November 23, 2018
  • 1 reply
  • 854 views

Hi Everyone,

I've been playing around with ID Animate for a bit now and cant seem to figure something out. It is simple, but I may be missing something here.

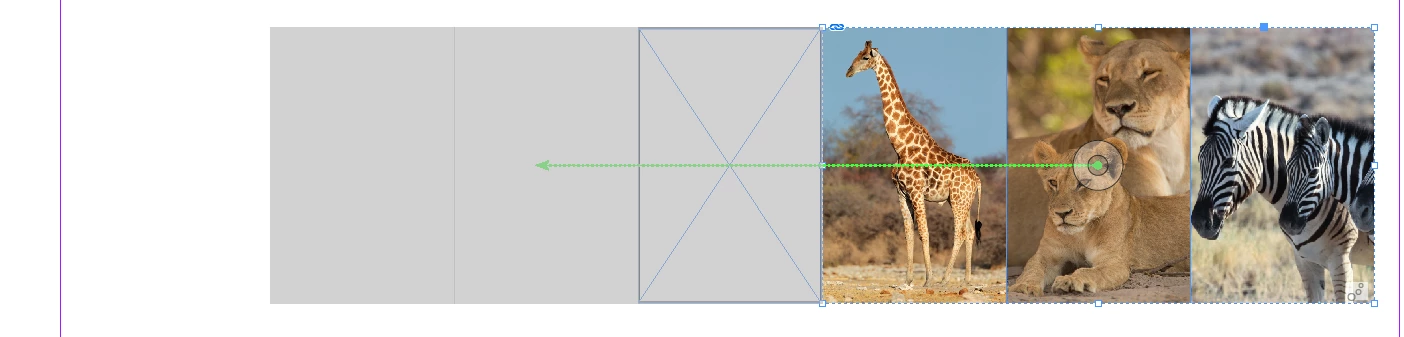
What I'm trying to do is create a slide show that will run through a window area. Currently the image will run from its respective start position (right side) - run through the window and stop in its respective ending position (left side). What I wanted to achieve is having the images run edge to edge, like a film strip.

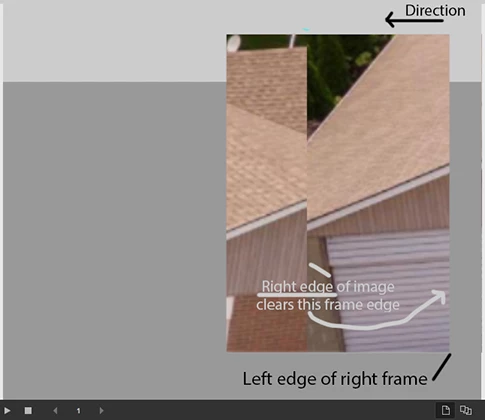
When the right edge of the image (image moving left) clears the left edge of the frame on the right, I would like the next image to start coming in. In turn creating a seamless image strip. This would be similar to having photographs butted up against each other and running them side by side.

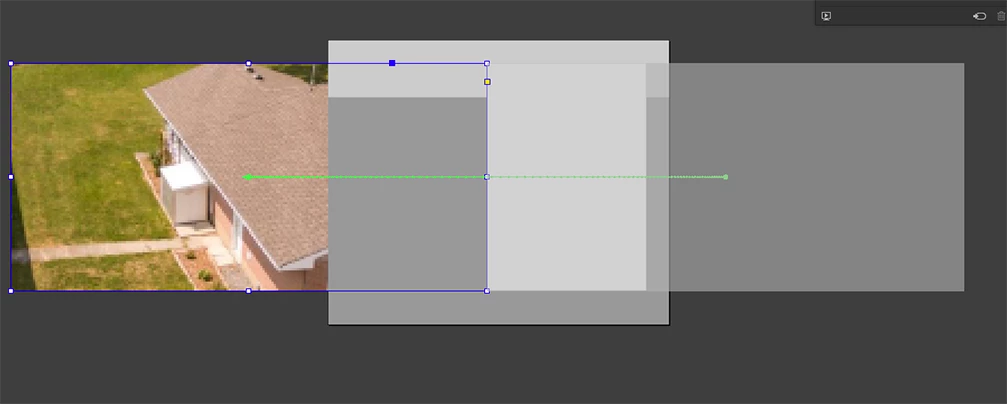
I have been successful in creating one style that moves right to left but the image below only animates once the top one if off out of view. Iwould like to attain this particular solution mentioned above with your help. I could also use PS to create an image strip and simply drop it into ID; however, this solution presents one other problem - inefficiencies. We go through hundreds of images so simply re-linking the files would be best (in ID) - instead of having to constantly copy and paste and scale in PS to create one image that is then brought into ID and then animated.

I hope this is as clear as mud

Any ideas?

    This topic has been closed for replies.
    Correct answer Diane Burns

    Three separate images, easy to swap out. Does not use Fade In/Fade out.

    Here are the steps:

    1. Place images side by side, and group them. Create a separate "viewing" frame.

    2. Apply a motion path to the group (in my example, I used the Move Left preset and set the Duration to 5 seconds).

    3. Turn on the animation proxy (icon in bottom of animation panel), and make sure the motion path length is such that the last image is centered in the viewing frame.

    4. Cut the group, click on the "viewing" frame, and choose Edit menu > Paste Into.

    5. Adjust the group so the left-most image is sitting right outside the viewing frame.

    Note that you have to set the animation before you do the Paste Into.

    Hope this is clear and that it helps, please let me know if it resolves your issue.

    1 reply

    Diane Burns
    Inspiring
    November 23, 2018

    Does this illustrate more or less what you are trying to do? If not, let me know what I've missed. If this is correct, I'll list the steps.

    https://indd.adobe.com/view/39508ca0-afa2-49c6-b438-1121bcce340c

    BCVCAuthor
    Participant
    November 24, 2018

    Yes this is exactly what I was thinking, now are those separate images that can be modified with fade in fade out if one should chose to do so?

    Diane Burns
    Diane BurnsCorrect answer
    Inspiring
    November 24, 2018

    Three separate images, easy to swap out. Does not use Fade In/Fade out.

    Here are the steps:

    1. Place images side by side, and group them. Create a separate "viewing" frame.

    2. Apply a motion path to the group (in my example, I used the Move Left preset and set the Duration to 5 seconds).

    3. Turn on the animation proxy (icon in bottom of animation panel), and make sure the motion path length is such that the last image is centered in the viewing frame.

    4. Cut the group, click on the "viewing" frame, and choose Edit menu > Paste Into.

    5. Adjust the group so the left-most image is sitting right outside the viewing frame.

    Note that you have to set the animation before you do the Paste Into.

    Hope this is clear and that it helps, please let me know if it resolves your issue.