Inspiring
August 17, 2018
Answered

Trim,image area and safe area

  • August 17, 2018
  • 9 replies
  • 9652 views

Hi,

I have received the following dimensions for a flyer.

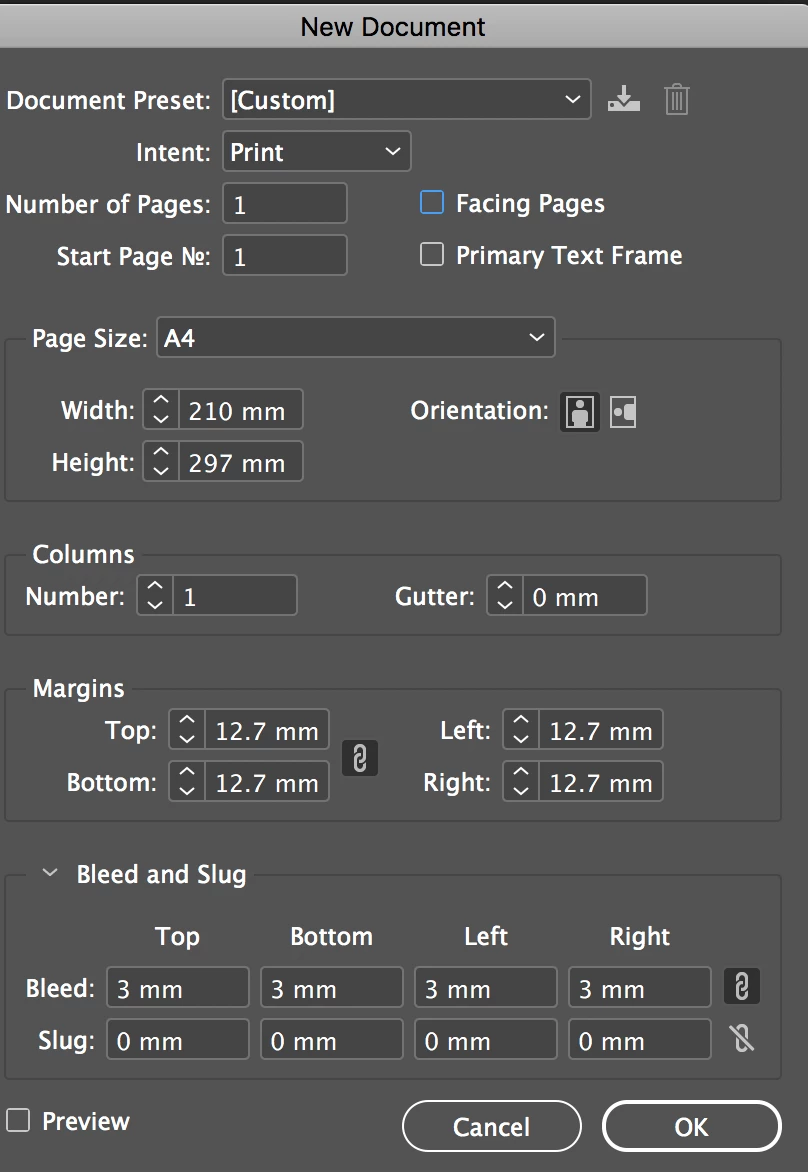
Trim Size: 297mm(d) x 210mm(w)

Bleed: 307mm(d) x 220mm(w)

Image Area: 270mm(d) x 182mm(w)

Safe Area: 285mm(d) x 198mm(w)

What do trim, image area and safe area correspond to in Adobe Indesign?

Is trim size the overall size of the document and how can I set up the image area and safe area? Also my Indesign always rounds up the mm, I'm not sure where to change this setting?

My flyer has been created in Photoshop and I was hoping to import it in Indesign as a final step.

Many thanks.

Correct answer Derek Cross

The trimmed page size (TPS) is 297 x 210mm — that’s A4, in other words the size of the finished flyer. You normally add 3mm to each edge for Bleed, such as a flyer, (no bleed for the inner margins of facing pages).  Safe area is the notional space within which to include text and images, known as margins. You may prefer larger margins.

You Place images that have been optimised in Photoshop in InDesign where you then add the text and coloured shapes etc. Do not produce the text in Photoshop, apart from maybe, the odd decorative effect heading. The Effective PPI of images should be between 200 and 300PPI — you can check that in the Links Panel.

When you set up your document in InDesign select Print as the intent, work in RGB color mode and supply your printer (unless they give you another spec) a PDF/X-4 including trim marks and tick Use Document Bleed Settings.

You can change the the measurements to mm in InDesign Preferences under the Units tab.

Here's how the set up new document panel might look – ready add your own margins (unselect the lock icon to have different measurements):

9 replies

Inspiring
September 11, 2018

The flyer turned out fine in the magazine Thanks for all your help!

Inspiring
August 28, 2018

Yes, it worked thanks until I see the results .

Inspiring
August 23, 2018

It was press quality preferred. Some of the logos were not showing right on the pdf so I provided what you suggested. I also provided the Indesign package just in case. 6mm was confirmed. Just need to wait and see how it turns out in the magazine now.

Derek Cross
Community Expert
Community Expert
August 23, 2018

Yeah, PDF/X-4 allows for transparency.

Inspiring
August 20, 2018

I might try to give them a call to clarify tomorrow. Thank you!

Derek Cross
Community Expert
Community Expert
August 20, 2018

Also ask them what type of PDF they want, normally a PDF/X-4 is the correct one.

Inspiring
August 20, 2018

Derek Cross
Community Expert
Community Expert
August 20, 2018

Assuming the trim marks trim the flyer to A4 this seems OK, although a little more space (margin) on the left and right would look a bit better IMO, in other words bring the content in a little. Also make sure the type layers are the first ones. Other comments (subjective), I'd make the headline a bit larger and move the shadow closer to the lettering and make the line spacing a bit closer.

Inspiring
August 20, 2018

Thank you so much. I have done as you suggested and moved everything closer to the centre. So 6 mm margin is good?

Inspiring
August 20, 2018

So if I have logos at the bottom of the flyer, do I need to make sure they are within the margin area and that they are not going over it?

I don't think I am understanding the margin thing. Do I really need to add 12.5 mm margin for 285mm(d) x 198mm(w)?

Derek Cross
Community Expert
Community Expert
August 20, 2018

Margins are within the Trimmed Page Size (you don't add them to that size).

Can you post a screen shot of your flyer including the trim marks so we can see more clearly any issues.

You can do this by exporting a PDF of your flyer using one of the InDesign Adobe PDF Presets (best to select PDF/X-4) and in subsequent Export Adobe PDF dialogue box, under the Marks and Bleeds tab, tick Crop Marks and also tick Use Document Bleed Settings.

Then take a screen shot of the subsequent PDF and post it here as a JPG (this forum doesn't accept PDFs).

Inspiring
August 18, 2018

Thanks I might just leave it the way it is then. Don't want to risk. Thanks for your help!

Inspiring
August 18, 2018

Thanks so much for your help. I have now redone most of the flyer in Indesign.

Now I have a couple more questions..

1. How can I achieve the same effect (clipping mask in PS) like on the provided example. (photo on top of the rectangles with low opacity). Do I have to duplicate the shapes?

2. If I want a white border for the top photo, do I need to make sure that the photo is not going over the margins?

Many thanks

BobLevine
Community Expert
Community Expert
August 18, 2018

You can knock the opacity back with the effects panel.

The shapes can be drawn using the rectangle tool and the shear tool.

Keep the white frame in the safe area, but I warn you, if the flyer isn't cut perfectly centered, it's not going look right.

Derek Cross
Community Expert
Derek CrossCommunity ExpertCorrect answer
Community Expert
August 17, 2018

The trimmed page size (TPS) is 297 x 210mm — that’s A4, in other words the size of the finished flyer. You normally add 3mm to each edge for Bleed, such as a flyer, (no bleed for the inner margins of facing pages).  Safe area is the notional space within which to include text and images, known as margins. You may prefer larger margins.

You Place images that have been optimised in Photoshop in InDesign where you then add the text and coloured shapes etc. Do not produce the text in Photoshop, apart from maybe, the odd decorative effect heading. The Effective PPI of images should be between 200 and 300PPI — you can check that in the Links Panel.

When you set up your document in InDesign select Print as the intent, work in RGB color mode and supply your printer (unless they give you another spec) a PDF/X-4 including trim marks and tick Use Document Bleed Settings.

You can change the the measurements to mm in InDesign Preferences under the Units tab.

Here's how the set up new document panel might look – ready add your own margins (unselect the lock icon to have different measurements):

Community Expert
August 17, 2018

https://forums.adobe.com/people/Derek+Cross  wrote

The trimmed page size (TPS) is 297 x 210mm — that’s A4, in other words the size of the finished flyer. You normally add 3mm to each edge for Bleed, …

Hi Derek,

FWIWI: If like in this case the bleed area is defined as 307 x 220 we can assume that a bleed of 5 mm on every side is needed.

Regards,
Uwe

Derek Cross
Community Expert
Community Expert
August 17, 2018

Yes, I guess so, rather generous, don't you think.