Copy link to clipboard
Copied
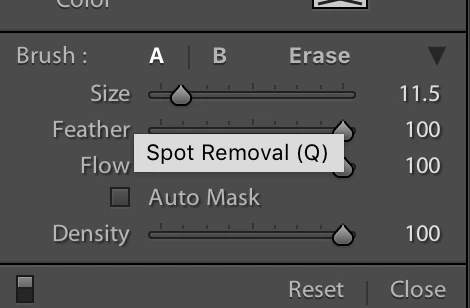
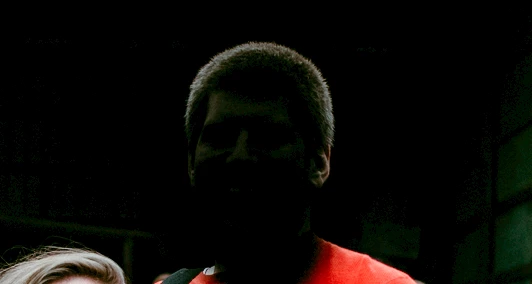
Hello! I have LR 5 and up until today, when I used the adjustment brush everything worked perfectly. I understand that it will paint a mask over where I brush so that I can see what I'm adjusting, but now it is leaving black behind on the photo that I can't get rid of. I'm sure it's an easy fix, but i am driving myself crazy trying to figure out what i did wrong. The last picture is what i'm left with after I leave the adjustment brush.
Copy link to clipboard
Copied
So what are your Brush slider settings?
Post a screen-clip of the Brush panel sliders- (the area above the clip you posted in your question.)
I suspect you have Exposure at -4 stops or something similar.
The 'mask' (more correctly called an 'Overlay' ) is only an indicator of the area you have brushed. You can toggle it on/off with the 'O' key, and set options for it on the Tool Bar 'T'
Copy link to clipboard
Copied
You're using the Spot Removal tool, which clones or heals using the surrounding area.Try using the Adjustment Brush as shown below:
Copy link to clipboard
Copied
I'm not using the spot removal tool, unfortunately 😕
It's like after i use the adjustment brush, the area is left black no matter what settings I adjust (contrast, exposure, etc.)
Here's my slider settings
Copy link to clipboard
Copied
Lauren, the screenshot you posted shows the Spot Removal tool (see below). Perhaps you applied it by mistake and then tried using the Adjustment Brush?
Try this. With the posted image file selected click on the Spot Removal tool and then click on its 'Reset' as shown below.
Copy link to clipboard
Copied
I tried that and still the same thing happened. I hit reset on the spot removal and on the adjustment brush but it doesn't seem to make a difference. I appreciate your help!
Copy link to clipboard
Copied
In your first photo it shows that there is another adjustment brush pin (there may be others we do not see as well)
Select that other pin and see if those brush adjustments have overlapped the person's face?
(The green mask does not seem to completely match the effect in the 2nd photo otherwise.)
---
Also it looks like when you are taking the adjustment panel screenshots your mouse pointer is over items that trigger tool tip info to be unfortunately captured along with the panel image causing some confusion (Spot healing and Crop overlay in the 2nd)
Copy link to clipboard
Copied
I think the green mask doesn't match the black part because I accidentally forgot to screenshot the black one so had to go back and redo it, that's why they don't line up. Because they are lining up here, first green overlay and then when I hit enter, it changes to black.
Hopefully this kind of shows a little better..first image is how everything looks without me editing anything. Then, I select the adjustment brush and paint green, i upped the exposure just to make a noticeable difference. Then after I deselect the adjustment brush, I'm left with the black over where the green was.
Copy link to clipboard
Copied
As wobertc mentioned you have 'Show Selected Overlay Mask' checked and set for Green color. Select one of the Adjustment Brush pins and hit the O key to turn it off. Hit 'Reset' in the Adjustment Brush panel and start over. This is only used to show where the mask is applied and NOT something that is applied to the image. You can use the 'Color' panel at the bottom of the Adjustment Brush panel to add a Green hue color to the image along with other settings to achieve the desired effect.
Copy link to clipboard
Copied
Are you trying to make the face look green? If so, the only adjustment you are currently applying, so far as is visible in the screenshot, are a reduced WB Temperature, Contrast, Saturation and Exposure. The greyish look is the expected result from those adjustments.
The green mask you see temporarily while painting the adjustment brush, is purely a mask overlay - an optional one - so you can see where you are painting. It is MEANT to go away when you are finished painting. This mask overlay can be changed to red instead, for example - whatever shows up best.
To really tint the man's face with a particular hue, you can use the "Color" option at the bottom of the Adjustments panel. There's a rectangular box there, initially with an X through it when you have got no paint colour selected. Click on the box and choose your facepaint!
To intensify the effect, simply use the other sliders to taste as well - in particular, White Balance "Tint" can be pushed to the left.
Copy link to clipboard
Copied
same happening to me, but instead of green it is white or black. It was working fine until now.
Copy link to clipboard
Copied
Followed Richard's advice. Works fine now!! Thank you!!!!!!!
Copy link to clipboard
Copied
I totally get that the green is just so I can see where I'll be painting
I've tried everything - reset and even restarted the computer, with no luck. Thanks everyone!
Copy link to clipboard
Copied
Ah, OK. (apologies for misunderstanding your aim here). Could be this:
In your screenshot just after writing "It's like after i use the adjustment brush, the area is left black no matter what settings I adjust (contrast, exposure, etc.)..." you show some sliders which you say make no difference to the adjustment which has been applied.
At the top of the adjustment sliders area, are buttons "New" and "Edit". "Edit" is not highlighted in your screenshot. This indicates that you do not at this time have ANY adjustment pin selected.
This is the normal condition each time you go back to using this tool. But in your screenshot showing the green mask overlay, the pin IS clicked (has a black centre). So in that state, the adjustment sliders DO change the settings for this particular mask.
LR does not know until you tell it, whether you now want to begin a brand new 'pin', or alter the settings / change the brushing for an existing 'pin' - and if there are several of those, which 'pin' you mean.
To re-access the settings for a mask that has previously been painted on, and also in order to paint / erase its mask differently, you will need to have clicked on the "pin" that was originally placed on the image, as the first action in doing that.
(In the event that you don't see existing pin(s) on opening the adjustment brush tool, those may have been set as visible "Never". Press T to open the toolbar, change the pins' visibility there to either Auto or Always.)
Copy link to clipboard
Copied
I just noticed that it places black around everything also even when I use the radial filter (which wasn't happening before?) Maybe this shows what could be wrong, I hope! Haha
Copy link to clipboard
Copied
Your default local settings have been set to reduced Exposure and reduced Contrast, and reduced Saturation.
This is the effect of moving sliders around while you have got nothing selected. You just update what starting settings will get used the NEXT time you start brushing a new local adjustment, also the NEXT time you start a new radial or graduated filter.
You are going to continue to see these same settings as your starting point, unless you maybe change them to something else. But a particular local adjustment can be given different settings of its own, and will then individually remember those / allow those to be further altered.
Try this: with the image in the state shown in the screenshot, change the Exposure to a higher value. The image should change accordingly. Now click New above the local sliders, and place a new radial filter onto a different part of the photo. See what Exposure is saying. Now click on the pin of the first radial adjustment again. See what Exposure is saying now. Hopefully this will make it clearer to you what is going on. This is all LR working quite normally.
Copy link to clipboard
Copied
Okay, so after I upped the exposure the black turned to white. I then created the new radial filter and this is what I see. This is driving me crazy because it wasn't happening yesterday!
Copy link to clipboard
Copied
Again, this is just Lightroom doing what you have told it to do. The radial filter is applying your current default settings, in the first instance.
The new filter is lightening (instead of darkening) the area defined by the mask, because of having changed the Exposure value (if fresh adjustments are showing this now, you must have done so without any adjustment being selected), It is also continuing to reduce contrast and reduce saturation; those defaults are unchanged.
(Oh, and are you asking why the radial filter's mask is applying outside the oval area, rather than inside? That is one of the Radial filter's settings (you'll probably need to scroll to the bottom of the panel to see it). Click on "Invert Mask" to switch between outside and inside.)
It is likely that what you are remembering from before, are some prior local adjustment defaults which initially applied no adjustment at all - rather than, as now, applying a very visible adjustment straight away.
To get back to that earlier situation, simply select one of the tools (say, radial filter) and immediately before doing anything else, set all the adjustment sliders to zero - do this BEFORE clicking on the image. Now whenever you do click on the image hereafter, each fresh adjustment that you place, will begin by doing nothing visible to the image - until you change that particular adjustment's sliders to something different.
Copy link to clipboard
Copied
Copy link to clipboard
Copied
Thank you, thank you so much! I had to set everything back to zero. I am so very thankful for your help ( and patience!)
I can't express how happy I am! THANK YOU!
Copy link to clipboard
Copied
You are most welcome - RP